AppWave Studio Overview
Go Up to Studio User Guide
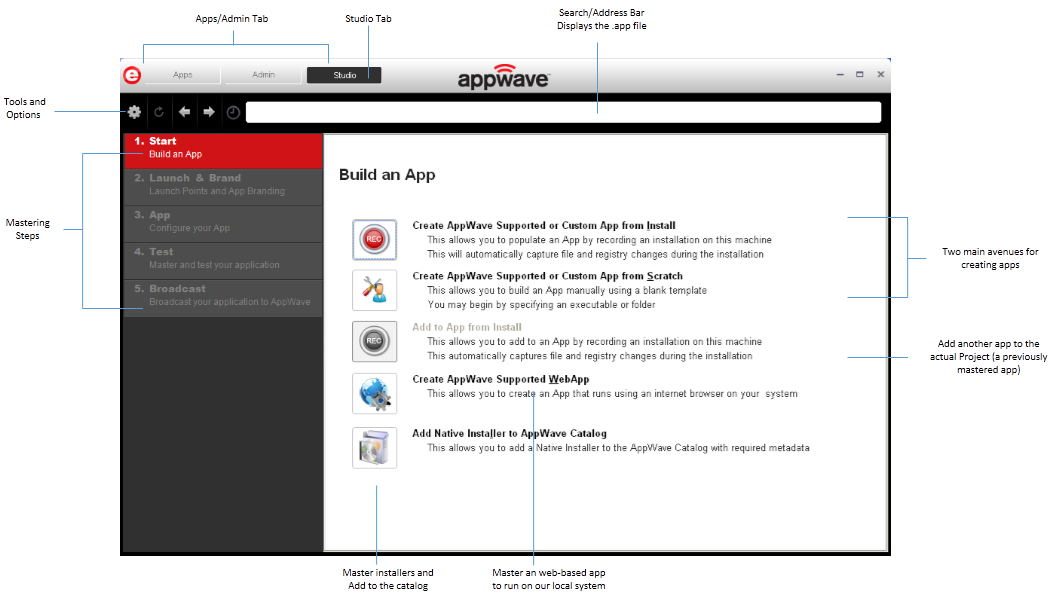
The AppWave Studio application is integrated with the AppWave as a feature of the local library and appears in the AppWave Browser as the Studio tab.
An application can be mastered into a file which can run without installing it on your computer. This application runs on the desktop, locally but does not change the operating system or registry. It also does not share DLLs or other system-wide settings. The application data, including settings and licenses, are stored locally on the hard drive separate from the executable. The licenses are managed by the Administrator and are administered through Embarcadero’s licensing system.
The AppWave Studio is used to create an app file for an application. There are three main ways to master an App:
- Create an App with One Click
- Create AppWave Supported or Custom App from Install
- Create AppWave Supported or Custom App from Scratch
Once your app has been mastered and then broadcast, it can then be run on the local machine and be launched from either the local hard drive or the network using the AppWave. You can create and manage your tools in your Local Library and then share them with your organization or with the world.
Once an app is mastered an “AppWave Template” is automatically created. This template file (.aw) contains all the information necessary to master an app such as production name, version, EULA, etc. It is placed in the output directory C:\xxx\<user>\Embarcadero\AppWaveStudio\Output\
AppWave Studio Elements
Window Control Menu
Click the Embarcadero “e” icon ![]() to manipulate the window size of the AppWave Browser.
to manipulate the window size of the AppWave Browser.
| Command | Description |
|---|---|
| Restore | Restores the default window size. |
| Minimize | The AppWave Browser window is minimized and now appears on Windows task bar. |
| Maximize | Enlarges the AppWave Browser to full screen. |
| Close | Select Close and the application continues to run in the background. The Exit command closes the application (under the gear icon in Tools and Options) |
Note: Double-click the window’s title bar to maximize it or restore it to its previous size.
Toolbar
The following functions are available on the Studio Tools and Options menu:
| Command | Description |
|---|---|
| Tools and Options menu | Provides access to menu options such as connect, opening an existing project, saving your project or opening the online help. |
| Refresh Tool | Upates the display. |
| Back | Once you have accessed a step and then moved forward, you can move back to that step. |
| Forward | Once you have accessed a step and then moved backward, you can move forward to that step. |
| Path
C:\User_application.tca |
Displays the path, and the .tca file name of the application you are currently working with. It is also the search window. |
Note: The other items on the toolbar not listed in this table are used only by the Apps portion of the application.
Tools and Options Menu
Click the Tools and Option icon ![]() to access the menu options. The following table explains each menu item:
to access the menu options. The following table explains each menu item:
| Command | Description |
|---|---|
| New AppWave Custom App | Takes you to the Build an App page where you can start to create an app from an install executable or from scratch. |
| Connect | Opens the Connect dialog where you can change the connect details using different user credentials or change the URL to connect to a different AppWave. |
| Open Project | Opens a dialog where you can browse to and select a .tca file (Studio Designer File) for an existing project. |
| Open for Upgrade | You can revisit a project file and modify the project as needed by opening the .tca file in Studio. |
| Recent Projects | A pull-right menu displays the most recent projects you have worked on. Select a project and the Open File dialog appears. Once the file has loaded click Finished. |
| Save | Saves the .tca file for the project currently open in AppWave Studio. |
| Save As | Rename the current .tca file in the Save As dialog. |
| Options | Opens the Options dialog where you can set AppWave Browser defaults. |
| Quick Start Guide | Opens the online help file for the AppWave Quick Start Guide. |
| Help Content | Opens the online help file for AppWave Studio. You can also press F1. |
| About Embarcadero AppWave Browser | Displays the current version and build number. |
| Exit | Closes the AppWave Browser application.
Note: You do not get a warning dialog before the application closes. |
Tasks
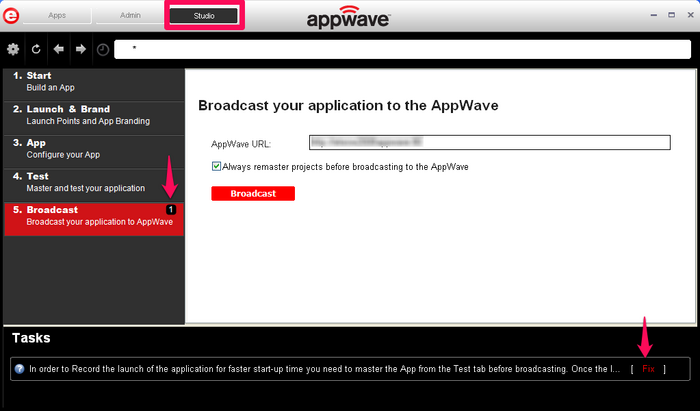
The number icon located to the right of a step indicates the number of tasks that need to be completed before you can advance to the next step. In the screen shot below, the Broadcast step has one task to be completed.
When you open the step, for example, click on Launch & Brand, a Tasks panel listing all the incomplete tasks appears at the bottom of the page.
The fields requiring a Fix have a warning icon ![]() . When you click Fix in the Task panel, you are taken to the appropriate task for the application you are configuring.
. When you click Fix in the Task panel, you are taken to the appropriate task for the application you are configuring.
For more information about mastering see: Mastering Apps
AppWave Studio Bug Report
When the AppWave Browser encounters a problem, the error dialog appears.
★ We really appreciate our customer's feedback. Please send us the bug report, it helps us to improve the product. The reported bug will be analysed by our team and fixed in future versions.
| Element | Description |
|---|---|
| Continue Application | This option is available if an error did not close the application. |
| Restart Application | An error closed the AppWave Browser. Click Restart. If you were creating an App, that process was terminated. |
| Close Application | Closes the AppWave Browser application. This action does give you a warning dialog. |
| Send Bug Report | Opens a Send Assist dialog where you can enter your name, email, and details about the error. |
| Show Bug Report | Opens the AppWave Browser .exe dialog which contains the Bug Reports. |
See Also
- For information on how to use AppWave Studio, see: Using AppWave Studio
- For complete information about installing the AppWave Browser, see: Install Appwave Browser
- For more information about the different tabs on Browser, see: AppWave Browser Tabs


