Session 3: Database Security Management
Go Up to DBArtisan Tutorial exercises
DBArtisan can help you efficiently establish and maintain database security. Whether you are managing an existing production database or setting up a new environment, you’ll find consistent support across all of the supported platforms.
Adding a new database user
While this example focuses on creating a new Oracle user, the same wizard-driven principle applies to all security objects (groups, roles, etc.).
- On the Datasource Explorer, expand an Oracle datasource, and then the Security node.
- On the Security node, right-click Users, and then click Create.
- DBArtisan opens the Create User Wizard and leads you through the process of adding a user.
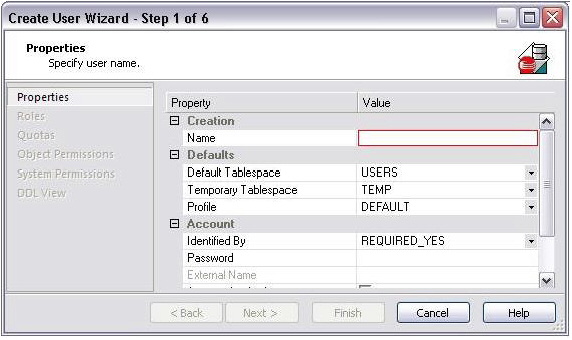
- Provide the information on each panel of the Create User Wizard until you reach the DDL View panel.
- DBArtisan allows you to preview any and all generated scripts before they are submitted to the database. This is standard for all object-related scripts.
- Click Execute to create the new user.
- DBArtisan automatically opens the User Editor for the new user. The standard User Editor can be used to manage existing database users as shown below.

Granting and Editing User Privileges
Privileges can be easily granted, revoked, or viewed from within either of two editors within DBArtisan; the User Editor, or the individual object editor (Table, Procedure, etc.). The User Editor provides a tabbed interface, which can be used to view and modify individual attributes of the user.
- In the User Editor, open the Object Permissions tab.
- Use the Object Type dropdown to select a set of objects such as tables or views.
- Right-click a cell (corresponding to a specific object and a specific permission, such as DELETE), and then click Grant.
- A distinctive icon is shown in the cell, indicating that this permission is granted. You use a similar process to revoke privileges and perform other permission-based activities.
- On the Object Editor toolbar, click Alter to implement the changes.
Proceed to Session 4: Space Management.