Session 4: Creating a Conceptual Model Diagram
Go Up to Tutorials
In this session, we are going to create a conceptual model and diagram. Then, in the next session we will export that model to ER/Studio. We will also create and bind a Business Element and a Domain to Business Attributes.
We are going to create a conceptual model and diagram within the workspace we created earlier.
- Right-click the workspace node labeled “Acme Company” and select New > Model….
- In the New Model dialog, type the Model name “Sales”.
- In the Model Type drop-down list, select Conceptual.
- We are going to place this model under the Compliance Reinstatement Project node, so select it.
- Next, click the Create a diagram within this model option, and then enter the name “Sales Components”.
- Click OK and the diagram Sales Components is placed in the Sales model. The Conceptual Objects palette now appears in place of the Business Process Objects palette.
- Expand the Conceptual Objects palette, select a Subject Area (
 ) and click in the Diagram View.
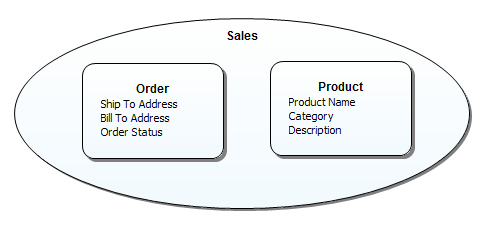
 - Name the Subject Area “Sales”. Once you have named it, enlarge the element so it is approximately three times its original size.
- A subject area can reference a collection of entities. You can embed the entities in the subject area, or you can have the Subject Area reference a diagram that contains entities. For this example, we are going to embed two entities in the subject area.
- Select Business Entity (
 ) from the palette, and place two of them inside the Subject Area. Name the first one “Order” and the second one “Product”. When you place the entities in the subject area they are automatically “mapped” to that subject area.
 - Double-click on the Sales Subject Area to open the Property View.
- Click the Mappings tab. This hierarchy shows that both entities are mapped to Sales.
- Select the Business Attribute element (
 ) and place three (3) of them in the Order entity. Name the three attributes as follows: “Ship to Address”, “Bill to Address”, and “Order Status”.
- Place three Business Attributes in the Product Entity. Name them “Product Name”, “Category”, and “Description”.
- When building conceptual models, you need a way to mark attributes in an entity as a primary identifier, which is similar to a primary key identifier in a physical model. ER/Studio BA uses the CASE notation, which is a “#” symbol placed before the attribute name.
- To set a unique identifier on an attribute, right click the attribute, “Ship to Address” and select Unique Identifier from the shortcut menu. The attribute is now shown with the unique identifier symbol (#).
- Click the drop-down arrow next to the Relationship icon (
 ) on the palette. You can select one of four relationship types: Many to Many, Many to One, One to Many, and One to One. For this example, we are going to set the relationship type as “One to Many”. Create a relationship between the Order and Product business entities.
 - We are now going to set the source/target optionality setting. Double-click the Relationship to open the Property View. In the Optionality drop-down list box select “Mandatory to Optional”. Notice that the “split-line” notation shows the optionality setting in the diagram.
- Right-click the relationship and select Show > Name. The relationship is now labeled “Order.Product”.
- Right-click in the Sales subject area and deselect the “Show as Expanded” command. The subject area is collapsed and shows only the name of the subject and hides its contents. You can use the subject area as a single object, or expanded to show its contents.
- You can also change the shape of the subject area from an oval to a rectangle. In the Property View for the Sales subject area click the Appearance tab. In the Shape options, select Rectangle and the shape is changed.
- For purposes of this session, reset the rectangle setting to oval, and check the “Show as Expanded” option.


Proceed to Session 5: Exporting Conceptual Diagrams to ER/Studio Data Architect