Creating and Managing Groups
Go Up to Establishing Security for the Repository
Contents
- 1 Create, Update, and Delete Group
- 2 Assigning a Role to a Group
- 3 Granting and Prohibiting User Access to Repository Items
- 4 Assigning Users/Groups Roles for Accessing Repository Items
- 5 Prevent Users from Accessing Specific Repository Items
- 6 Change User/Group Access to Repository Items
- 7 See Also
You can use groups in the Repository Security Center to make it easier to handle permissions. You can assign roles to a group at the Repository, Project, and Diagram levels and then add or remove users from the group to apply the settings to the user quickly and easily.
Groups can be created two ways:
- Create a group in the Repository Security Center and then add users to it manually
- Create a group with the same name as an LDAP/Active Directory group, and any LDAP/Active Directory users that are added to the Repository would automatically be members of that group based on the LDAP/Active Directory settings.
Create, Update, and Delete Group
- Choose Repository > Security > Security Center.
- Click the Manage Groups tab and select New.
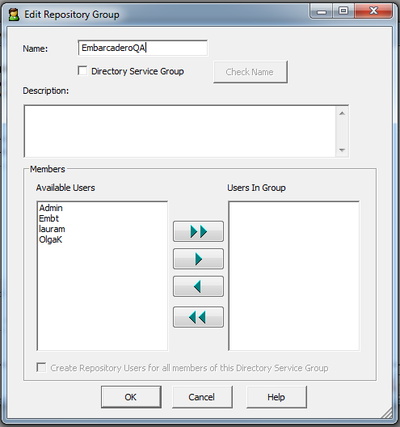
- Provide a name for the group and optionally, a description of the group.
- If you want to create a group based on an LDAP/Active Directory group, click Directory Service Group and another option becomes available at the bottom of the dialog, Create Repository Users for all members of this Directory Service Group. If you select this option, then repository users in this group are automatically added to the list of Repository users. If you do not select this option, then you will need to create the users manually and as you add LDAP/Active Directory Service users, they will be added to the Repository groups that correspond to the LDAP/Active Directory Service groups that they are members of.
If you want to manually populate the group, do not select Directory Service Group, from the list of Available Users, select the group members by Ctrl-clicking each user, or click the double right-facing arrow to select all the users. You can also remove group members by clicking the left-facing arrow.
Notes
- Delete a group: On the Manage Groups tab, you can delete a group by selecting the group and clicking Delete. Deleting a group does not delete the group members but the group members will no longer have the permissions afforded to them by the group membership.
- Edit a group: On the Manage Groups tab, you can edit the group name and list of group members by selecting the group and clicking Edit and making your changes on the Edit Repository Group dialog.
Assigning a Role to a Group
Assigning a role to a group grants the group all the permissions selected in the role.
- Choose Repository > Security > Security Center.
- Select a Repository item you want to assign permissions to.
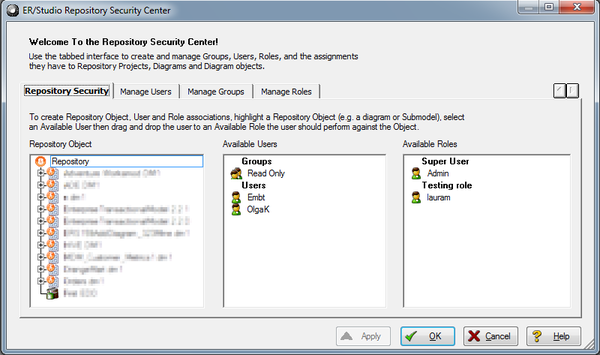
- If the group is not currently assigned a role, on the Repository Security tab, click the group name in the Available Users column and drag it onto a role name in the Available Roles column.
If the group was already assigned a role, on the Repository Security tab, click the group name the Available Roles column and drag it onto another role name in the Available Roles column.
- Click Apply and then click OK to exit the Security Center.
- Notify users in the group that they must log out and then log in again to receive the security updates.
Granting and Prohibiting User Access to Repository Items
On the Repository Security tab of the Security Center, users with the appropriate privileges can assign other users the appropriate access privileges for different objects, granting them permission to perform specific operations on a Repository item and prohibiting them from performing other operations on the same object. You can assign the access privileges of a role to individual users or to an entire group.
Assigning Users/Groups Roles for Accessing Repository Items
- Log in to the Repository.
- Choose Repository > Security > Security Center.
- Click the Manage Roles tab; explore the available roles to determine if an existing role provides the access you want to grant the user. If necessary, create a new role with the appropriate permissions.
- Click the Manage Groups tab; explore the available groups to determine if an existing group encompassed the users you want to authorize users. You can double click the name of a group to see the members of the group in the Edit Repository Group dialog. If necessary, create a new group. Assigning a role to a group is more efficient than assigning the role to the users one at a time.
- Click the Repository Security tab.
- In the Repository Object area, select a Repository item (diagram, object, submodel, data flow, transformation, or data dictionary) to which you want to grant or prohibit access.
- Beneath Available Users, select a group or user to which you want to assign the role to the selected object and drag it onto the appropriate role in the Available Roles area.
- To remove the role assignment of a user/group to a Repository item, click the Repository item, drag the user/group name from under role onto another role in the Available Roles area or back onto the Available Users list.
Notes
- All permissions available to a user through direct assignment to roles are added to the permissions available to any groups the user is a member of. Permissions are additive, so the user gets all the permissions assigned to the user whether they were assigned through a group or directly to the user.
- A user or group can only have one role for each object. But a user or group can have different roles for different objects.
- If a user is listed in the Available Users area, but cannot be selected, the user has been deactivated and must be reactivated before you can modify the user.
Prevent Users from Accessing Specific Repository Items
The system-defined No Access role can prevent a user from accessing selected projects or diagrams
- Log in to the Repository.
- Choose Repository > Security > Security Center.
- In the Repository Object area, navigate to and then click to select a project or diagram you want to secure from specific users.
- From the list of users in the Available Users area, click a user name or CTRL-click several names and then drag the users onto the No Access role in the Available Roles area.
- Repeat Step3 and Step4 as required to secure other diagrams and projects.
- Click Apply, continue changing security settings if required, and then click OK to exit the security center.
Notes
- If a user has been assigned the No Access role for an object, but that user is a member of a group with permissions for the object, then the user will have all permissions assigned to the group. All permissions available to a user through direct assignment to roles are added to the permissions available to any groups the user is a member of. Permissions are additive, so the user gets all the permissions assigned to the user whether they were assigned through a group or directly to the user.
Change User/Group Access to Repository Items
To change user/group access to Repository items, change the permissions of the role the user/group has for the Repository item or assign another role to the user/group for that particular Repository item. If required, you can force the user log out on the Manage Users tab of the Security Center, and then change the user's access privileges.

