Optimizing Query Performance on the Physical Model (Denormalizing the Physical Model)
Go Up to Developing the Physical Model
No matter how elegant a logical design is on paper, it often breaks down in practice because of the complex or expensive queries required to make it work. Sometimes, the best remedy for the performance problems is to depart from the logical design. Denormalization is perhaps the most important reason for separating logical and physical designs, because then you do not need to compromise your logical design to address real-world performance issues.
Here are some common scenarios you should consider when denormalizing a physical design:
- Duplicated Non-Key Columns: You may decide to duplicate non-key columns in other tables to eliminate the need to access, or join to that table in a query, such as when you duplicate the description or name column of a lookup table. When duplicating non-key columns in tables, ensure that the procedural logic synchronizes the column data so that it does not differ from the values in the reference table.
- Horizontal Table Splits: When tables have many rows of data, you may want to partition the data by splitting the table into multiple tables where each table uses the same schema but stores a different range of primary key values. Splitting the table reduces the size and density of the indexes used to retrieve data, thereby improving their efficiency. On the other hand, once the table is split you must access data in multiple tables instead of in a single table which requires more complicated procedural logic to manage the tables.
- Vertical Table Splits: When tables with many columns have high read/write activity, you may want to split the table into multiple tables with different column sets, where each column set uses the same primary key. This lets you spread update activity across multiple tables, thus decreasing the impact of maintaining multiple indexes. As with horizontal table splits, vertical table splits require more complex procedural logic to manage multiple tables.
After generating a physical model from a logical model, you can use denormalization mappings to improve performance in the physical model implementation.
Unlike a manual edit of the physical model, a denormalization mapping provides a record of what has been changed and retains the link back to the logical model (visible in the Table Editor Where Used tab). This makes the denormalization self-documenting, and reduces the manual labor required when merging with an updated logical model. Also, a mapping can be undone at any time (see Synchronizing Physical and Logical Models).
The following denormalization mappings are available:
- About Roll-Up Denormalization: Remove one or more unnecessary child tables, consolidating their columns into the parent table.
- About Roll Down Denormalization: Remove an unnecessary parent table, copying all of its non-primary-key columns into one or more of its child tables. The child tables can be further consolidated via a Table Merge Denormalization.
- About Horizontal Split Denormalization: Partition a table into two or more tables with identical columns.
- About Vertical Split Denormalization: Remove a table and distribute its columns among two or more new tables. The new tables have the same primary keys as the original; each of the other columns can appear in one, several, or all of the new tables, or can be dropped.
- About Column Map Denormalization: Copy a column from one table to another to improve query performance by eliminating the need for a join.
- About Table Merge Denormalization: Remove unnecessary tables by combining two or more unrelated tables with the same primary key into a single table containing both tables' columns.
Contents
- 1 Removing and Consolidating Child Columns
- 2 About Roll-Up Denormalization
- 3 Create a New Roll-up Mapping
- 4 Removing Unnecessary Parent Tables
- 5 About Roll Down Denormalization
- 6 Create a New Roll-Down Mapping
- 7 Partitioning a Table and Duplicating Columns
- 8 About Horizontal Split Denormalization
- 9 Create a New Horizontal Split Mapping
- 10 Replacing a Table with New Tables That Share the Primary Key
- 11 About Vertical Split Denormalization
- 12 Create a Vertical Split Mapping
- 13 Eliminating Joins by Copying Columns
- 14 About Column Map Denormalization
- 15 Create a New Column Map Mapping
- 16 Removing Unnecessary Tables
- 17 About Table Merge Denormalization
- 18 Create a New Table Merge Mapping
- 19 See Also
Removing and Consolidating Child Columns
This sections contains the following topics:
About Roll-Up Denormalization
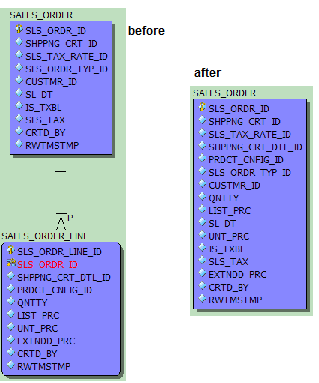
A roll-up denormalization mapping removes one or more unnecessary child tables from a physical model, consolidating their columns into the parent table. For a roll-up operation, the PARENT primary key is preserved. Any native PK columns in the child are discarded.
In the following example, Sales_Order_Line has been rolled up into Sales_Order, all of the columns of Sales_Order_Line have been consumed by Sales_Order, and only the parent's key remains.
Create a New Roll-up Mapping
- Display the physical model.
- Click and drag or CTRL-click to select the parent and child tables.
- Right-click one of the selected tables and then choose Denormalization Mapping > Rollups .
- Complete the Roll Up Denormalization Wizard as required.
- The Convert Subtype Relationships to Recursive Relationships check box allows you to preserve relationships between subtypes when rolling up subtypes into a supertype. The relationships will become recursive. The rolenames in the subtypes will be used in the supertype. Otherwise this page is merely informative. If the correct tables are listed, click Next; otherwise, click Cancel and redo your selection.
- If the Rollups menu choice is grayed, check to make sure you have not accidentally selected another table or some other object.
- When appropriate, child columns can be repeated in the unified table. For example, if a parent-child relationship normalizes month-specific data using a cardinality of 1:12, the wizard would by default repeat the child table's columns 12 times in the unified table. The repeating columns are named by appending numeric suffixes to the original column name; you should rename them appropriately after creating the mapping.
Removing Unnecessary Parent Tables
This section contains the following topics:
About Roll Down Denormalization
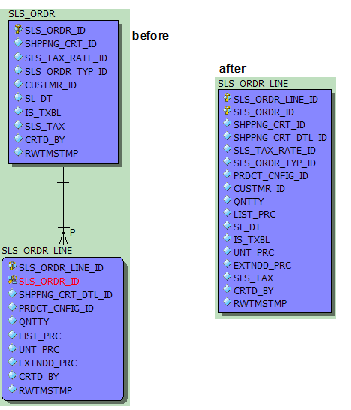
A roll-down denormalization mapping removes an unnecessary parent table, copying all of its non-primary-key columns into one or more of its child tables. In the following example, the SLS_ORDR table has been rolled down into the SLS_ORDR_LINE table. The child will keep the compound key from the propagating SLSORDRID identifying relationship. For a Rolldown operation, the CHILD primary key is preserved. Any native PK columns in the child are kept.
Create a New Roll-Down Mapping
- Display the physical model.
- Click and drag or CTRL-click to select the parent and child tables.
- Right-click one of the selected tables, then from the pop-up menu choose Denormalization Mapping > Rolldowns.
- Complete the Roll Down Denormalization Wizard as required.
- If the Rolldowns menu choice is dimmed, check to make sure you have not accidentally selected another table or some other object.
- The first panel of the wizard is merely informative. If the correct tables are listed, click Next; otherwise, click Cancel and redo your selection.
- If appropriate, the denormalized child tables can be further consolidated via a Table Merge Denormalization.
Partitioning a Table and Duplicating Columns
This section contains the following topics:
About Horizontal Split Denormalization
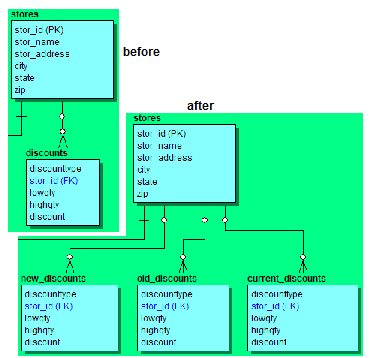
A horizontal split denormalization mapping partitions a table into two or more tables with identical columns. In the following example, a single discounts table is split into three separate tables
Create a New Horizontal Split Mapping
- Display the physical model.
- Right-click the table to be partitioned and then choose Denormalization Mapping > Horizontal Splits.
- Complete the Horizontal Table Split Wizard as required.
This section contains the following topics:
About Vertical Split Denormalization
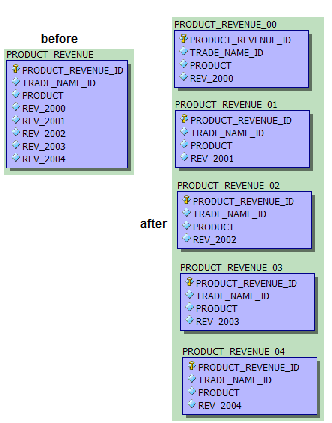
A vertical split denormalization mapping removes a table and distributes its columns among two or more new tables. The new tables have the same primary keys as the original; each of the other columns can appear in one, several, or all of the new tables, or can be dropped. In the following example, a table with separate columns for each of five years' revenues, is split into five tables, one for each year.
Create a Vertical Split Mapping
- Display the physical model.
- Right-click the table to be split and then choose Denormalization Mapping > Vertical Splits.
- Complete the Vertical Table Split Wizard as required.
- When apportioning columns, you can select multiple columns using Shift-Click or CTRL-Click, then drag them all at once to one of the new tables. The columns remain selected, so if appropriate you can drag the same set to another new table.
Eliminating Joins by Copying Columns
This section contains the following topics:
About Column Map Denormalization
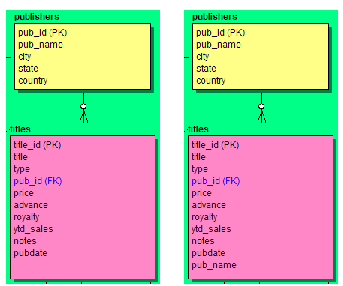
A column map denormalization mapping copies a column from one table to another to improve query performance by eliminating the need for a join. In the following example, the pubname column is copied into the titles table, eliminating the need for a join when querying for the name of a book's publisher.
Create a New Column Map Mapping
- In the Data Model tab of the Data Model Explorer, right-click the column you want to map and then choose Denormalization Mapping > Column Mappings.
- Complete the Column Mapping Wizard as required.
- The first panel of the wizard is merely informative. If the correct column is listed, click Next; otherwise, click Cancel and redo your selection.
Removing Unnecessary Tables
This section contains the following topics:
About Table Merge Denormalization
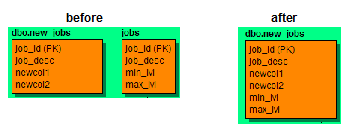
A table merge denormalization removes unnecessary tables by combining two or more unrelated tables with the same primary key into a single table containing all tables' columns.In the following example, all the fields from the jobs table are merged into the dbo.newjobs table.
Create a New Table Merge Mapping
- Display the physical model.
- Click and drag or CTRL-click to select the tables to be merged.
- Right-click one of the selected tables and then choose Denormalization Mapping > Table Merges .
- Complete the Table Merge Denormalization Wizard as required.
- If the Table Merges menu choice is dimmed, check to make sure you have not accidentally selected another table or some other object.
- The first panel of the wizard is merely informative. If the correct tables are listed, click Next; otherwise, click Cancel and redo your selection.
