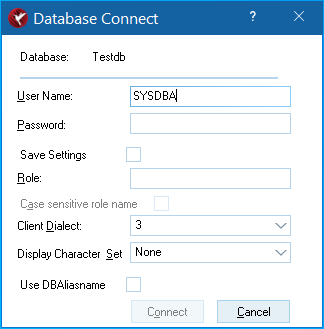
Database Connect Dialog
Go Up to IBConsole Dialogs
The Database Connect dialog
IBConsole provides two methods for connecting to a database. The first method is a quick connect using the username and password that were supplied with the login to the server to instantaneously connect the database. The second method allows you to connect to the database using a different username and password by accessing the Database Connect dialog.
If you want to perform an automatic connect, using the username and password supplied for the server login to instantaneously connect the database, you can do so by one of the following methods:
- Select a disconnected database in the Tree pane. Choose Database|Connect, choose Connect in the Work pane, or click on the Database Connect toolbar button.
- Right-click a disconnected database in the Tree pane and choose Connect from the context menu.
- Double-click a disconnected database in the Tree pane.
Once you connect to a database, the database tree expands to display the database hierarchy.
Automatic connection only works with external databases.
If you want to access the Connect Database dialog in IBConsole to connect to the database using a different username and password from that which was supplied in the server login, you can do so by one of the following methods:
- Select a disconnected database in the Tree pane. Choose Database|Connect As or choose Connect As in the Work pane.
- Right-click a disconnected database in the Tree pane and choose Connect As from the context menu. This displays the Database Connect dialog box:
To Connect to a Database:
- Verify that the database displayed in the Database field is correct.
- Type the username and password for the database in the corresponding User Name and Password text fields.
- If you want to connect as a role, specify the role in the Role text field. This is optional. Connecting as a role gives you all privileges that have been assigned to that role, assuming that you have previously been granted that role with the
GRANTstatement. Once you have typed a character in the Role field, the Case Sensitive Role Name field becomes active. Check this box if you want the server to consider case in the role name. Role names are case insensitive by default. For more information on roles, refer to SQL Roles. - Select the SQL Client dialect. The dialect for the database connection will default to the lower value of the client or server. For more information on SQL dialects, refer to “Understanding SQL Dialects” in the migration appendix of the InterBase Operations Guide.
- Optionally, you can choose a character set to use. If you do not specify one here, the server uses the default set that was specified at creation time.
- Click Connect.
Once you connect to a database, the database tree expands to display the database hierarchy.
