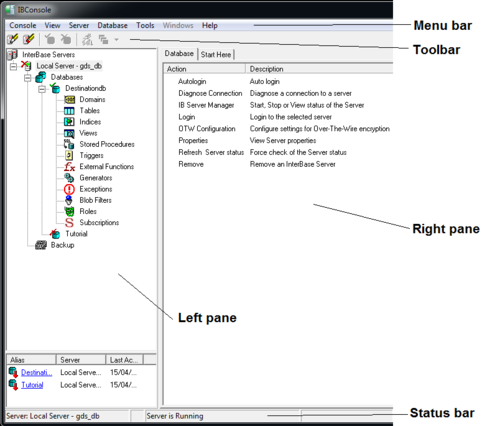
IBConsole - Main Window
Go Up to IBConsole
Contents
Overview
The main window is the control center of IBConsole. The main window consists of:
- A menu bar, across the top of the window.
- A toolbar, just below the menu bar, containing shortcut buttons to perform common menu commands.
- A status bar, at the bottom of the window, that shows the currently selected server and database, and the user logged in.
- The left pane, which displays registered servers and databases and their various sub-categories in an Explorer style server/database tree. Icons located next to the names of servers and databases provide a quick indication of which servers and databases to which you are currently connected.
- The right pane, which displays an action list or summary list depending on the selected item in the left pane.
Toolbar
The main window toolbar provides shortcuts to the most common menu commands.
Command Availability
When you begin a new IBConsole session, only Add Server, Diagnose Connection and Help are available. Some View options are also available. After adding a server, Remove Server and Server Login become available. Several commands become available upon login to a server. After registering and logging in to a database, all commands are available.
Certain specific commands are enabled only when an appropriate item is selected in the server/database tree. For instance, Server Logout is only available when a branch of a connected server is highlighted.
Connections Tree
The server/database tree provides a quick and easy way to get to the data you are looking for. The tree view is arranged in a hierarchical manner, starting at the top left with "InterBase Servers". Items added to the tree are called child branches or nodes. The branch to which a child is added is called the parent.
Getting Information From The Tree
There are many types of items that can be added to the tree. Each type of node has an icon associated with it, to the left of the name, to aid in quick identification. Each icon also has a contents indicator to its left.
The contents indicator is used to display or hide the contents of the node in the tree and is the main method of navigating the tree. The contents indicator appears as a + (plus) or - (minus) sign inside a small square if there are additional contents to display. If there are no additional contents, it is omitted. When the square contains a + sign, the node has additional branches attached which are hidden. Clicking on the contents indicator or double clicking on the node name will cause the branches to be displayed. When the branches are displayed, the contents indicator will have a - sign inside it. Clicking the node again will hide the contents.
Clicking on a node name highlights it and causes detailed information about the item to be displayed in the right side pane. Only one item in the tree can be highlighted at a time. If a branch containing the highlighted node is subsequently closed, then the parent node (the one that closed) automatically becomes highlighted.
Adding To The Tree
The first type of node that can be added to the tree is a server. Servers are added to the tree when they are added. Upon logging in to a server, it expands the server node, displaying folders of information related to the server, including users, certificates and databases. Highlighting the Database Aliases node of a server enables you to add an existing or new database. Adding a database adds a new branch to the tree. Logging in to the database causes more branches to be added to the tree, making most database information available.
Summary List
Many items in the server/database tree consist of a number of instances. For example, many tables are associated with the Table branch of any database. The Summary List displays the instances of the selected item.
Items displayed in the Summary List can be selected in the same manner as items in the server/database tree. They may have associated popup menus and can be double-clicked to perform the default action.
Status Bar
The status bar on the bottom of the main IBConsole window displays the following information, when applicable:
| Status | Description |
|---|---|
| Server | The name of the server currently selected in the tree. |
| Database | Name of the database currently selected in the tree. |
| User | The User Name used to connect to the selected server as displayed in Server. |
Additionally, the status bar has a textured triangle in the bottom right side corner. Using the mouse, you can "grab" the triangle and "drag" it to resize the IB Console main window.
