EMS Push Notification UI
Go Up to EMS Management Console Application UI
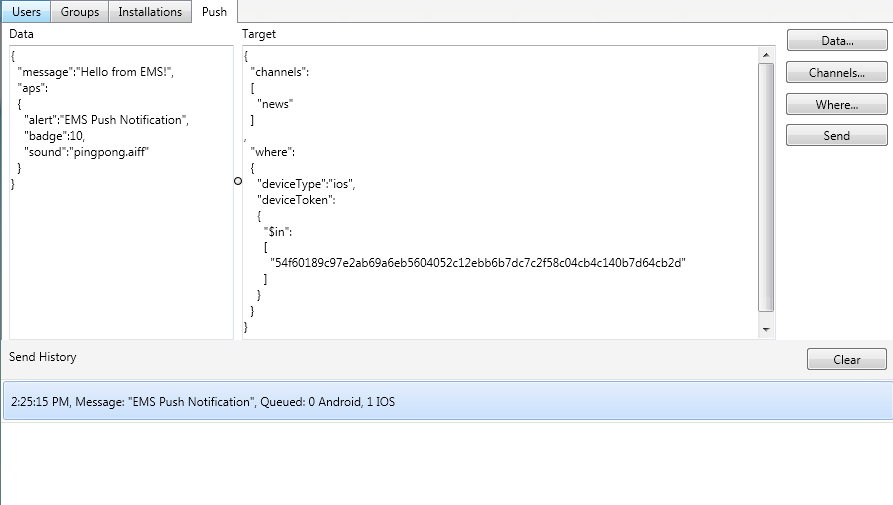
The Push tab displays the data of your EMS push notification and also allows you to send new EMS push notification messages to your registered devices.
- The Data area displays the EMS Push Notification payload as a JSON message.
- The Target area displays the EMS Push Notification targets that will receive the message. The information is displayed as a JSON message.
- Use the buttons in the right-side of the area to set the fields and the target of EMS push notification.
- Data.... Click this button to open the Push Data dialog box.
- Channel.... Click this button to open the Channels dialog box.
- Where.... Click this button to open the Where dialog box.
- Send. Click this button to send the EMS Push Notification message to the target devices.
The Send History area logs the sent push notification messages. You can click in a logged message of this area to send again a notification. Click the Clear button to clean the Send History.
Contents
Push Data
The Push Data dialog box allows you to set the text of the push message and other settings to customize the received EMS Push Notification (depending on the destination device).
You can set the following fields in this dialog box:
- Message. Text body of the push notification message.
- Apple Notifications. Custom settings to be shown when the push notification message is received in an iOS device.
- APS.Alert. Enter the text body of the standard alert.
- APS.Badge. Set the number of the badge number displayed in the iOS application icon.
- APS.Sound. Set the name of the sound file played as an alert of the notification.
- Android Notifications. Custom settings to be shown when the push notification message is received in an Android device.
- GCM.Title. Set the title of the notification in an Android device.
- GCM.Message. Set the text message of the notification in an Android device.
Click the OK button to save your changes. The push notification JSON text is displayed in the Data area of the Push tab. You can edit this JSON message by clicking the area.
{
  "message":"Hello from EMS!",
  "aps":
  {
    "alert":"EMS Push Notification message for iOS",
    "badge":10,
    "sound":"pingpong.aiff"
  }
,
  "gcm":
  {
    "message":"EMS Push Notification message for Android",
    "title":"EMS Push Notification for Android"
  }
}
Channels
The Channels dialog box allows you to select one or more channels to which the push notification message is sent.
- Check or uncheck a channel to add or remove it from the notification settings.
- Check the Check All option to send the EMS push notification message to all the available channels.
Click the OK button to save your changes. The push notification JSON text is displayed in the Target area of the Push tab. You can edit this JSON message by clicking the area.
{

  "channels":
  [
    "news"
  ]
}
Where
The Where dialog box allows you to select one or more registered devices to which the push notification message is sent. You can filter the displayed devices in the Devices list by selecting a Device types:
- All devices. The Devices list shows all Android and iOS registered devices in the EMS Server
- Android Devices. The Devices list shows only Android devices.
- iOS Devices. The Devices list shows only iOS devices.
The Devices list shows the token devices of the registered devices.
- Check or uncheck the devices to add or remove them from the notification settings.
- Check the All devices option to send the EMS push notification message to all the registered devices.
Click the OK button to save your changes. The push notification JSON text is displayed in the Target area of the Push tab. You can edit this JSON message by clicking the area.
{
  "where":
  {
    "deviceToken":
    {
      "$in":
      [
        "APA91bFhHP-587M0rqLLQADXy_BU47uOBBsPzP_WmZPOAb1X8xNi6BgTihywothor_pKTY1D-VLm24-GoXC6u6rMqHlMdoY4964NElTM9rSVfjNcdbnSFX-xJrscfbSeY4tNLVkj6i6f6vfwQL5yEloXiq8QmyWnHL9p3vrLA3JIaDqssFSyt3g",
        "54f60189c97e2ab69a6eb5604052c12ebb6b7dc7c2f58c04cb4c140b7d64cb2d"
      ]
    }
  }
}
