User:Carolinag/Using Notifications
Go Up to Using the RTL in Multi-Device Applications
Notifications are messages that the apps send to communicate information or alert about something.
- Note: This topic is about local notifications, which are the notifications that the applications installed in the device send. For remote notification see Push Notifications.
RAD Studio provides the TNotificationCenter component to manage multi-device notifications. The notification center, allows you to send messages from a running applications. Applications can use the notifications to inform the user about something.
The TNotification component is the message that the application sends to the notification center to be displayed in the designated notification area according to the platform.
You can create notifications for Windows using VCL, or for your Multi-Device applications using FireMonkey.
Contents
Notifications Support per Platform
| Item | Windows | OS X | iOS | Android |
|---|---|---|---|---|
| Platform Support | Windows 10 and Windows 8 |
10.8+ |
||
| Name of Notification Area | Action Center | Notification Center | Notification Center | Notification Drawer |
| TNotification | ||||
| TNotification.Name | ||||
| TNotification.AlertBody | Mandatory |
|||
| TNotification.Title | If no title, app name is used as title. |
Not supported.
App name used as title. |
If no title, app name is used as title. | |
| TNotification.FireDate | Not supported. | |||
| TNotification.Number | Not supported. | Not supported. | Sets the badge number. |
|
| TNotification.EnableSound | Not supported.
Sound always enabled. |
|||
| TNotification.AlertAction | Not supported. | Not supported. | ||
| TNotification.HasAction | Not supported. | Not supported. | ||
| TNotification.RepeatInterval | Not supported. | |||
| TCustomNotificationCenter | ||||
| TCustomNotificationCenter.ApplicationIconBadgeNumber | Not supported. | Not supported.
See OS X Badge Sample. |
Not supported. | |
| TCustomNotificationCenter.ScheduleNotification | Not supported. | |||
| TCustomNotificationCenter.PresentNotification | ||||
Windows Notifications
Notifications are compatible with the following versions of Windows:
- Windows 8: Windows 8 displays the notifications for a short period of time, after this, the user does not have any further access to the notifications.
- Windows 10: Windows 10 displays the notifications for a short period of time, after this, the notifications are available in the Action Center.
To access the Action Center to view the notifications, click the Action Center icon available on the taskbar. The icon changes depending on whether there are notifications pending or not:
Windows 10 Action Center Icon Notifications Pending No Notifications Pending 

OS X Notifications
OS X supports notifications since version 10.8. For further information about OS X, see Using the Mac OS X Notification Center.
iOS Notifications
Notification Permissions
You need to add notification permissions to your application to use notifications in iOS. You need to ensure that the value of the key FMLocalNotificationPermission is set to true. Then, RAD Studio adds the appropriate key and value pair in the Info.plist file of your project.
To set FMLocalNotificationPermission to true:
- Go to Project > Options > Version Info.
- Select the appropriate iOS target platform.
- In the key/value list, set the value of FMLocalNotificationPermission to true.

Notification Alert
iOS allows the user to set whether the notifications of an app is displayed as a banner or as an alert. Banners are displayed in the screen for a short period of time, while Alerts remain in the screen until the user interacts with the Alert.
To display the notifications as an alert, the end user has to go to the Notifications Settings of the application in the iOS device, and change the Alert Style when Unlocked settings to Alerts.
Creating Notifications
The TNotification class is used to create notification messages. You need the TNotificationCenter component to manage one or several TNotification instances.
After you have a TNotificationCenter component on your form, you can declare a TNotification variable, and call the CreateNotification method to create the notification.
Delphi:
MyNotification:= NotificationCenter1.CreateNotification;
C++:
TNotification *MyNotification = NotificationCenter1->CreateNotification();
After creating the notification, we recommend that you set at least the following fields:
- Name: with the unique name to identify your notification.
- AlertBody: with the text of the notification. The
AlertBodyfiled is mandatory in iOS
You can manage other settings for your notifications:
- Title: with the title of the notification. iOS is not compatible with the
Titlefield; iOS always displays the app name as title.
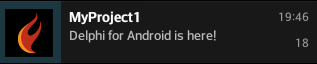
- Number: use this field to update the notification number in Android or the application badge number in iOS.
- ApplicationIconBadgeNumber: use this property to update the application badge number in iOS.
iOS Badge Number Android Notification Number 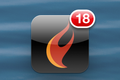


Firing Notifications
FireDate is used to set the date and time when the notification is going to be fired.
As regarding the time to fire the notification, you can create two types of notifications.
Immediate Notifications
By default, FireDate is set to Now, so if you do not change the value of FireDate, the notification is fired immediately.
Scheduled Notifications
Notifications can be scheduled to be fired at any time. Set FireDate to the date and time when you want to fire the notification.
Firing Notifications in a Particular Date and Time
You can set that a notification must be fired in a particular date and time. For example, to set a notification to be fired on the 16th of December of 2015 at 5:30 P.M., you could set FireDate like this:
Delphi:
MyNotification.FireDate := EncodeDateTime(2015, 12, 16, 17, 30, 00, 00);
C++:
MyNotification->FireDate = System::Dateutils::EncodeDateTime(2015, 12, 16, 17, 30, 00, 00);
When scheduling notifications to a particular date time, you must bear in mind that if the FireDate you set has already passed, the notification is fired immediately.
Firing Notifications After a Period of Time
You can set that a notification must be fired after a period time. For example, to fire the notification in 1 minute and 30 seconds, you can do the following:
Delphi:
MyNotification.FireDate := Now + EncodeTime(0, 1, 30, 0);
C++:
MyNotification->FireDate = Now() + EncodeTime(0, 1, 30, 0);
If a notification is scheduled, and you create another notification with the same name (whether scheduled or not), any previous notification that was scheduled with that same name is overwritten.
Repeating Notifications
You can use RepeatInterval to schedule notifications to repeat after a period of time. You can use one of the interval types that TRepeatInterval defines: None, Second, Minute, Hour, Day, Week, Weekday, Month, Quarter, Year, or Era.
- Warning: When you schedule a notification to repeat after a period of time using
RepeatInterval, the notification continues repeating even after the application closes; ensure you deal properly with cancelling the notifications.
For example, to set a notification to repeat every hour, you could do the following:
Delphi:
MyNotification.RepeatInterval := TRepeatInterval.Hour;
C++:
MyNotification->RepeatInterval = TRepeatInterval::Hour;
Notification Actions
Clicking the notifications in OS X, iOS, or Android, brings the application that sent the notification to the front, whether this application is running in the background or closed completely.
There is no particular behaviour when the user clicks the notification in Windows.
The following section shows further settings for notification actions in iOS.
Notification Actions (OS X and iOS)
You can add an Action button to an alert so the user can open the application clicking the button. For this feature to work, the user needs to set the style of notifications settings of the project to Alerts, for further information see how to set Notification Alerts in OS X and Notifications Alerts in iOS.
To add an action button, set the HasAction field to True. Use the AlertAction field to indicate the text of the button.
Delphi:
MyNotification.HasAction := True;
MyNotification.AlertAction := 'Open App';
C++:
MyNotification->HasAction = True;
MyNotification->AlertAction = "Open App";
Sending Notifications to the Notification Center
After you finish configuring all the settings for your notification, you must send your notification to the notification center to process it.
You can send notifications to the notification center using one of the following two methods.
- ScheduleNotification: Sends a scheduled notification to the notification center. If FireDate is Now, or if it has a past TDateTime, then the notification is presented immediately; otherwise it is scheduled as indicated.
- Warning: Windows does not support
ScheduleNotification.
- PresentNotification: presents the notification immediately regardless of the value of FireDate.
Cancelling Notifications
You can cancel notifications that are scheduled, notifications that repeat, and you can also remove notifications that are already displayed in the Action Center, Notification Center, or Notification Drawer.
- CancelNotification is used to cancel a scheduled notifications or a notifications that repeat. You need the Name of a notification to cancel it.
- CancelAll cancels all notifications:
- The notifications that are scheduled will not be fired.
- The notifications that have repeat interval are cancelled.
- The notifications that are available in the Action Center, Notification Center, or Notification Drawer for this application are deleted.
Updating Notifications
You can update a notification using the Name, that is the unique identifier of the notification. To update a notification, follow these steps:
- Create an instance of TNotification with the same
Nameas the one you want to update. - Configure the new instance with the settings that you want.
- Send the notification to the notification center.
Updating future notifications, whether scheduled or repeat, deletes the notifications that are already present Action Center, Notification Center, or Notification Drawer (if any), and overwrites any future notifications.
See Also
- Using the OS X Notification Center
- Mobile Tutorial: Using Notifications (iOS and Android)
- Push Notifications
- System.Notification.TNotification
- System.Notification.TNotificationCenter