User:Maria/Mobile Tutorial: Connecting to an Enterprise Database from a Mobile Client (iOS and Android) with FireDac
Go Up to Mobile Tutorials: Mobile Application Development (iOS and Android)
Before starting this tutorial, you should read and perform the following tutorial session:
- Mobile Tutorial: Using ListBox Components to Display a Table View (iOS and Android)
- Mobile Tutorial: Using InterBase ToGo with FireDAC (iOS and Android)
Contents
This tutorial describes how to connect to an Enterprise database from a mobile client application.
To connect to an Enterprise Database, you need to have a client library. In most cases, the client library is provided by the database vendor in DLL format. This strategy does not work well for mobile devices because no client library is available. To resolve this issue, you can develop a middle tier to connect to an Enterprise Database, and your mobile application can communicate with the middle tier.
RAD Studio provides the DataSnap framework with which you can develop the middle tier (and access the middle tier) with almost no coding required. This tutorial describes the steps to develop the middle tier and then develop the mobile client.

Creating the Middle Tier, a DataSnap Server
First, create a DataSnap server that exposes a table from a database server. This tutorial uses a DataSnap Server Forms Application as a DataSnap server.
Note: In this tutorial, the DataSnap server functions as the middle tier in a multi-tiered database application. You can easily create and later delete an instance of a DataSnap server. After you understand the basic steps, you can convert the middle tier to a Windows service application.
Create a DataSnap Server Application
- Create a new project. Choose File > New > Other and from the New Items dialog select Delphi Projects > DataSnap Server > DataSnap Server or C++Builder Projects > DataSnap Server > DataSnap Server in order to create a new Delphi or C++ project.
- The New DataSnap Server wizard appears and you need to follow its steps without modifying too many parameters.
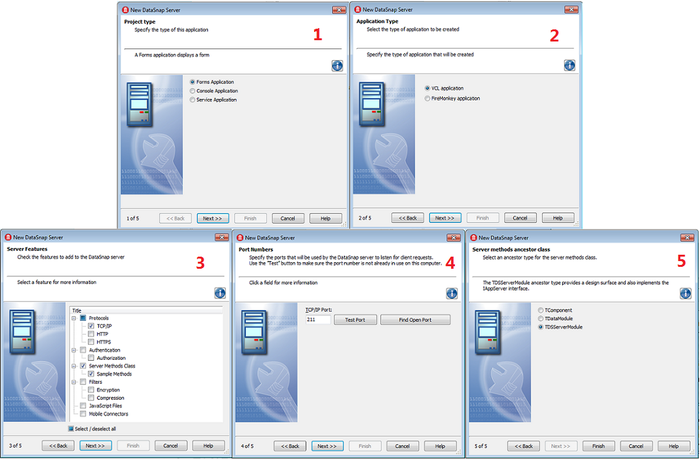
- In the New DataSnap Server wizard:
- At first step, choose Forms Application as project type.
- At the second step, check VCL Application or FireMonkey Application as application type.
- At the third step, choose the TCP/IP protocol, Server Methods Class and Sample Methods from the Server Features list.
- At the fourth step, leave the default TCP/IP communications port to 211. This will ensure that the communication between the client and the server will pass through the default DataSnap port.
- At the final step (number five) select TDSServerModule as the ancestor for the Server Methods.
- Save the form unit as DataSnapServerUnit.pas / DataSnapServerUnit.cpp.
- On the DataSnapServerUnit change the Name property of the Form to DSServerForm.
- Save the server methods unit (by default as created by the Wizard: ServerMethodsUnit1) as ServerModuleUnit.pas/ ServerModuleUnit.cpp.
- Save the server container unit (by default as created by the Wizard: ServerContainerUnit1) as ServerContainerUnit.pas / ServerContainerUnit.cpp.
- Save the new project as DataSnapServerProject.droj / DataSnapServerProject.cbproj.
- Select ProjectGroup1 in the Project Manager, and save the project as DataSnapTutorialProjectGroup.groupproj.


Define the IB connection on the DataSnap Server
- Switch to the ServerContainerUnit.pas file and replace the ServerMethodsUnit1 uses clause in the implementation with:
uses ServerModuleUnit, for Delphi, and replace #include "ServerMethodsUnit1.h" with#include "ServerModuleUnit.h"in ServerContainerUnit.cpp, for C++; - Switch to the ServerModuleUnit.pas/cpp file.
- In the Form Designer, change the Name property of the Server Module to DSServerModule_EMPLOYEE.
- Configure the following components on the Server Module:
- Drop a TFDConnection component on the Server Module, and set the following properties:
- TFDConnection encapsulates a FireDac connection to a database server.
- Set the Name property to SQLConnection_EMPLOYEE.
- Set the LoginPrompt property to False.
- Set DriverName to IB.
- Right-click the component and click Connection Editor... to open the FireDAC Connection Editor window.
- Set the Database field to
C:\Users\Public\Documents\Embarcadero\Studio\18.0\Samples\Data\EMPLOYEE.GDB - Set the User_Name and password. The values by default are User_Name = sysdba and Password = masterkey.
- Change the Connected property to True. If you get an error, double-check the properties you just configured:
- Drop a TFDTable component on the Server Module, and set the following properties:
- TFDTable is a TDataSet that contains the table form the IB connection.
- Set the Name property to EMPLOYEE_TABLE.
- Set the Connection property to SQLConnection_EMPLOYEE.
- Set the TableName property to EMPLOYEE.
- Change the Active property to True. If you get an error, double-check the properties you just configured.
- Drop a TFDConnection component on the Server Module, and set the following properties:

Note: This tutorial uses InterBase as an example. However, you can connect to any database server using the same steps. Select the proper driver, and other properties to point to your database.
Expose the Table from the DataSnap Server
You have just created a new Server Module that contains a TFDTable that packages data to the next layer. The next step is to expose the Server Module to the DataSnap client.
On the "ServerModuleUnit.pas/h" add the functions or methods that you want to expose as public to allowed them to be called by the client:
- in Delphi:
Click the Code tab. In the type section under public, add this function declaration:
function GetTable: TDataSet; // This function returns a TDataSet that contains the table from the IB connection.
CTRL-SHIFT-C to create a stub for this function in the implementation section.
Write code for the function you just added.
Add the following function to ServerModuleUnit.pas':
function TDSServerModule1.GetTable (): TDataSet;
begin
 EMPLOYEE_TABLE.Close;
 EMPLOYEE_TABLE.TableName := 'employee';
 EMPLOYEE_TABLE.Open;
 Result := EMPLOYEE_TABLE;
end;
- In C++:
On the "ServerModuleUnit.h" add this function declaration:
TDataSet * __fastcall GetTable(); // This function returns a TDataSet that contains the table from the IB connection.
Write code for the function you just added on "ServerModuleUnit.cpp" .
TDataSet *__fastcall TDSServerModule_EMPLOYEE::GetTable()
{
	EMPLOYEE_TABLE->Close();
	EMPLOYEE_TABLE->TableName = "employee";
	EMPLOYEE_TABLE->Open();
	return EMPLOYEE_TABLE;
}
- In the Form Designer, open ServerContainerUnit.
- Select DSServerClass1, and update the existing event handler for the OnGetClass event. Add the following code to the DSServerClass1 event handler:
Delphi:
procedure TServerContainer1.DSServerClass1GetClass(DSServerClass: TDSServerClass;
  var PersistentClass: TPersistentClass);
begin
  PersistentClass := TDSServerModule_EMPLOYEE;
end;
C++ (only for iOS):
void __fastcall TServerContainer1::DSServerClass1GetClass(TDSServerClass *DSServerClass,
          TPersistentClass &PersistentClass)
{
	PersistentClass =  __classid(TDSServerModule_EMPLOYEE);
}
With this event handler, the DataSnap Server exposes providers as well as public methods in this class to a DataSnap client.
Run the DataSnap Server
Implementation of the DataSnap Server is complete. Right-click DataSnapServerProject.exe and select Run Without Debugging.
 .
.
Now you can see the DataSnap server running on your Windows machine. Because this DataSnap server has no UI element, it looks like a blank form, and this is as expected at this point.

Creating a Mobile Application that Connects to the DataSnap Server
The next step is creating the mobile client application.
- In the Project Manager, right-click DataSnapTutorialProjectGroup, and select Add New Project.
- Select FireMonkey Mobile Application on the Delphi Projects page:
- Save the new Unit as DataSnapClientUnit.pas/cpp.
- Save the new Project as DataSnapClientProject.droj/cbproj.
- Open DataSnapClientUnit, and change the Name property of the Form to DSClientForm.
- Drop the following components on the FireMonkey Mobile Form Designer:
- TFDPhysDSDriverLink
- TFDGUIxWaitCursor
- TFDConnection component (FDConnection1)
- Set the DriverName property to DS.
- Right-click the component and click Connection Editor to open the FireDAC Connection Editor window.
- Set the Server field with the IP address of the DataSnap Server. Do not use localhost or 127.0.0.1, use the ipconfig command to locate the IP address of the server.
- Set the Port with the same value as the server, 211 value by default.
- Set the LoginPrompt property to False.
- Set the Connected property to True.
- If you see an error, please double-check the properties you have just set.
- TFDStoredProc component (FDStoredProc1)
- The TFDConnection component provides connectivity to the DataSnap server using FireDAC.
- Set the Connection property to FDConnection1.
- Set the StoredProcName property to TDSServerModule_EMPLOYEE.GetTable.
- Set the Active property to True.
- TListBox component
- Set the Align property to Client:
- Open the LiveBindings Designer and connect the data and user interface as follows:
- Click FULL_NAME in FDStoredproc1, and drag the mouse cursor to Item.Text in ListBox1:
- Now you have created and configured the DataSnap Client on the mobile platform. You should be able to see the data coming from the DataSnap server in the IDE:
- Click FULL_NAME in FDStoredproc1, and drag the mouse cursor to Item.Text in ListBox1:


Run Your Application on the mobile platform
Now your application is ready to run.
In the Project Manager, select the mobile target platform, and run your application. You should be able to browse data just as you do within the IDE.