Providing Help for Your Component
Go Up to Making components available at design time
You can create your own CHM help files and add them to RAD Studio. In this topic, you can see how to create help for new library files.
You can create the help so once you press F1, the appropriate file opens according to the class or member you are located when F1 is pressed.
This topic shows you how to create the CHM file and how to install the help files in RAD Studio. You can also see the sample that illustrates a possible structure for the CHM help file.
Contents
Creating the CHM Help Files
You can download the required tools to create a .chm going to the Microsoft HTML Help Workshop and documentation page.
Once you install the HTML Help Workshop, you can proceed with the following points.
Creating the Project
To create a new project in HTML Help Workshop:
- Click on File > New, select Project and click OK.
- Click Next to specify the path and name of your project, and then click Next.
- If you have any files you want to include in your project, select the type of file, click Next, and add the files; otherwise, click Next.
- Click Finish to complete the wizard.
Creating the Contents
Once the project is created:
- Click the Content tab, select Create a new contents file, and click OK.
- Change the name of the suggested .hhc file if wanted, then click Save.
- To create new .htm files, click on File > New, select HTML File, and click OK.
- Here you are prompted to enter the title of the HTML file. You need to add the fully-qualified name as title. It is very important that the title included between the
<Title></Title>HTML tags is the fully-qualified name that describes the content of such file, such as:<Title>UnitName.ClassName.MethodName</Title>.- Warning: The title included between the
<Title></Title>HTML tags must be fully qualified, otherwise the help may not link to the right file when F1 is pressed.
- Warning: The title included between the
- You can now save your .htm file going to File > Save File As…. We recommend naming the HTML files also with fully-qualified names (as explained in point 4), such as: UnitName.ClassName.MethodName.htm.
Repeat steps 3, 4, and 5 to create all necessary .htm files. Once you have created and saved all the .htm files, you can add them as content by clicking Insert a heading or Insert a page and then click Add/Edit, browse for the .htm file, add the Entry title (it does not have to be fully qualified), and click OK.
- Use Insert a heading to add a heading-level icon (a page that contains further pages).
- Use Insert a page to add a page-level icon (a final page).
Use the arrow buttons to organize the contents as required.
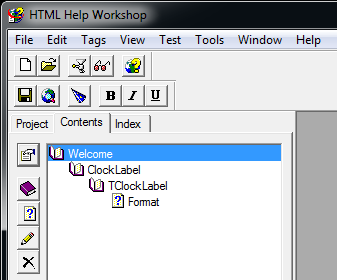
The following image shows a possible Contents structure following the sample below:
Note: You can change from books to folders with the Use folders instead of books checkbox inside Content Properties.
Creating the Index
Once all the contents are ready, you can add them as Indexes. To create an index:
- Click Index tab, select Create a new index file, then click OK.
- Change the name of the suggested .hhk file if wanted, then click Save.
- Click Insert a keyword button, to add a new index entry.
- Click Add/Edit and then Browse to add the .htm. Add the fully-qualified name as Title and click OK. In the Keyword field, add the fully-qualified name, then click OK.
- Warning: The name included as Keyword must be fully qualified, otherwise the help may not link to the right file when F1 is pressed.
Repeat steps 3 and 4 to add all required .htm files to the index.
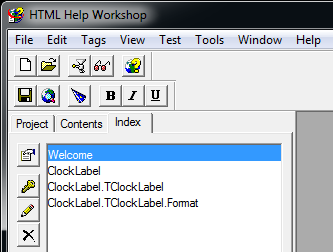
The following image shows a possible Index structure following the sample below:
Project Options
To change the project options, click the Project tab and then click the Change project options button. We recommend that you add:
- Title: The title displays at the top of the CHM Help Window.
- Default file: This is the file displayed by default when you open the CHM file.
- Full-text search: To enable full-text search, to go the Compiler tab and check the Compile full-text search information.
Installing the CHM Help Files
When you compile the files, you generate a .chm file. RAD Studio stores the CHM files in the following paths depending on the language:
- English:
C:\Program Files (x86)\Embarcadero\Studio\21.0\Help\Doc - German:
C:\Program Files (x86)\Embarcadero\Studio\21.0\Help\Doc\de - French:
C:\Program Files (x86)\Embarcadero\Studio\21.0\Help\Doc\fr - Japanese:
C:\Program Files (x86)\Embarcadero\Studio\21.0\Help\Doc\ja
You do not need to use the above paths, you can copy your CHM help files to any folder ensuring that the language CHM files are stored in the appropriate language folder as follows:
- English:
MyDirectory - German:
MyDirectory\de - French:
MyDirectory\fr - Japanese:
MyDirectory\ja
You need to create the new value in the Registry Editor.
- Go to the following path:
HKEY_CURRENT_USER\Software\Embarcadero\BDS\21.0\Help\HtmlHelp1Files\
- In the right pane, right-click and select New > String Value, then rename the new value with a descriptive name.
- Double-click this new entry to add the full path and CHM file name to Value data. For example, if you are using the same path as RAD Studio to store the CHM you need to add the following in Value data
%programfiles(x86)%\Embarcadero\Studio\21.0\Help\Doc\NameOfYourCHM.chm, where NameOfYourCHM.chm is the .chm you have previously compiled and copied to such directory as explained above. Indicate only the path to the English version of the CHM, even if you are not adding help in English language. Ensure to add the correct .chm file name; RAD Studio automatically looks for the CHM in the different help language folders mentioned above, according to the language. If you add help in several languages, ensure that files with the same translated content have the same .chm file name.- Note: Paths using macros are not supported, only environment variables are allowed.
You need to add a new registry value for each .chm file.
CHM Help Sample
This sample illustrates a possible CHM. The sample uses a new component, called TClockLabel, and a new developed Format property for this component. The new component has been developed in a new unit called ClockLabel.pas.
The sample uses the Welcome.htm page as default first page.
Bear in mind that the name between the <Title></Title> .html tags, as well as the Keyword field of the Index entry must be fully qualified, as shown in the table below, the rest is open for you to configure as required.
The table below displays a four-level CHM help sample with the required text between the <Title></Title> .html tags and the text of the Keyword field of the Index entries which both are the fully qualified:
| Item | Represents | Between the <Title></Title> .html tags & Keyword field of the Index entry
|
Recommended .htm Name |
|---|---|---|---|
| Welcome | The default page | Welcome | Welcome.htm |
| ClockLabel | The ClockLabel.pas unit | ClockLabel | ClockLabel.htm |
| TClockLabel | The TClockLabel class developed inside the ClockLabel unit | ClockLabel.TClockLabel | ClockLabel.TClockLabel.htm |
| Format | The Format property of the TClockLabel class | ClockLabel.TClockLabel.Format | ClockLabel.TClockLabel.Format.htm |
The table above only illustrates a possible sample, since you may, for example, add extra levels to group the methods/properties together.
Providing Access to Your CHM Files on the Help Menu of the IDE
You can extend the IDE so that the Help > Third-Party Help menu shows an entry for your product and provides menu items to open your CHM files. Extending the IDE Using the Tools API explains the required steps to extend the IDE, and Adding an Item to the Main Menu of the IDE shows how to extend the main menu.
For example code that shows how to add your help to the Help > Third-Party Help menu, see:
- Third-Party Help Menu Item (Delphi) code example
- Third-Party Help Menu Item (C++) code example

