Configuring Your EMS Server or EMS Console Server on Linux
Go Up to EMS Server
To set up your Enterprise Mobility Service (EMS) properly, you need the resources and the stand-alone developer applications that are delivered with RAD Studio.
Contents
Setting Up the EMS Server
- On your Windows machine at
C:\Program Files (x86)\Embarcadero\Studio\19.0\EMSServer, find the following files:ems_install.shLinuxEMSServer.tar
- Copy the files to your Linux machine.
- Note: Copy both files to the same folder.
- Run the
ems_install.shfile (with use administrator privileges).- Note: You can find installation details in /var/ems_install.log.
Running the EMS Server
You can run the EMS server using the following command:
/usr/lib/ems/EMSDevServerCommand
To run the EMS console, use the following command:
/usr/lib/ems/EMSDevConsoleCommand
Also, you can use environment variables created by ems_install.sh, for example:
$EMS_HOME/EMSDevServerCommand
Configuring Your EMS Environment for the First Time
The EMSDevConsoleCommand and EMSDevServerCommand programs run the setup wizard when they cannot find the emsserver.ini file in the current and /etc/ems directories, or if the server runs with param setup, like the following:
/usr/lib/ems/EMSDevConsoleCommand -setup
Note: Before running the EMS Setup Wizard, you need to properly set up the Interbase EMS database.
To configure the EMS server do the following:
- Run Console or Server.
- Type
start - Type
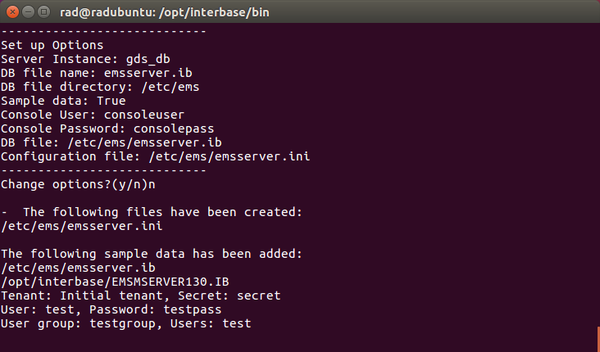
yto run the wizard. - Specify the connection parameters by entering the following values:
- Server instance: type the following default instance name
gds_db - DB File Name: the default name is
emsserver.ib - DB File Directory: the default path is current directory
- DB User Name: the default parameter is
sysdba - DB Password: the default parameter is
masterkey - Console User Name: the default value is
consoleuser - Console Password: the default value is
consolepass
- Note: The username and password are saved in the emsserver.ini file as plain text.
- Server instance: type the following default instance name


