Image List Editor (FireMonkey)
Contents
Go Up to Property Editors Index
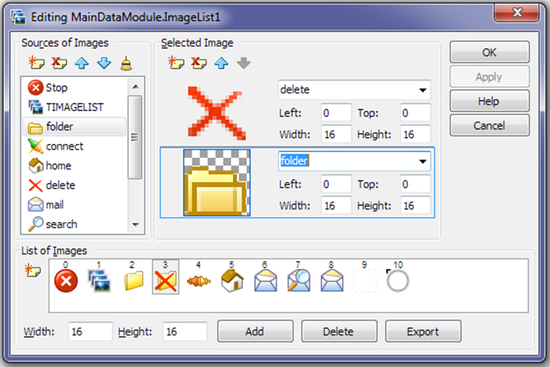
Use the Image List editor at design time to add bitmaps and icons to an image list.
You can view the Video demonstrating how to use the Image List Editor to create and edit Image Lists.
Opening Image List Editor
- Find a TImageList object in either the Form Designer or Structure View.
- Do either of the following:
- Double-click the TImageList object.
- Right-click the TImageList object and select ImageList Editor from the context menu.
- The Image List editor opens to edit the selected TImageList object.
You can use the ImageList Sample to test all features and functionality discussed in this topic.
List of Images Pane
The List of Images pane shows preview images of all the images in the Destination collection of the current image list . Numbers above the preview images indicate zero-based indexes (positions) of images in the image list. You can drag a preview image item to a new position to change the image position in the Destination collection of the image list.
Select a preview image to show the image in the Selected Image pane.
The List of Images pane provides the following commands, which can be activated using buttons, tool icons, and context menu commands.
| Command | Hint | Description |
|---|---|---|
| Add | Add images from file into the List of Images (Ctrl+O)
|
Opens the Add Images dialog box, which lets you select an image to add to the image list. You can select among The dialog box prompting to type the New source item name opens; by default, it shows the name of the selected file. If the size of an image to add is multiple of the specified Width and Height, a prompt appears asking whether the Image List editor should divide the image into several images. This is useful for toolbar bitmaps, which are usually composed of several small images in a sequence and stored as one larger bitmap. The added image appears highlighted in the preview images list of the List of Images pane and is shown in the Selected Image pane. Notice, that the image is added into the Source collection and is shown in the Sources of Images pane. The Add Images dialog box allows you to select and add multiple images at once. You can add multiple files whose names match the following mask:
|
| Delete | Delete selected item from the List of Images |
Removes the selected image from the List of Images pane (from images in the Destination collection). |
| Export | Export List of Images into file |
Opens the Export Images dialog box, which lets you save the current list of images to a file. You can select among |
| Width Height |
These Width and Height are used during Add and Export commands (see descriptions of these commands). | |
New Image |
Add new image into the List of Images |
Adds an image selected in the Sources of Images or in a selected layer in the Selected Image. |
Selected Image Pane
The Selected Image Pane shows the detailed information about the destination image selected in the List of Images pane. (See TCustomDestinationItem.Layers.)
To display another image, click another preview image in the List of Images pane.
The Selected Image pane provides the following commands, which can be activated using buttons, tool icons, and context menu commands.
| Command | Hint | Description |
|---|---|---|
New Layer |
Add new layer into Selected Image |
Adds a new layer into the Selected Image pane. (See TLayer.) |
Delete Layer |
Delete selected layer from Selected Image |
Deletes the selected layer from the Selected Image pane. |
| Move Up selected layer in Selected Image Move Down selected layer in Selected Image |
Using these arrows you can change the order of layers. | |
| Show Editor |
Selecting the Show Editor command (from the context menu) or double-clicking an image activates the MultiResBitmap Editor, in which you can edit the multi-resolution bitmap in the selected layer. |
The Selected Image pane is used to form images used in the image list. Each image is a sum of sub-images placed in layers, one sub-image in each layer. Each sub-image is a multi-resolution bitmap. You can manipulate image layers. The Selected Image pane shows layer panes. Each layer shows one multi-resolution bitmap. Double-clicking a multi-resolution bitmap activates the MultiResBitmap Editor, in which you can edit the multi-resolution bitmap.
Each Layer pane shows the sub-image and the following properties of the sub-image:
- Image Name list button where you can select the name of the multi-resolution bitmap to use in this layer.
- Left, Top, Width, and Height - parameters of the rectangle (for the scale 1) used to draw the multi-resolution bitmap from this layer. All these rectangles are intersected with the resulting image rectangle. Multi-resolution bitmaps from all layers are drawn in the corresponding rectangles overwriting overlaid parts of multi-resolution bitmaps of the lower layers.
If a specified name does not exist or the specified rectangle does not intersect with the rectangle of the image, then nothing is drawn and no exception is risen. During run time you can set the proper image and pictures in all controls, using this image, will be updated automatically.
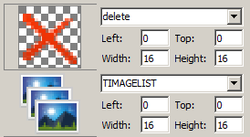
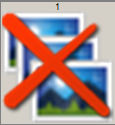
Each image typically contains only one layer. However, in some cases you might want to use several layers to form an image. For example, it can be convenient to use a separate layer containing a 'strikethrough' or a 'magnifying glass' picture. This layer can then be placed over layers containing other pictures; for example, over a layer containing a 'list of images' or an 'envelope' picture. Then the two layers can form a combined picture, such as a 'strikethrough list of images' or a 'magnifying glass over envelope' picture.
The following figure illustrates the usage of two layers to form a Strikethrough list of images picture:
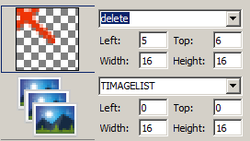
Compare the Strikethrough list of images image with the image obtained by dislocation of the rectangle of the upper layer, containing the 'Strikethrough' picture, with Left = 5 and Top = 6.
This dislocation, is shown in the following figure:
If the rectangle shown in the layer pane only covers (shows) the part of the whole multi-resolution bitmap used by the layer, then this rectangle can be moved over the whole picture. To demonstrate this feature, load a big picture into a layer.
For example, load the big picture My 1 having Width = 80 and Height = 32:
If you set Width = 16 and Height = 16 to reduce the size of the rectangle shown in the layer pane, the layer pane looks like this:
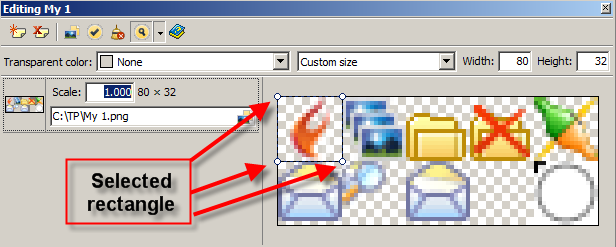
To demonstrate what happens, double-click a multi-resolution bitmap in a layer pane, to activate the MultiResBitmap Editor. The MultiResBitmap Editor shows the whole multi-resolution bitmap. In this bitmap you see the selected rectangle that corresponds to the rectangle shown in the layer, and you see that this rectangle shows the same picture as in the layer:
Using the mouse, you can move and resize the selected rectangle like a 'moving viewport' over the whole bitmap. See which part of the bitmap appears in the layer pane. If you place the mouse pointer into the layer pane, then you can move the shown rectangle by using 'CTRL + Mouse Wheel' or by clicking the Left and Right arrows at the top of the layer pane.
Sources of Images Pane
The Sources of Images pane displays all images in the Source collection of the current image list. These images are used to construct images in the Destination collection (shown in the List of Images pane).
Notice that when you Delete an image preview from the List of Images collection, the source image is not deleted from the Sources of Images collection. Use the ![]() Delete Source tool button to delete an item from the Sources of Images collection.
Delete Source tool button to delete an item from the Sources of Images collection.
| Icon | Hint | Description |
|---|---|---|
New Source |
Add new item into Sources of Images |
This button shows the prompt asking for the New source item name and then activates the MultiResBitmap Editor. Using the MultiResBitmap Editor you can add several images optimized for different scales. During the run time an application selects an image having the most appropriate scale. |
Delete Source |
Delete selected item from Sources of Images |
Deletes the selected item from the Sources collection. |
| Move Up selected item in Sources of Images Move Down selected item in Sources of Images |
Using these arrows you can move Up and Down source images changing their order. You can use this for convenience. | |
Clear |
Clear design-time information |
Names of files from which source images were loaded, user sizes of images, and transparent colors are only used during the design time. However, these parameters, by default, are stored in the fmx-file. The |
| Show Editor |
Selecting the Show Editor command (from the context menu) or double-clicking an image activates the MultiResBitmap Editor, in which you can edit the selected multi-resolution bitmap. (See TLayer.MultiResBitmap.) |
Buttons
The Image List editor contains the following buttons.
| Button | Description |
|---|---|
| OK |
Apply your changes and close the editor. ( |
| Apply |
Apply your changes without closing the editor. |
| Help |
Displays this page. |
| Cancel |
Closes the editor without applying changes. |
See Also
- Video demonstrating how to use the Image List Editor to create and edit Image Lists Some advanced and not trivial features of the Image List Editor are demonstrated.
