チュートリアル:デスクトップ プラットフォーム上のマルチデバイス アプリケーションから SQLite データベースに接続する
データベースおよび LiveBinding のチュートリアル への移動
このチュートリアルでは、単純なマルチデバイス アプリケーションを使って、SQLite データベースへの接続を確立し簡単なクエリを実行する方法を説明します。
このチュートリアルでは Embarcadero から提供しているデータベースを使用していますが、どのような SQLite データベースでも使用できます。このチュートリアルで使用するデータベースは次の場所にあります。
- Windows の場合:
C:\Users\Public\Documents\Embarcadero\Studio\19.0\Samples\Data\Employees.s3db - OS X: Embarcadero が提供しているデータベースを、ご使用の Mac にコピーすることができます。 アプリケーションを配置する前に、忘れずに[OS X] as your target platformし、接続プロファイルを確認してください。
- メモ: SQLite プログラムは、OS X のバージョン 10.4 以降に付属しており、
/usr/binに置かれています。 データベースを作成するには、[アプリケーション|ユーティリティ|ターミナル]に移動します。 [ターミナル]ウィンドウを開き、「sqlite3<データベース名>」と入力するだけです。
このデータベースには、Employee という名前の 1 つのテーブルと、フィールドを持ついくつかのタプルが含まれています。ここでは、データベースに接続し、Employee テーブル内のすべてのタプルを表示します。
手順
- Delphi または C++ のマルチデバイス アプリケーションを作成します。
- [ファイル|新規作成|マルチデバイス アプリケーション - Delphi|空のアプリケーション]
- [ファイル|新規作成|マルチデバイス アプリケーション - C++Builder|空のアプリケーション]
- [プロジェクト マネージャ]でターゲット プラットフォームをアクティブにします。マルチデバイス アプリケーションでは以下のプラットフォームをサポートしています。
- [32 ビット Windows]
- [64 ビット Windows]
- [OS X]
- メモ: 必要なターゲット プラットフォームが[プロジェクト マネージャ]に表示されていない場合には、[ターゲット プラットフォーム]ノードを右クリックして、そのターゲット プラットフォームをプロジェクトに追加してください。詳細は、「ターゲット プラットフォームをアクティブにして構成する」を参照してください。
- [オブジェクト インスペクタ]でフォームの onCreate イベントをダブルクリックし、以下のコードを追加します。
- Delphi の場合:
procedure TDemonstration.FormCreate(Sender: TObject);
begin
  Self.Caption := 'Demonstration';
end;
- C++ の場合:
void __fastcall TDemonstration::FormCreate(TObject *Sender) {
	this->Caption = "Demonstration";
}
- フォームに以下のコンポーネントを追加します。
- 2 つの TButton コントロール。[オブジェクト インスペクタ]で、ボタンの Name プロパティを「
executeButton」と「connectButton」に、Text プロパティを「Execute」と「Connect」に、それぞれ設定します。 - 1 つの TSQLConnection コントロール。[オブジェクト インスペクタ]で、Driver プロパティを
Sqliteに設定します。 - 1 つの TMemo コントロール。[オブジェクト インスペクタ]で、Name を「
outputMemo」に設定します。 - 1 つの TSQLQuery コントロール。[オブジェクト インスペクタ]で、SQLConnection プロパティを
SQLConnection1に設定します。
-
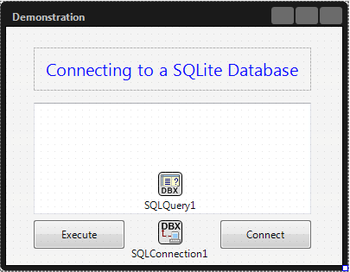
- この時点で、フォームは次のようになっています。
- 2 つの TButton コントロール。[オブジェクト インスペクタ]で、ボタンの Name プロパティを「
- ユニットに setParamsToConnect 手続きを新規作成し、以下のコードを追加します。
- メモ: "full_path_to_your_database_file" は使用するデータベース ファイルの絶対パスに置き換えてください。
- Delphi の場合:
procedure TDemonstration.setParamsToConnect();
begin
  // If Database param does not exist, it adds it. Otherwise, the existing value is overwritten.
if SQLConnection1.Params.IndexOf ('Database=') = -1 then
SQLConnection1.Params.Add('Database=full_path_to_your_database_file');
else
SQLConnection1.Params.Values ['Database'] := 'full_path_to_your_database_file';
end;
-
-
- メモ: ソース ファイルの
interfaceセクションでprocedure setParamsToConnect();と宣言するのを忘れないでください。
- メモ: ソース ファイルの
-
- C++ の場合:
void __fastcall TDemonstration::setParamsToConnect() {
	// Use double backslash in Windows paths, as the backslash character (\) must be escaped with another backslash to be treated literally.
	if (SQLConnection1->Params->IndexOf("Database") == -1) {
		SQLConnection1->Params->Add("Database=full_path_to_your_database_file" );
	}
	else {
		SQLConnection1->Params->Values["Database"] = "full_path_to_your_database_file";
	}

}
-
-
- メモ: プロジェクトの
Unit.hファイルでvoid __fastcall TDemonstration::setParamsToConnect();と宣言するのを忘れないでください。
- メモ: プロジェクトの
-
- [オブジェクト インスペクタ]で TSQLConnection コンポーネントの BeforeConnect イベントをダブルクリックします。
- このイベント ハンドラに次のコードを追加します。
- Delphi の場合:
procedure TDemonstration.SQLConnection1BeforeConnect(Sender: TObject);
begin
   SetParamsToConnect;
end;
- C++ の場合:
void __fastcall TDemonstration::SQLConnection1BeforeConnect(TObject *Sender) {
	setParamsToConnect();
}
connectButtonの OnClick イベント ハンドラに以下のコードを追加します。- Delphi の場合:
procedure TDemonstration.connectButtonClick(Sender: TObject);
begin
  try
    // Establish the connection.
    outputMemo.Lines.Clear;
    SQLConnection1.Connected := true;
    executeButton.Enabled := true;
    outputMemo.Text := 'Connection established!';
  except
    on E: EDatabaseError do
      ShowMessage('Exception raised with message' + E.Message);
  end;
end;
- C++ の場合:
void __fastcall TDemonstration::connectButtonClick(TObject *Sender) {
	outputMemo->Lines->Clear();
	try {
		SQLConnection1->Connected = true;
		executeButton->Enabled = true;
		outputMemo->Text = "Connection established!";
	}
	catch (EDatabaseError& E) {
		ShowMessage("Exception raised with message" + E.Message);
	}
}
-
executeButtonの OnClick イベント ハンドラに以下のコードを追加します。- Delphi の場合:
procedure TDemonstration.executeButtonClick(Sender: TObject);
var
  query: String;
begin
  outputMemo.Lines.Clear;
  // A random query
  query := 'SELECT * FROM Employee;';
  try
    // Assign the query to the object SQLQuery1.
    SQLQuery1.SQL.Text := query;
    SQLQuery1.Active := true;
  except
    on E: Exception do
      outputMemo.Text := 'Exception raised with message: ' + E.Message;
  end;
  // Show the results of the query in a TMemo control.
  ShowSelectResults();
end;
- C++ の場合:
void __fastcall TDemonstration::executeButtonClick(TObject *Sender) {
	String query;

	outputMemo->Lines->Clear();
	// A random query
	query = "SELECT * FROM Employee;";
	try {
		// Assign the query to the object SQLQuery1.
		SQLQuery1->SQL->Text = query;
		SQLQuery1->Active = true;
	}
	catch (Exception& E) {
		outputMemo->Text = "Exception raised with message" + E.Message;
	}
	// Show the results of the query in a TMemo control.
	ShowSelectResults();
}
- 以下の
ShowSelectResults手続きのコードを追加します。- Delphi の場合:
procedure TDemonstration.ShowSelectResults();
var
  names: TStringList;
  i: Integer;
  currentField: TField;
  currentLine: string;
begin
  if not SQLQuery1.IsEmpty then
  begin
    SQLQuery1.First;
    names := TStringList.Create;
    SQLQuery1.GetFieldNames(names);
    while not SQLQuery1.Eof do
    begin
      currentLine := '';
      for i := 0 to names.Count - 1 do
      begin
        currentField := SQLQuery1.FieldByName(names[i]);
        currentLine := currentLine + ' ' + currentField.AsString;
      end;
      outputMemo.Lines.Add(currentLine);
      SQLQuery1.Next;
    end;
  end;
end;
-
-
- メモ: ソース ファイルの
interfaceセクションでprocedure ShowSelectResults();と宣言するのを忘れないでください。
- メモ: ソース ファイルの
-
- C++ の場合:
void __fastcall TDemonstration::ShowSelectResults()
{
	TStringList* names;
	TField* currentField;
	String currentLine;

	if (!SQLQuery1->IsEmpty()) {
	SQLQuery1->First();
	names = new TStringList;
	SQLQuery1->GetFieldNames(names);
	while (!SQLQuery1->Eof)
		{
		currentLine = "";
		for (int i = 0; i < names->Count; ++i)
		{
			currentField = SQLQuery1->FieldByName(names->Strings[i]);
			currentLine = currentLine + " " + currentField->AsString;
		 }
		 outputMemo->Lines->Add(currentLine);
		 SQLQuery1->Next();
		}

	}

}
-
-
- メモ: プロジェクトの
Unit.hファイルでvoid __fastcall TDemonstration::ShowSelectResults();と宣言するのを忘れないでください。
- メモ: プロジェクトの
-
-
アプリケーションを実行し、まず[Connect]ボタンを、それから[Execute]ボタンをクリックすると、アプリケーションは次のように表示されます。


メモ: Windows で SQLite データベースに接続するためには、ライブラリ sqlite3.dll を以下のシステム パスに置いて、アプリケーションから sqlite3.dll を見つけられるようにしてください。
- 32 ビット版 Windows の場合: C:\Windows\System32
- 64 ビット版 Windows の場合: C:\Windows\SysWOW64
使用する API
- Data.DB.TDataSet
- Data.DB.TField
- System.Classes.TStringList
- Data.SqlExpr.TSQLConnection
- Data.SqlExpr.TSQLConnection.BeforeConnect
- FMX.StdCtrls.TButton
- FMX.Memo.TMemo
- FMX.Controls.TControl.OnClick