Playing Audio Files
Go Up to Tutorial: FireMonkey Audio-Video
This tutorial demonstrates how to include and play audio media data in a FireMonkey application.
Contents
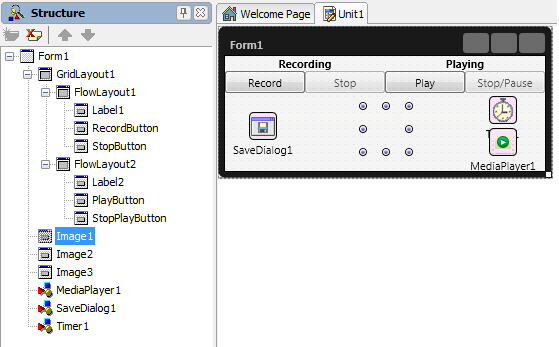
Form Design
- Use the form created in the previous tutorial.
- Add to the empty flow layout:
- A TLabel. Set its text to Playing.
- A TButton to start playing the audio file recorded following the steps from the previous tutorial.
- A TButton to stop or pause playing the audio file.
- Change the name of the two buttons to PlayButton and StopPlayButton.
- Set the StopPlayButton to disabled by setting the Enable property of the button to False.
- Add a TMediaPlayer to the form.
- Add two more TImages to the form. Set the TImage.Bitmap property of each TImage to images that are suggestive for the play and pause actions. The usual icon for the play action is an arrow, and for pause--two parallel vertical bars.
- Set all images on the same position and with the same sizes. The three images should be totally superimposed.
- Set the Opacity property for all images to
0. The visible image will be the image that shows the current running process. - Add a TTimer to the form. Set it as enabled.
- The form should look like this:

Implementation
To play an audio file using a TMediaPlayer, set the FileName.
- 1. Double-click the Play button to attach OnClick event handlers to it.
Delphi:
procedure TForm1.PlayButtonClick(Sender: TObject);
begin
// This application plays only recorded data, so if there is no data recorded there is nothing to play.
  if (Mic <> nil) and (Mic.State = TCaptureDeviceState.Stopped) then
  begin
    //Specifies the file to be played.
    MediaPlayer1.FileName := Mic.FileName;
    //Checks if the data can be decoded.
    if MediaPlayer1.Media <> nil then
    begin
      if (MediaPlayer1.State = TMediaState.Stopped) then
      begin
        Timer1.Enabled := true;
        StopPlayButton.Enabled := true;
        MediaPlayer1.Play;
        //Updates the opacity of each image.
        // Image2 shows the play sign.
        Image1.Opacity := 0;
        Image2.Opacity := 1;
        Image3.Opacity := 0;
      end;
    end;
  end
  else
  begin
    ShowMessage('The audio device is still capturing');
  end;
end;
C++:
void __fastcall TForm1::PlayButtonClick(TObject *Sender)
{
  // This application plays only recorded data, so if there is no data recorded there is nothing to play.
  if ((Mic != NULL) && (Mic->State == TCaptureDeviceState::Stopped))
  {
    //Specifies the file to be played.
    MediaPlayer1->FileName = Mic->FileName;
    //Checks if the data can be decoded.
    if (MediaPlayer1->Media != NULL)
    {
      Timer1->Enabled = 1;
      StopPlayButton->Enabled = 1;
      MediaPlayer1->Play();
      //Updates the opacity of each image.
      // Image2 shows the play sign.
      Image1->Opacity = 0;
      Image2->Opacity = 1;
      Image3->Opacity = 0;
    }
  }
  else
    ShowMessage("The audio device is still capturing.");
}
- 2. Double-click the Stop/Pause button to attach OnClick event handlers to it.
Delphi:
procedure TForm1.StopPlayButtonClick(Sender: TObject);
begin
  if MediaPlayer1.Media <> nil then
  begin
    if MediaPlayer1.State = TMediaState.Playing then
    begin
      MediaPlayer1.Stop;
      Image1.Opacity := 0;
      Image2.Opacity := 0;
      Image3.Opacity := 1;
      Timer1.Enabled := false;
    end
    else
    begin
      Image1.Opacity := 0;
      Image2.Opacity := 1;
      Image3.Opacity := 0;
      MediaPlayer1.Play;
      Timer1.Enabled := true;
    end;
  end;
end;
C++:
void __fastcall TForm1::StopPlayButtonClick(TObject *Sender)
{
  if (MediaPlayer1->Media != NULL)
  {
    if (MediaPlayer1->State == TMediaState::Playing)
    {
      MediaPlayer1->Stop();
      Image1->Opacity = 0;
      Image2->Opacity = 0;
      Image3->Opacity = 1;
      Timer1->Enabled = 0;
    }
    else
    {
      Image1->Opacity = 0;
      Image2->Opacity = 1;
      Image3->Opacity = 0;
      Timer1->Enabled = 1;
    }
  }
}
- 3. Double-click the timer to attach OnTimer event handlers to it. The timer is used to manipulate the images opacities during the play process.
Delphi:
procedure TForm1.Timer1Timer(Sender: TObject);
begin
  if (MediaPlayer1.Media <> nil) and
    (MediaPlayer1.CurrentTime = MediaPlayer1.Duration) then
  begin
    Image1.Opacity := 0;
    Image2.Opacity := 0;
    Image3.Opacity := 0;
    StopPlayButton.Enabled:=false;
    MediaPlayer1.Stop;
    MediaPlayer1.CurrentTime:=0;
  end;
end;
C++:
void __fastcall TForm1::Timer1Timer(TObject *Sender)
{
  if ((MediaPlayer1->Media != NULL) &&
      (MediaPlayer1->CurrentTime == MediaPlayer1->Duration))
  {
    Image1->Opacity = 0;
    Image2->Opacity = 0;
    Image3->Opacity = 0;
    StopPlayButton->Enabled = 0;
    MediaPlayer1->Stop();
    MediaPlayer1->CurrentTime = 0;
  }
}
Run the Application
- 1. Run the project by pressing F9.
- 2. Press the Record button to start recording audio data. The SaveDialog opens.
- 3. Choose a path and a file name to save the recorded data.
- The form should look like this:
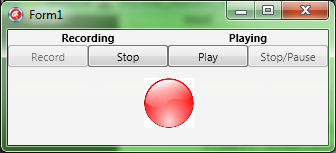
- 4. Press the Stop button to stop recording. If the recording is not finalized by calling the StopCapture method, the saved file will not be properly decoded when it is played by a media player.
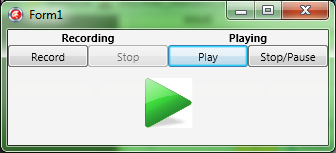
- 5. Press the Play button. The media file will start playing.
- The form should look like this, during the playing process:
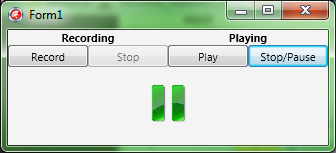
- 6. Press the Stop/Pause button. The media file will be paused.
- The form should look like this, wile the media is paused:


Previous
Next
See Also
Samples
- PlayAudioFile sample