Setting Project Options
Go Up to How To Create Forms and Projects, and Write the Code Behind
Use the Project > Options dialog box to:
- Set compiler options, such as search paths and warning/error levels, for the compiler you are using (Delphi or C++). You can also set options for any available related compilers such as the Resource Compiler and the Turbo Assembler.
- Set debugger options, such as the location of symbol tables and the rules to follow for loading symbol tables.
- Set application options, such as the application title (displayed in the Windows task tray) and the name of the application's help file.
Any change to the Project Options for one project only affects the current project. However, you can also save your selections as build configurations or option sets so that you can reuse the settings for new projects that you create, as well as for existing projects.
To change option values
To change the value of an option, click the value field, and then either enter a value or click the displayed down-arrow to select from the available choices, as follows:
- Choose Project > Options. The Project Options dialog box appears.
- Select a page from the list in the left pane of the Project > Options dialog box. Pages include compiler options for the compiler you are using, as well as pages for Debugger, Packages, Build Events, Build Order, and more.
- Set options on each page to determine how your project will be built.
- Depending on the option, you might enter text in a text field, either select or clear a box, or make a selection from a pull-down menu.
- If an option's value is boldface, the value differs from the value in its parent configuration. To display help for the option page, click the Help button.
- Build-related pages (including the compiler pages) typically contain a two-column list of options. The option name is in the left column; the option value is in the right column.
- Some options have an ellipsis button
 that you click to display an ordered list dialog box to manage a list of items, such as paths or directories.
 - Some options have a down-arrow button
 that you click to display and select from the possible choices for the option. For example, here your choices are True/False:
- Some options have an ellipsis button
- Click OK to accept the changes and close the dialog. Click Cancel to ignore the changes and close the dialog. Project options are not actually saved to disk until you build and save your project.
To set options for a multi-device project
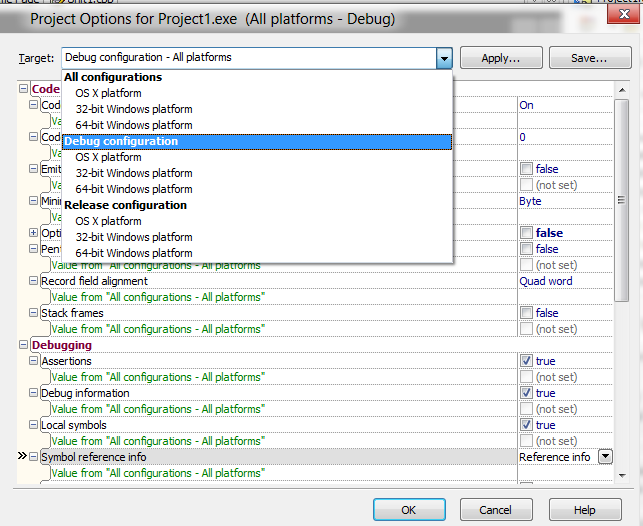
For a project that supports multiple platforms and configurations, the Project Options dialog box also displays the names and values of the parent build configurations after you click the plus sign (+) in front of the option name.
For example, the following screenshot shows the Project Options dialog box for a multi-device application. The parent or "upstream" options are displayed here; note that the ultimate parent for all options is the target configuration All Configurations - All Platforms, which displays options for all the platforms.
In the lines displaying the parent values, green color indicates that no value has been set. You can set the options for the specified parent configuration even though it is not the selected Target, but be cautious. Changes that you make to the parent are immediately displayed for the child so that you can see the impact of the changes you make.

