Creating an Android App
Go Up to Android Mobile Application Development
Contents
- 1 Component Restrictions for FireMonkey Android Apps
- 2 Style Selector
- 3 View Selector
- 4 Using Frameworks in Android Apps
- 5 Android Core Lib Names Cannot Be Used as App Names
- 6 Alignment Recommendations for Mobile Toolbars and Other FireMonkey Components
- 7 Using Custom Fonts in Android Apps
- 8 Setting the Required Uses Permissions for Your Android Apps
- 9 Using the Android Device's Back Button
- 10 Making Your Application Run in Fullscreen Mode
- 11 Settings for Virtual Keyboard in TEdit and TMemo Controls
- 12 Using Icons and Images in Multiple Resolutions
- 13 Loading and Deploying Files
- 14 Creating Applications for Google Glass
- 15 Creating Applications for Android Smart Watches
- 16 Implementing Android-Specific Features
- 17 See Also
This page describes how to develop multi-device applications that target the Android platform. See Android Mobile Application Development for topics that are not specific to the development phase, such as configuring your PC and Android devices to work with RAD Studio.
To create a multi-device app that supports Android:
File > New > Multi-Device Application - Delphi
File > New > Multi-Device Application - C++Builder
Then select a multi-device application type in the Multi-Device Application wizard.
Component Restrictions for FireMonkey Android Apps
While you are designing your Android app in RAD Studio, you can only use components that are supported on Android devices. When Android is the active target platform of your project, unsupported components are grayed out on the Tool Palette.
Style Selector
At the top of the multi-device Form Designer is the style selector:
![]()
The style selector's drop-down menu lists all the styles that you can apply to the Master view.
Select the Android style from the style selector to see all the properties on the components according to the target platform.
View Selector
At the top of the multi-device Form Designer is the view selector:
![]()
The view selector's drop-down menu lists all the available views, which show the different platforms, such as iOS, Android, Windows and macOS.
Use the Master form for a general design of your application. Then you can add new views to your project in order to customize your application for a specific device type. You can even create new customized views; see Adding a Customized View to the View Selector. The predefined Android device views are:
- Android 3.5" Phone
- Android 4" Phone
- Android 5" Phone
- Android 7" Tablet
- Android 10" Tablet
- Google Glass
Add new views to your project in order to customize your application for a specific Android device type. All the views inherit the components and properties from the Master form. For more information see Form Designer.
If you want to customize some aspects of your application for all Android devices you can do it using the Master form, provided you do not want to propagate to the rest of platforms. Otherwise use the Code Editor, for example:
// You will see the changes applied at run-time.
{$IFDEF ANDROID}
    SpeedButton1.StyleLookup := priortoolbutton;
{$ENDIF}
For more information:
- Mobile Tutorial: Using Layout to Adjust Different Form Sizes or Orientations (iOS and Android)
- (shows how to use the Master form for different form factors (such as phone or tablet), without using different views for each form factor)
Using Frameworks in Android Apps
FireMonkey
The FireMonkey framework is ideal for the Android target platform, and it supports other target platforms as well.
VCL (not available for Android)
The Visual Component Library (VCL) is available only on Windows (32-bit or 64-bit).
RTL
Some run-time library (RTL) units that provide basic functionality are common for every supported target platform (including Android), such as System.pas or System.SysUtils.pas.
A number of RTL units are Android-only (see Android API and Java Libraries). These units are prefixed with the Androidapi unit scope.
See also Android C RTL.
Android API and Java Libraries
The RTL contains a number of units that provide Delphi and C++ interfaces to the Android native API. These units are scoped with Androidapi and are typically located in the source\rtl\android\ directory of your RAD Studio installation. The FireMonkey framework relies on some of these units. You may also use them directly if you want.
You can also use parts of the Android API that are not mapped by the RTL, or use your own Java libraries in your project:
Android Core Lib Names Cannot Be Used as App Names
You cannot assign a name to your project if the name conflicts with the name of a core library shared object file, such as <libNAME>.so.
For example, you cannot use any of the following as project names:
c(conflicts with libc.so)m(conflicts with libm.so)z(conflicts with libz.so)ssl(conflicts with libssl.so)ui(conflicts with libui.so)gui(conflicts with libgui.so)camera_client(conflicts with camera_client.so)
And so forth.
Alignment Recommendations for Mobile Toolbars and Other FireMonkey Components
To ensure that the toolbar in your app behaves and looks the same on the iOS and Android platforms, you should set specific alignment properties in the Object Inspector, as follows:
- Set the Align property for all controls that are children of a TToolbar. For example, the following are Align property values:
- (Left, Right, Center, Contents)
- To maintain space between controls, or to maintain space between the left and right borders of toolbars, set the following properties:
- For example, assume you have a toolbar with a child TLabel as the Title, and two left-aligned speedbuttons with space between each button:
- On the TToolbar, set:
- Align = Top
- On the child TLabel, set:
- Align = Contents
- Send the TLabel to the back using the context menu.
- On the two child TSpeedButtons, set:
- Align = Left, Right, Center, Contents, VertCenter
- For descriptions of these properties, see FMX.Types.TAlignLayout.
- Margins Left = 5
- Align = Left, Right, Center, Contents, VertCenter
- On the TToolbar, set:
- For example, assume you have a toolbar with a child TLabel as the Title, and two left-aligned speedbuttons with space between each button:
- To format a segmented control (styled TSpeedButtons with a shared group name) so that it is centered on the toolbar:
- Add a TLayout control to the TToolBar.
- Set TLayout.Align to Center.
- Add buttons to the TLayout and set alignment properties and margins for each button (that is, Align = Left, Margins = Left, Margins = Right, and so forth).
- For an example, see Mobile Tutorial: Using a Button Component with Different Styles (iOS and Android).
- To use TLabel, you must set TLabel.AutoSize = False and set the Align property.
- To center the label on a toolbar that already has buttons, you must set TLabel.Align = Contents and select Send to Back on the context menu.
Similar alignment rules pertain to other controls. For example, assume you have added a TSwitch to a ListBox item; to have the switch aligned to the right and centered vertically, set the following properties for TSwitch:
- Align= Right
- Margins Right = 5
Using Custom Fonts in Android Apps
You can use custom fonts in your Android apps. One use for custom fonts is as icons in your mobile applications. True-type fonts have advantages over raster image files in that fonts are lightweight and vector-based, so they scale well to high resolutions. You can install your own custom fonts into the font library of your development system. Then, the custom fonts should be available in the IDE for you to select during design time.
However, if you deploy the app at this point to a target device, the fonts in the app are rendered using only the installed fonts available on the device. You need to add the font to your project using the Deployment Manager to ensure that the fonts you see at design time in the IDE are copied over to the device.
Here are the basic steps for incorporating a custom font in your Android app::
- Install the custom font on your Windows system.
- See the Windows Help and Support on your system for instructions.
- For example, right-click the font file, and click Install.
- Add the font file to the root directory of your project.
- In the Object Inspector, assign the font to the Text Settings/Font property for the controls that use the font.
- Add the font file to your project in the Deployment Manager.
Full instructions and downloadable files for creating a mobile project that uses a custom-installed font (Font Awesome) are available here:
To know whether a font might be available at run time on a specific mobile device, you need to check whether the font you are using at design time is supported on your target devices:
- Fonts on Android: http://developer.android.com/design/style/typography.html
Setting the Required Uses Permissions for Your Android Apps
Some basic Android permissions are pre-set for all FireMonkey Android apps. You should verify that specific access permissions are enabled for your Android device on the Uses Permissions page in Project Options.
For example:
- To use the Android device's camera, ensure that the following permissions are enabled:
- Camera
- Read/Write external storage
- To use GPS location on the Android device, ensure that one or more of the Location Access permissions are enabled:
- Access coarse location
- Access fine location
- Access location extra commands
- To record audio on the Android device, ensure that the following permission is enabled:
- Record audio
Using the Android Device's Back Button
To make your application handle when users press the Back button on their Android device, add an event handler to your form for OnKeyUp, and use the following code within your event handler:
Delphi:
if Key = vkHardwareBack then
begin
  // Do whatever you want to do here
  Key := 0; // Set Key = 0 if you want to prevent the default action
end;
C++:
if (Key == vkHardwareBack) {
    // Do whatever you want here
    Key = 0; // Set Key = 0 if you want to prevent the default action
}
Making Your Application Run in Fullscreen Mode
By default, Android applications display the Android status bar/title bar.
If you want your application to run in fullscreen mode and hide the Android status/title bar, select Project > Options > Version Info and change the value of the theme key to No TitleBar.
For more information, see Version Info.
Settings for Virtual Keyboard in TEdit and TMemo Controls
On mobile platforms that support virtual keyboards, the virtual keyboard automatically displays when a TEdit or TMemo control is displayed.
To enable the user to hide the virtual keyboard by clicking the Return key, set KillFocusByReturn = True.
Using Icons and Images in Multiple Resolutions
- On Android, the following resolutions are supported:
- 1x, 1.5x, 2x, 3x (Small, normal, large, extra large)
- On iOS, the following resolutions are supported:
- 1x and 2x (Non-Retina and Retina)
Multiple resolutions can be supported by creating a MultiResBitmap using the MultiResBitmap Editor. For more information, see Using Multi-Resolution Bitmaps.
- MultiResBitmap supports the following resolutions on Android: 1x, 1.5x, 2.5x
- (iOS supports 1x and 2x)
Loading and Deploying Files
When you deploy your application for the Android target platform, if you plan to provide files along with your application to load those files at run time, you must first decide whether you want to have them on the internal device memory or on a external memory (for example, an SD card). After you decide, use the Deployment Manager to place those files in the assets\internal (internal) or assets (external) folder during deployment.

Use the following code to locate those files at run time:
Delphi:
TPath.Combine(TPath.GetDocumentsPath, 'filename')  { Internal }
TPath.Combine(TPath.GetPublicPath, 'filename')  { External }
C++:
System::Ioutils::TPath::Combine(System::Ioutils::TPath::GetDocumentsPath(), L"filename") // Internal
System::Ioutils::TPath::Combine(System::Ioutils::TPath::GetPublicPath(), L"filename") // External
In this example, filename is the name of your file, such as 'dbdemos.gdb' in the screenshot above. The TPath record is declared in System.IOUtils unit, so you need to add System.IOUtils in the uses clause.
Using 'assets\internal' as the value of the 'Remote Path' column of a given entry on the 'Deployment Manager' dockable window only causes that entry's local file to end up being stored as the 'assets/internal/<REMOTE-FILE-NAME>' entry in the generated APK file.
During the application deployment, the '.\assets\internal\<REMOTE-FILE-NAME>' file path is recorded in the '<PROJECT-ROOT-DIR-PATH>\Android64\Debug\<PROJECT-NAME>\assets\deployinfo\deployedassets.txt' file and so the 'FMX.StartUpCopy' unit can leverage it, during the application startup, to detect all files that are meant to be copied to the 'application's internal storage'.
The following table contains an example of the 'FMX.StartUpCopy' unit in action:
| Files on the Windows device | <PROJECT-ROOT-DIR-PATH>\Android64\Debug\VideoPlayerTest\assets\internal\Kayaking.mp4
<PROJECT-ROOT-DIR-PATH>\Android64\Debug\VideoPlayerTest\assets\internal\Ocean.mp4 |
| Files on the Android device | /data/user/0/com.embarcadero.VideoPlayerTest/files/Kayaking.mp4
/data/user/0/com.embarcadero.VideoPlayerTest/files/Ocean.mp4
|
| Return of the TPath.GetDocumentsPath function | /data/user/0/com.embarcadero.VideoPlayerTest/files |
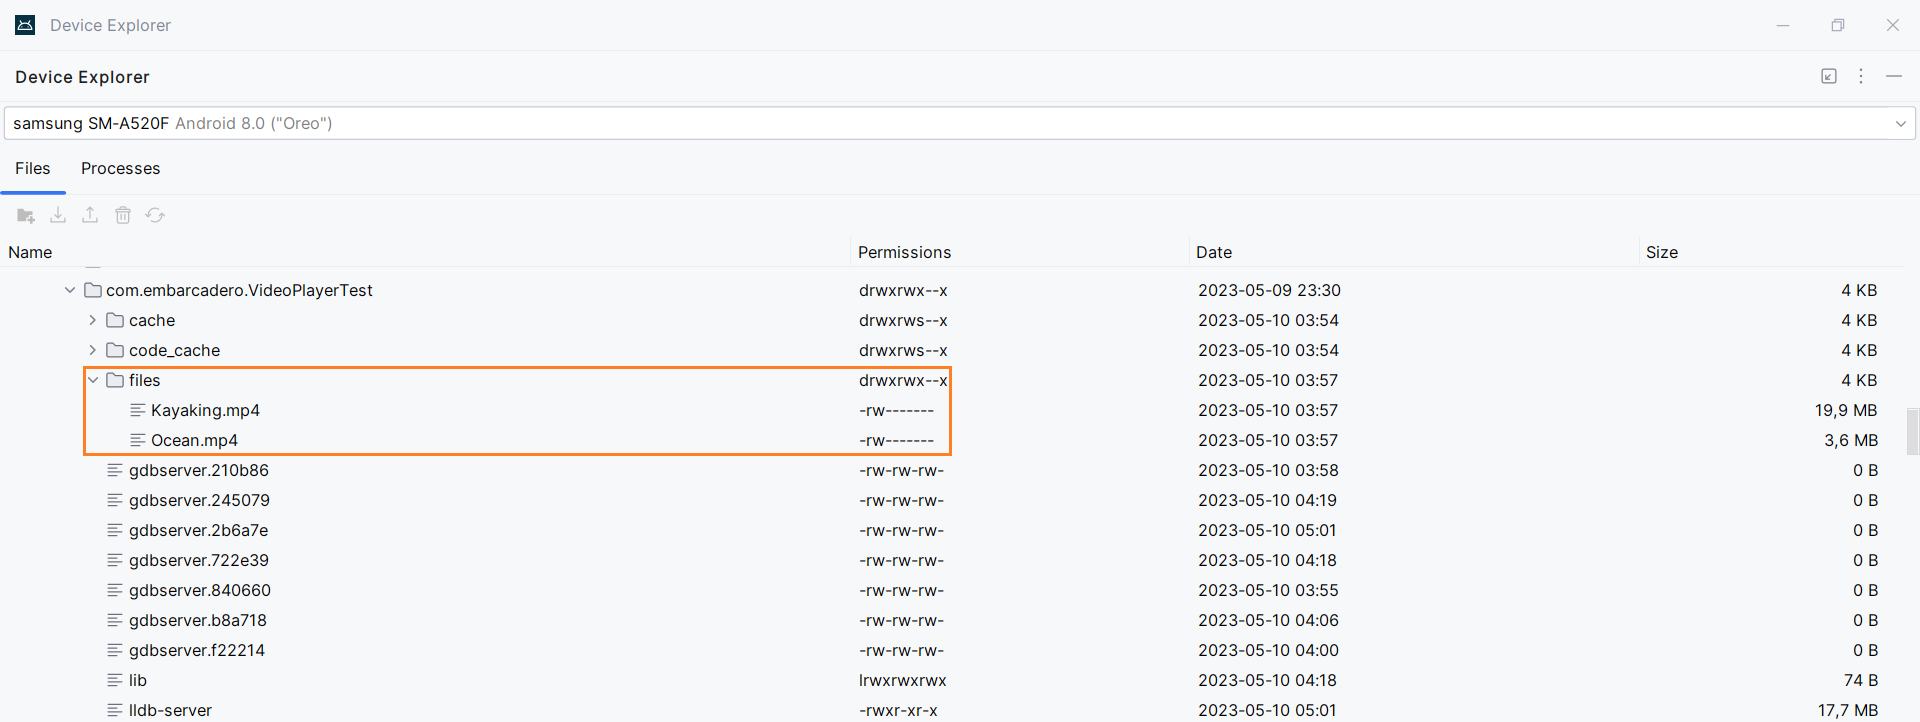
When you copy an asset file to the 'application's internal storage' it enables that file to be accessed through an absolute file path, as asset files are originally accessible only through methods of the 'AssetManager' native class.
Another benefit is to bypass the compression of the original asset file. Observe that some native APIs are meant to operate on non-application-specific files and, therefore, can incorrectly report files from the 'application's internal storage' as inaccessible or absent.
Creating Applications for Google Glass
The Form Designer provides a Google Glass view, which enables you to create apps for Google Glass:

If you are creating an app for Google Glass, use the custom Google Glass style that RAD Studio provides:
C:\Users\Public\Documents\Embarcadero\Studio\23.0\Styles\Android\GoogleGlass.fsf
The Google Glass style is optimized for the Google Glass user interface and resolution.
For steps to follow in using the Google Glass style in your FireMonkey apps, see Adding a Custom Style to Your Mobile Application.
For general information about developing applications for Google Glass using RAD Studio, see First Steps with Google Glass.
Creating Applications for Android Smart Watches
The Form Designer provides two different views for Android smart watches: the Sony SmartWatch 3 and the Motorola Moto 360. Both views cover the typical shapes of the Android smart watches. Therefore, you can define the most suitable design depending on the smart watch where the application is running. You can also create your own custom views for other devices, including additional Android smart watches.

The Multi-Device Preview window provides a design time view of what your application is going to look like on four different Android smart watches, in addition to a wide range of other devices.

If you are creating an app for an Android smart watch, RAD Studio provides the Android Wear style, which is optimized for the user interface and different resolutions of Android smart watches.
The Android Wear style is available at C:\Users\Public\Documents\Embarcadero\Studio\23.0\Styles\Android\Androidwear.fsf.
For general information about developing applications for Android smart watches using RAD Studio, see Creating an Android Smart Watch App with RAD Studio.
Implementing Android-Specific Features
The following topics describe how to implement some Android-specific features in your applications:
- Creating Android services
- Using the Google Play In-app Billing Service
- Using the AdMob Service
- Using 9-patch Images
Find documentation about other, platform-agnostic features in the FireMonkey Applications Guide.
See Also
- Rules for Naming Multi-Device Projects and Files
- Migrating Delphi Code to Mobile from Desktop
- Migrating C++ Code to Mobile from Desktop
- Multi-Device Application Templates
- Mobile Tutorials: Mobile Application Development (iOS and Android)
- Configuring Your System to Detect Your Android Device
- Creating a FireMonkey Component (Delphi)
- FireMonkey Application Design
- Creating an iOS App
Samples
- FireMonkey Device Info sample