Tutorial: Using LiveBindings and DataModules with the Metropolis UI
Go Up to Database and LiveBindings Tutorials
This tutorial will guide you through the steps of connecting data to the FireMonkey Metropolis UI Grid Template. This tutorial consists of populating the GridView Listboxes with data that is linked to the DetailView, and adding navigational buttons using actions to navigate through data on the DetailView form.
Contents
Step 1: Creating the Project
Create a new project. Select File > New > Other > Delphi Projects > FireMonkey Metropolis UI Application and select Grid Metropolis UI Application from the wizard that opens.
- Right-click your project name (for instance Project1.exe) in the Projects Window and select Add New > Other.

- From the Delphi Projects | Delphi Files page, select Data Module.

- Rename the Data Module unit in the Projects Window to DataModule.pas.
- Open the GridView.pas unit and go to File > Use Unit and select DataModule.pas. This operation is identical to manually adding DataModule.pas to the Uses clause of the GridView.pas unit.
- Similarly, add the DataModule.pas unit to the uses clause of the DetailView.pas unit.
- Open the DataModule.pas unit and add a TPrototypeBindSource component from the Tool Palette.
- Right-click the PrototypeBindSource1 component and select Add Field command.
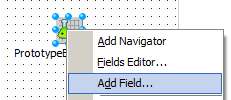
- Multiselect some items to add multiple fields of sample data. Make sure you select BitmapNames and Bitmaps among other items.
- Return to GridView.pas and select the ListBox1 control (make sure not to select the individual MetroListBoxItem items).
- Go to the View menu and choose the LiveBindings Designer command to bring up the LiveBindings Designer. If you do not see the Data Module in the LiveBindings Designer, right-click in the designer and select the Refresh Designer command.


Step 2: Creating the LiveBindings
In the LiveBindings Designer:
- Bind
DataModule1.PrototypeBindSource1.BitmapName1toListBox1.ItemText.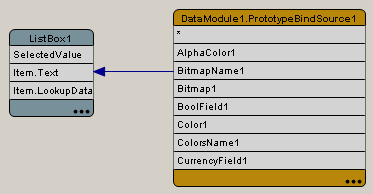
- Select your new LiveBinding by clicking it in the Designer.
- In the Object Inspector, go to
ListItemStyleand select MetropolisUI from the drop-down menu.
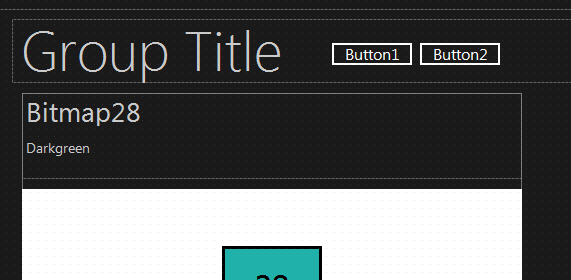
At this moment the items in the ListBox1 control are automatically populated with data through LiveBindings. - Bind
DataModule1.PrototypeBindSource1.ColorsName1toListBox1.Item.SubTitleDataModule1.PrototypeBindSource1.Bitmap1toListBox1.Item.Icon.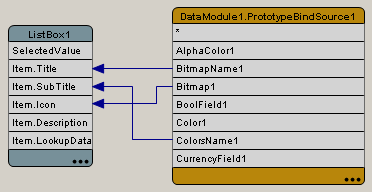
The items in the ListBox1 update once again. - Add new fields in the TPrototypeDataSource1 component from the DataModule.pas unit and repeat the four steps above for the other list boxes (ListBox2 and ListBox3).


Save your project at this point and continue with the following steps:
- Open the DetailView.pas unit and bind
DataModule1.PrototypeBindSource1.Bitmap1toIllustration1.Bitmap.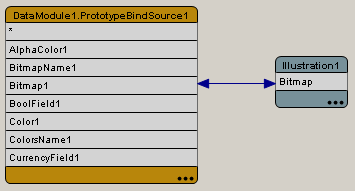
- Bind
DataModule1.PrototypeBindSource1.ColorsName1toItem.SubTitle.Text,DataModule1.PrototypeBindSource1.BitmapName1toItemTitle.Text.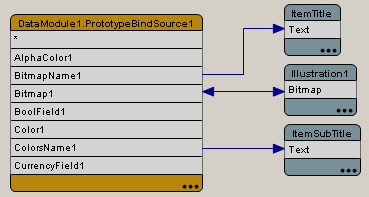


Save your files once again. Return to the GridView.pas unit and select the ListBox1 control. Go to the Object Inspector, and set up an OnChange event with the following code:
begin
  if ListBox1.ItemIndex <> -1 then
  begin
    DataModule1.PrototypeBindSource1.ItemIndex := ListBox1.ItemIndex;
    Application.GetDeviceForm('DetailView').Show;
  end;
end;
Repeat this procedure for the other two list boxes (ListBox2 and ListBox3).
Return to the DetailView.pas unit and:
- Add two buttons on the form. Place them at your convenience.
- From the Tool Palette add a TActionList component to the form.
- For Button1, go to the Object Inspector and search the
Actionproperty. From the drop-down menu select New Standard Action > LiveBindings and choose TFMXBindNavigatorPrior.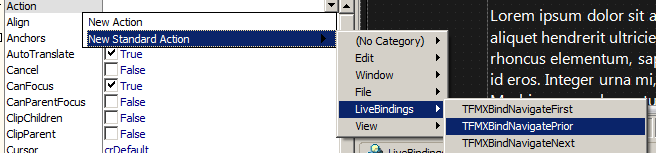
Now expand the action in the Object Inspector and double-click theDataSourceproperty.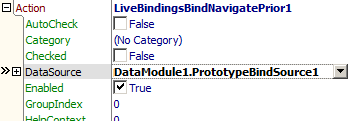
This automatically sets the DataModule1.PrototypeBindSource1 component. - For Button2, go to the Object Inspector and search the
Actionproperty. From the drop-down menu select New Standard Action > LiveBindings and choose TFMXBindNavigatorNext. Now expand the action in the Object Inspector and double-click theDataSourceproperty. This automatically sets the DataModule1.PrototypeBindSource1 component. - For each of the two buttons, now clear the button action's
Textproperty and the button'sTextproperty. - For Button1, set the
StyleLookupproperty to flipviewleftbutton, while for Button2, set the same property to flipviewrightbutton. The buttons should change appearance.


The Results
Run the Application by pressing F9 or using the Run > Run menu command.
Select individual items and observe how LiveBindings automatically provide data to the items in the Grid/Detail views.

