Running Your Android Application on an Android Device
Go Up to Android Mobile Application Development
Contents
- 1 The View Selected at Runtime Depends on the Target Device
- 2 Running Your Application with Clean Data and Cache Folders
- 3 Troubleshooting
- 3.1 Unable to install <APK file>. Failure [INSTALL_FAILED_CONTAINER_ERROR]
- 3.2 Stuck at "Uninstalling" on the Run Dialog Box
- 3.3 Workaround for Android 4.0/Kindle Fire Message: "Application does not support this device"
- 3.4 Android Console App Must Provide a Pause at Startup
- 3.5 Cannot Deploy Android Apps if File Name Contains Unicode
- 3.6 Manually Uninstall an Android Application
- 3.7 Debugging Does Not Start or Breakpoints Are Ignored
- 3.8 Debugging Does Not Detect When App Exits
- 4 See Also
After you prepare your development system for Android development, enable USB debugging in your Android device and configure your system to detect your Android device, you can run a multi-device application on a connected Android device.
- Connect your Android device to your development system using your device's USB cable.
- You should see your Android device listed under Portable Devices in the Device Manager (available from the Control Panel).
- For more information, see Configuring Your System to Detect Your Android Device.
- In RAD Studio, select either File > New > Multi-Device Application - Delphi or File > New > Multi-Device Application - C++Builder.
- In the Project Manager, activate (double-click) the Android target platform.
- Enable the Android SDK for your device:
- In the Project Manager, right-click the Android node and select Properties.
- In Platform Properties, click the down-arrow in the SDK (Software Development Kit) field and select either:
- Your installed Android SDK version, if it is displayed
- Add New
- In the Add a New SDK dialog box, click the down-arrow in the Select an SDK version field and select your installed Android SDK.
- Complete the fields in the Create a New Android SDK wizard. Most of the fields are completed automatically by the wizard.
- Enable your Android device as the target platform: In the Android target platform in the Project Manager, open the Target node and double-click your Android device.
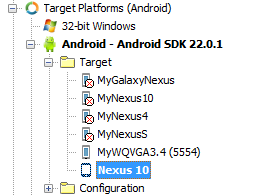
- When your Android device is correctly installed, the SDK version number appears after the Android target name; for example:
- Android - Android SDK 22.0.1
- Tips: If your device is not shown, try these steps:
- In the IDE, right-click the Target node and select Refresh.
- In the Control Panel, open the Device Manager:
- Verify that your Android device is listed, typically under Portable Devices.
- If your device is not listed, right-click any node and select Scan for hardware changes.
- If necessary, use the Android SDK Manager to uninstall and then reinstall the device driver for your Android device. Select Start | All Programs | Embarcadero RAD Studio Athens | Android Tools.
- The following image shows a populated Android Target node displaying the Nexus 10 device:
- When your Android device is correctly installed, the SDK version number appears after the Android target name; for example:
- If you selected the Application Store platform configuration on the Configuration node of the Project Manager, you must have a signing certificate configured for the Application Store platform configuration on the Provisioning page. The Development platform configuration does not require a signing certificate.
- Run your application:
- Run with debugging (Run > Run or
F9) - Run without debugging (Run > Run Without Debugging or
Shift+Ctrl+F9).
- Run with debugging (Run > Run or

RAD Studio builds your application for Android and runs your application on the selected Android device. If your Android device screen is locked, unlock it to access your application.
The View Selected at Runtime Depends on the Target Device
In developing an Android app, you can specify views in the Form Designer if you want to target different devices.
When your application is run on an Android device, the runtime will query the device to determine the size and pixel density of the display. Then the runtime looks at the available views in your application to determine the view that is the closest match. This view is selected and resized to match the exact size specified by the device.
To see the algorithm used in selecting views and the range of sizes that match each Android view, see Using FireMonkey Views.
For details about FireMonkey views, see:
Running Your Application with Clean Data and Cache Folders
When you run an application on an Android device, RAD Studio installs your application on your device using the package name that you defined in the Version Info options page to uniquely identify your application. By default, the package name is com.embarcadero.$(ModuleName), where $(ModuleName) is the name of your project, such as "Project1".
If you run your application on a device that already contains a previously-installed application with the same package name as the application that you want to run, the Run command reinstalls your application, but updates only the application executable; your application's data and cache folders are not updated. This preserving of the data and cache folders can be a problem during development, when you need to debug/deploy successive iterations of your app.
You can configure RAD Studio so that the Run Without Debugging and Run actions completely uninstall any previously-installed version of your application, including the data and cache folders. To do this, before installing the newer version, use the following steps:
- Select Run > Parameters.
- Enter "-cleaninstall" in the Parameters field:
- Click OK to save your changes.

Troubleshooting
Unable to install <APK file>. Failure [INSTALL_FAILED_CONTAINER_ERROR]
Select Project > Options > Version Info and change the value of "installLocation" to auto.
See What does this mean: Failure [INSTALL_FAILED_CONTAINER_ERROR]? for more information and alternative solutions.
Stuck at "Uninstalling" on the Run Dialog Box
You might need to enable USB debugging specifically for your computer if you are running Android 4.2.2 or later and when you click Run or Run Without Debug, RAD Studio does not go beyond the following screen:

You might also need to enable the general USB debugging setting in your device. If this is the case, your device should show a dialog box asking you to allow USB debugging:

Click OK to allow USB debugging.
If you accidentally click Cancel, disconnect your device from your PC and then reconnect it to make the dialog box reappear on your device.
Workaround for Android 4.0/Kindle Fire Message: "Application does not support this device"
When you try to run an Android app on a device running Android 4.0.x (including some Amazon Kindle Fire devices), you might see this message:
Application does not support this device
To workaround this issue:
- In the IDE, open the Deployment Manager (Project > Deployment), and locate the following entry:
- Local Name: libnative-activity.so
- Remote Path: library\lib\armeabi\
- Uncheck the entry to prevent deployment of this file.
Android Console App Must Provide a Pause at Startup
When you run an Android console app, the app might run to completion before the debugger can start. To avoid this issue, we suggest that you add a sleep command at the beginning of your code. For example:
sleep(3000)
The sleep number (specified in milliseconds) that works for your app is dependent on your target device's overall performance; that is, slow hardware requires more waiting time.
Cannot Deploy Android Apps if File Name Contains Unicode
An Android app might not start on the device if the deployment contains a file with Unicode characters. For example, if you add a file named 'test試験.txt' to an Android deployment, only a black screen appears and the app closes. This happens because a file with Unicode characters in the file name is ignored and is not added to the Android .apk file. The app fails because of the incomplete deployment.
Manually Uninstall an Android Application
To manually uninstall an Android application:
- Go to the settings menu on your device: Settings > Apps or Application manager (this may differ depending on your device).
- Touch the application that you want to uninstall.
- Touch
uninstall.
Debugging Does Not Start or Breakpoints Are Ignored
You may experience that in some specific situations the debugging does not always start or your breakpoints are ignored. The reason may be that the value of the installLocation parameter in the application manifest file is set to preferExternal. You can change this parameter in the IDE in Project > Options > Version Info. Set it to auto and make sure that there is sufficient free space on the internal storage (otherwise the application installs on the external storage).
Debugging Does Not Detect When App Exits
It may appear that the debugger is unable to detect that your application has exited, but this is normal. Every Android application runs in its own Linux process which will continue running until it is no longer needed and the system needs to reclaim its memory (for more information, see https://developer.android.com/guide/topics/processes/process-lifecycle.html). Because the application's process keeps running, it may appear that the debugger itself has hung, when in fact the debugger is continuing to debug the process which is still running. To end this process in the debugger, click Terminate.