Animations
Controls can be animated as a response to client-side events. In this page you will learn how to define animations, and how to associate them to your controls.
Contents
Definition
Before you can associate an animation to a control, you must define the animation.
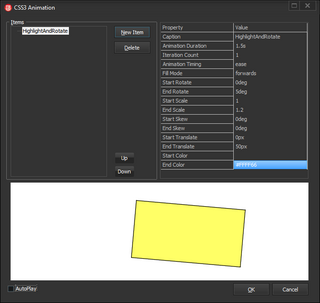
Animations are defined using an Animation component. You can use its Items property to define a series of animation that you can later associate to your controls. For that, HTML5 Builder provides a property editor where you can visualize your animations as you define them.
Each animation might have the following properties:
- Caption. A valid identifier for the animation. You will need it if you define more than one animation in this instance of the component (only one animation without identifier is allowed).
- Animation Duration. Duration of the animation. For example: 2s (2 seconds).
- Iteration Count. Number of times the animation should be repeated before it finishes. You can use an integer number (for example, 3).
- Animation Timing. Speed curve of the animation. The following values are supported:
- ease. The animation goes slower during the start and the end.
- linear. The speed of the animation is the same from the start to the end.
- ease-in. The animation goes slower during the start.
- ease-out. The animation goes slower during the end.
- ease-in-out. The animation goes slower during the start and the end.
- Fill Mode. When are the effects of the animation apparent. The following values are supported:
- none. The effects of the animation are only apparent during the animation.
- forwards. The last keyframe of the animation is still applied once the animation finishes.
- Rotation:
- Start Rotate. Initial angle. For example: 90deg for a right angle.
- End Rotate. Final angle.
- Escalation:
- Start Scale. Initial scale. It must be specified as a floating-point value, where 1 is the normal scale. For example: 0.5 for half the size of the control.
- End Scale. Final scale.
- Skewing:
- Start Skew. Initial horizontal skew angle. For example: 60deg.
- End Skew. Final horizontal skew angle.
- Translation:
- Start Translate. Initial horizontal translation. For example: 80px.
- End Translate. Final horizontal translation.
- Color:
- Start Color. Initial color. For example: green. It can be specified as a web color.
- End Color. Final color.
Association
Once you have one or more Animation components with animations defined, you can associate them to your controls.
The association between an animation and a control is performed in the Animations property of the control that triggers the animation when it is interacted with, as opposed to the control that is actually animated. For example, to animate a Label when a Button is clicked, you would associate the Label with the target animation using the Button’s Animations property. This way, you can get the same event to animate several controls.
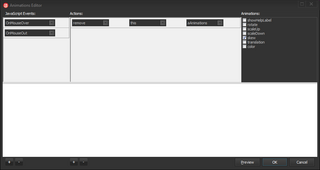
Select the triggering control on the Designer, and from the Object Inspector, double-click the value of the Animations property to open the animations editor.
It is important to understand that animations are not something that you just trigger on a control. You add an animation to a control, and as a result the animation is triggered on the control. To trigger the animation again, first you need to remove the animation from the control, and then add it back.
Also, you cannot use the same event to add and remove the same animation. If the control had the animation before the event, and it has the animation after the event, it does not matter whether you removed or not the animation during the event. For example, if in the OnClick event of a button you remove an animation and add it back, clicking on the button the first time (when the animation has not yet been added to the button), the animation will work; the following times, since the button has the animation both when the event starts and when the event ends, the animation won’t be triggered. Instead, you must use different events to add and remove the same animation. To get the button to trigger an animation upon click, add the animation during the OnMouseDown event, and remove it during the OnMouseDown event.
Once you understand what it means to add and remove an animation, using the editor is simple.
- Add events to the list of JavaScript Events.
- For each event:
- Select the event.
- Add actions to the list of Actions.
- For each action:
- Select the type of action: add, remove or toggle (adds the animations if the control does not have it, removes it otherwise).
- Select the name of the control the animation will be added or removed from. You can use this to select the same control that triggers the action, that whose Animations property you are editing.
- Select the Animation component that contains the animations that will be added or removed.
- In the right-side column, under Animations, mark the checkboxes of the target animations (those to be added or removed).
You can repeat the steps above as many times as you see fits, the limit is defined by the available events.
Help Resources
Tutorials
- HTML5 CSS3 Animations Tutorial, by Al Mannarino.
Video Tutorials
- HTML5 Builder CSS3 Client Side Animations and Mobile Themes.
- 2:00 — Rotating a Button.
Sample Applications
In the following folders inside the sample applications directory you will find projects covering this component:
- Components\Animation. It showcases several controls with all the available types of animations associated.

