オーディオの録音
チュートリアル:FireMonkey のオーディオ/ビデオ機能 への移動
このチュートリアルでは、FireMonkey を使ってオーディオ メディア データを記録する方法を説明します。
サポート対象のファイル形式
プラットフォームに応じて、以下の形式でメディア ファイルを保存し使用することをお勧めします。
.wav(Windows の場合).caf(iOS および macOS の場合).3gp(Android の場合)
MP3 ファイルなど、他の種類のメディア ファイルを再生することもできます。
フォームの設計
- [ファイル|新規作成|マルチデバイス アプリケーション|空のアプリケーション]を選択します。
- TGridLayout をフォームに追加します。このレイアウトを選択した状態で、[オブジェクト インスペクタ]で以下のように設定します。
- 2 つの TFlowLayout オブジェクトを TGridLayout に追加します(2 つ目のフロー レイアウトは次のチュートリアル「オーディオ ファイルの再生」で使用します)。
- 1 つ目の TFlowLayout に以下を追加します。
- 2 つのボタンの名前を「RecordButton」および「StopButton」に変更します。
- StopButton の Enable プロパティを False に設定して無効にします。
- TSaveDialog をフォームに追加します。
- TImage を追加します。TImage の Bitmap プロパティを、録音処理を示す画像に設定します。録音処理に通常使われるアイコンは赤い丸です。
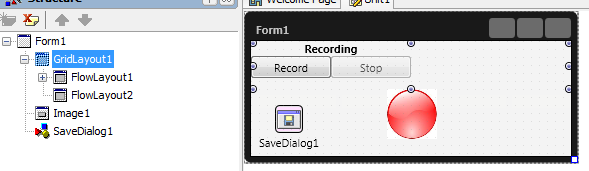
- フォームは次のようになります。

実装
- 1. FMX.Media ユニットをインクルードします。
Delphi の場合:
// Delphi version of the implementation
uses
 FMX.Media;
C++ の場合:
// C++ version of the implementation
#include <FMX.Media.hpp>
- 2. Mic という TAudioCaptureDevice 型の public メンバを TForm1 クラスに宣言します。
Delphi の場合:
type
  TForm1 = class(TForm)
   // ...............
  public
    Mic: TAudioCaptureDevice;
C++ の場合:
  class TForm1 : public TForm
  // ...............
  public:
    TAudioCaptureDevice *Mic;
- 3. 画像の Opacity プロパティを
0に設定します。この画像は、録音処理が開始したときにのみ表示されます。 - 4. [Record]ボタンをダブルクリックして、OnClick イベント ハンドラを追加します。
Delphi の場合:
procedure TForm1.RecordButtonClick(Sender: TObject);
begin
  //Get the default microphone
  Mic := TCaptureDeviceManager.Current.DefaultAudioCaptureDevice;
  if Mic <> nil then
  begin
    //Set the SaveDialog filter to choose only the supported extension
    SaveDialog1.Filter :=  Mic.FilterString;
    if SaveDialog1.Execute then
    begin
      RecordButton.Enabled := false;
      StopButton.Enabled := true;
      //Gets the name of the file where to save the recorded data
      Mic.FileName := SaveDialog1.FileName;
      Mic.StartCapture;
      Image1.Opacity:=1;
    end;
  end
  else
  begin
    ShowMessage('Audio capturing device not available');
  end;
end;
C++ の場合:
void __fastcall TForm1::RecordButtonClick(TObject *Sender)
{
  //Get the default microphone
  Mic = TCaptureDeviceManager::Current->DefaultAudioCaptureDevice;
  if (Mic != NULL)
  {
    //Set the SaveDialog filter to choose only the supported extension
    SaveDialog1->Filter = Mic->FilterString;
    if (SaveDialog1->Execute())
    {
      RecordButton->Enabled = 0;
      StopButton->Enabled = 1;
      //Gets the name of the file where to save the recorded data
      Mic->FileName = SaveDialog1->FileName;
      Mic->StartCapture();
      Image1->Opacity = 1;
    }
  }
  else
    ShowMessage("Audio capturing device not available.");
}
- 5. [Stop]ボタンをダブルクリックして、OnClick イベント ハンドラを[Stop]ボタンに追加します。
Delphi の場合:
procedure TForm1.StopButtonClick(Sender: TObject);
begin
  if (Mic <> nil) and (Mic.State = TCaptureDeviceState.Capturing) then
  begin
    Mic.StopCapture;
    Image1.Opacity := 0;
    StopButton.Enabled := false;
    RecordButton.Enabled := true;
  end;
end;
C++ の場合:
void __fastcall TForm1::StopButtonClick(TObject *Sender)
{
  if ((Mic != NULL) && (Mic->State == TCaptureDeviceState::Capturing))
  {
    Mic->StopCapture();
    Image1->Opacity = 0;
    StopButton->Enabled = 0;
    RecordButton->Enabled = 1;
  }
}
アプリケーションの実行
- 1. プロジェクトを実行するには、F9 キーを押します。
- 2. オーディオ データの録音を開始するには、[Record]ボタンを押します。SaveDialog が開きます。
- 3. 録音したデータを保存するパスとファイル名を選択します。
- 4. 録音を停止するには、[Stop]ボタンを押します。StopCapture メソッドを呼び出して録音を終了しなければ、メディア プレーヤーで再生しようとしたときに保存ファイルが正しくデコードされません。
前のトピック
次のトピック
関連項目
- FireMonkey コンポーネントの作成(Delphi)
- FireMonkey コンポーネントの作成(C++)
- HD マルチデバイス アプリケーション
- FireMonkey のレイアウト戦略
- FireMonkey でのオーディオ/ビデオ