チュートリアル:LiveBinding を使用してコレクション リストを作成する
データベースおよび LiveBinding のチュートリアル への移動
このチュートリアルでは、サンプル プロジェクト ListCollections で使われているアプリケーションの構築方法を説明します。
メモ: サンプル プロジェクト ListCollections は、
[スタート|プログラム|Embarcadero RAD Studio Sydney|サンプル]を選択し、Object Pascal\FireMonkey Desktop\ListCollections に移動すると、そこにあります。
このサンプルの説明は、FMX.ListCollections サンプルにあります。
目次
ステップ 1:プロジェクトの作成
- 新規プロジェクトを作成します。[ファイル|新規作成|マルチデバイス アプリケーション - Delphi]を選択します。
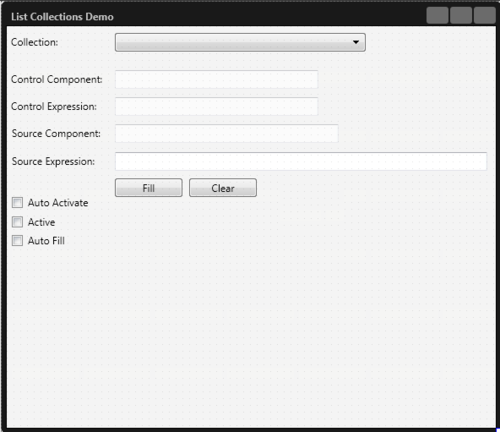
ウィザードで[空のアプリケーション]を選択します。 - フォームを選択し、[オブジェクト インスペクタ]でその Caption プロパティを「List Collections Demo」に変更します。
- TLabel コンポーネントを 1 つフォームに追加し、[オブジェクト インスペクタ]でその Text プロパティを「Collection: 」に変更します。
- [ツール パレット]で ComboBox コンポーネントを見つけてフォームにドロップします。
-
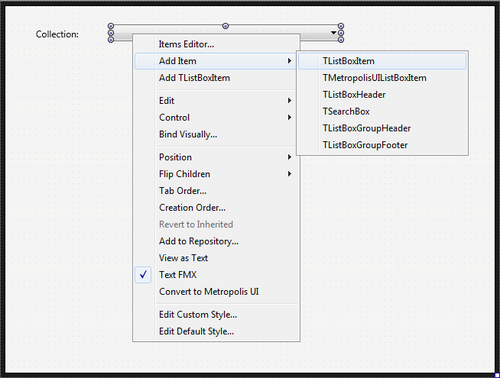
フォーム デザイナで ComboBox1 コンポーネントを右クリックし、[項目の追加|TListBoxItem]を選択します。
-
TLabel コンポーネントを 4 つフォームに追加し、それぞれのコンポーネントの Text プロパティを次のように変更します。
「Control Component:」、「Control Expression:」、「Source Component:」、「Source Expression:」
また、Name プロパティをそれぞれ次のように変更します。
「LabelControlComponent」、「LabelControlExpression」、「LabelSourceComponent」 -
ラベル("LabelControlComponent"、"LabelControlExpression"、"LabelSourceComponent")それぞれについて、TEdit コンポーネントを 1 つ追加し、その Name プロパティをそれぞれ次のように変更します。
「EditControlComponent」、「EditControlExpression」、「EditSourceComponent」
また、すべての TEdit の Enabled プロパティをFalseに設定します。 - TEdit コンポーネントを 1 つフォームに追加し、Name プロパティを「EditSourceExpression」に変更します。
-
TButton コンポーネントを 2 つフォームに追加し、Text プロパティを「Fill」および「Clear」に変更します。
また、Name プロパティを「ButtonEvaluate」および「ButtonClear」に変更します。 -
TCheckBox コンポーネントを 3 つフォームに追加し、それぞれの Text プロパティを次のように変更します。
「Auto Active」、「Active」、「Auto Fill」
また、Name プロパティをそれぞれ次のように変更します。
「CheckBoxAutoActive」、「CheckBoxActive」、「CheckBoxAutoFill」
- [ツール パレット]で TListBox コンポーネントを見つけてフォームにドロップします。
- TBindingList コンポーネントを 1 つフォームに追加します。
- フォーム上で BindingList1 コンポーネントを右クリックし、[バインディング コンポーネント...]を選択します。
-
バインディング リスト エディタで、[バインディングの新規作成]を選択します。

- [LiveBinding の新規作成]ダイアログ ボックスで、[リスト|TBindList]を選択します。
-
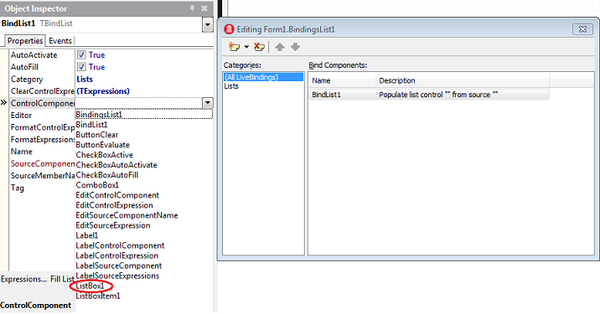
[オブジェクト インスペクタ]で、Control Component プロパティを
ListBox1に設定します。


ステップ 2:実装
- SampleCollections.pas ユニットでは、LiveBinding によってリスト ボックスにエクスポートされる、追加のサポート対象要素のコレクションを実装します。このサンプルでは、クラス Factory デザイン パターンを使って、次のようなさまざまな種類のコレクションを動的に構築します。
-
- ディクショナリ
- オブジェクトのリスト
- ジェネリックのリスト
- 文字列のリスト
- 製品のサンプル ListCollections は、初心者向けではありません(高度な知識が必要です。コードを理解するには、RTTI のほか、無名メソッドやデザイン パターンといった高度な言語要素を知っている必要があります)。
SampleCollections.pas ユニットをプロジェクトに追加する
TForm1 クラスの private セクションに以下の変数を追加します。
Delphi の場合:
FChecking: Boolean;
FDataObjects: TDictionary<TCollectionFactory, TObject>;
FFactory: TCollectionFactory;
FChanging: Boolean;
ユニットに以下の変数を追加します。
Delphi の場合:
var
  BindScope1: TBindScope;
1. フォームの OnCreate イベント ハンドラを追加する
-
- 1. [構造]ビューで、Form1 コンポーネントを選択します。
- 2. [オブジェクト インスペクタ]で[イベント]タブを開き、OnCreate をダブルクリックします。
- 3. コード エディタで以下のコードを追加します。
Delphi の場合:
procedure TForm1.FormCreate(Sender: TObject);
var
  LFactory: TCollectionFactory;
  LListItem: TListBoxItem;
begin
  BindScope1 := TBindScope.Create(Self);
  BindList1.SourceComponent := BindScope1;
  FDataObjects := TObjectDictionary<TCollectionFactory, TObject>.Create([doOwnsValues]);
  // テスト データのリストをコンボ ボックスに追加する
  for LFactory in GetCollectionFactories do
  begin
    LListItem := TListBoxItem.Create(ComboBox1);
    ComboBox1.AddObject(LListItem);
    LListItem.Text := LFactory.DisplayName;
    LListItem.Data := LFactory;
  end;
  Application.OnIdle := OnIdle;
  UpdateDisplayFields;
end;
TForm1 クラスの public セクションに以下の手続きを追加します。
Delphi の場合:
procedure OnIdle(Sender: TObject; var Done: Boolean);;
procedure UpdateDisplayFields;
上記の手続きを次のように実装します。
Delphi の場合:
procedure TForm1.OnIdle(Sender: TObject; var Done: Boolean);
begin
  FChecking := True;
  try
    CheckBoxActive.IsChecked := BindList1.Active;
    CheckBoxAutoFill.IsChecked := BindList1.AutoFill;
    CheckBoxAutoActivate.IsChecked := BindList1.AutoActivate;
  finally
    FChecking := False;
  end;
end;

// バインディングについての情報を表示する
procedure TForm1.UpdateDisplayFields;
var
  LSourceExpression: string;
  LControlExpression: string;
  LSourceComponent: string;
  LControlComponent: string;
begin
  if BindList1.FormatExpressions.Count > 0 then
  begin
    LSourceExpression := BindList1.FormatExpressions[0].SourceExpression;
    LControlExpression := BindList1.FormatExpressions[0].ControlExpression;
  end;
  if BindList1.ControlComponent <> nil then
    LControlComponent := BindList1.ControlComponent.ClassName;
  if BindList1.SourceComponent <> nil then
  begin
    LSourceComponent := BindList1.SourceComponent.ClassName;
    if BindList1.SourceComponent is TBindScope then
      with TBindScope(BindList1.SourceComponent) do
        if DataObject <> nil then
          LSourceComponent := LSourceComponent + ' (' +
            DataObject.ClassName + ')'
      else if Component <> nil then
        LSourceComponent := LSourceComponent + ' (' +
          Component.ClassName + ')';
  end;
  EditSourceExpression.Text := LSourceExpression;
  EditControlExpression.Text := LControlExpression;
  EditControlComponent.Text := LControlComponent;
  EditSourceComponent.Text := LSourceComponent;
end;
2. コンボ ボックスの OnChange イベント ハンドラを追加する
-
- 1. [構造]ビューで ComboBox1 コンポーネントを選択します。
- 2. [オブジェクト インスペクタ]で[イベント]タブを開き、OnChange をダブルクリックします。
- 3. コード エディタで以下のコードを追加します。
Delphi の場合:
procedure TForm1.ComboBox1Change(Sender: TObject);
var
  LDataObject: TObject;
begin
  FChanging := True;
  try
    if ComboBox1.ItemIndex <> -1 then
    begin
      FFactory := ComboBox1.ListBox.Selected.Data as TCollectionFactory;
    end
    else
    begin
      FFactory := nil;
    end;
    if FFactory <> nil then
    begin
      if BindList1.FormatExpressions.Count = 0 then
        BindList1.FormatExpressions.Add;
      BindList1.FormatExpressions[0].SourceExpression := FFactory.GetExpression;
      BindList1.FormatExpressions[0].ControlExpression := 'Text';
      LDataObject := FFactory.CreateCollection;
      FDataObjects.AddOrSetValue(FFactory, LDataObject);  // 使わなくなったら解放できるようオブジェクトを追跡する
      // DataObject は最後に設定する(アクティブ化されて自動設定される可能性があるため)
      BindScope1.DataObject := LDataObject;
    end
    else
      BindScope1.DataObject := nil;
  finally
    FChanging := False;
    UpdateDisplayFields;
  end;
end;
3. ボタンの OnClick イベント ハンドラを追加する
-
- 1. [構造]ビューで ButtonEvaluate コンポーネントを選択します。
- 2. [オブジェクト インスペクタ]で[イベント]タブを開き、OnClick をダブルクリックします。
- 3. コード エディタで以下のコードを追加します。
Delphi の場合:
procedure TForm1.ButtonEvaluateClick(Sender: TObject);
begin
  BindList1Activating(Self); // 式を更新する
  BindList1.FillList;
end;
-
- 4. 上記の手順を ButtonClear についても実行し、コード エディタで以下のコードを追加します。
Delphi の場合:
procedure TForm1.ButtonClearClick(Sender: TObject);
begin
  BindList1.ClearList;
end;
4. チェック ボックスの OnChange イベント ハンドラを追加する
-
- 1. [構造]ビューで CheckBoxAutoActive コンポーネントを選択します。
- 2. [オブジェクト インスペクタ]で[イベント]タブを開き、OnChange をダブルクリックします。
- 3. コード エディタで以下のコードを追加します。
Delphi の場合:
procedure TForm1.CheckBoxAutoActivateChange(Sender: TObject);
begin
  if not FChecking then
    BindList1.AutoActivate := CheckBoxAutoActivate.IsChecked;
end;
-
- 4. 上記の手順を CheckBoxActive および CheckBoxAutoFill についても実行し、コード エディタで以下のコードを追加します。
Delphi の場合:
procedure TForm1.CheckBoxActiveChange(Sender: TObject);
begin
  if not FChecking then
    BindList1.Active := CheckBoxActive.IsChecked;
end;
Delphi の場合:
procedure TForm1.CheckBoxAutoFillChange(Sender: TObject);
begin
  if not FChecking then
    BindList1.AutoFill := CheckBoxAutoFill.IsChecked;
end;
5. BindList の OnActivating および OnEvalError イベント ハンドラを追加する
-
- 1. [構造]ビューで BindList1 コンポーネントを選択します。
- 2. [オブジェクト インスペクタ]で[イベント]タブを開き、OnActivating をダブルクリックします。
- 3. コード エディタで以下のコードを追加します。
Delphi の場合:
procedure TForm1.BindList1Activating(Sender: TObject);
begin
  if not FChanging then
    if BindList1.FormatExpressions.Count > 0 then
      BindList1.FormatExpressions[0].SourceExpression := EditSourceExpression.Text;
end;
-
- 4. [オブジェクト インスペクタ]で[イベント]タブを開き、OnEvalError をダブルクリックします。
- 5. コード エディタで以下のコードを追加します。
Delphi の場合:
procedure TForm1.BindList1EvalError(Sender: TObject; AException: Exception);
begin
  // より詳しい情報を持つ新しい例外を生成する
  raise TBindCompException.CreateFmt(
    'Evaluation Exception'#13#10 +
    'Component Name: %s'#13#10 +
    'Exception Class: %s'#13#10 +
    'Exception Message: %s',
    [TComponent(Sender).Name, AException.ClassName, AException.Message]);
end;
結果
F9 キーを押すか、[実行|実行]を選択します。
使用するクラス
[List Collections Demo]はこのサンプルのメイン ウィンドウです。ここには以下のコンポーネントが含まれます。
- 2 つの TButton オブジェクト
- 4 つの TEdit オブジェクト
- 5 つの TLabel オブジェクト
- 3 つの TCheckBox オブジェクト
- 1 つの TComboBox
- 1 つの TListBox
- 1 つの TBindingsList
- 1 つの TBindScope
- 1 つの TBindList
使用する API
- FMX.StdCtrls.TButton
- FMX.Edit.TEdit
- FMX.StdCtrls.TLabel
- FMX.StdCtrls.TCheckBox
- FMX.ListBox.TComboBox
- FMX.ListBox.TListBox
- Data.Bind.Components.TBindingsList
- Data.Bind.Components.TBindScope
- Data.Bind.Components.TBindList