Tutorial: Connecting to a SQLite Database from a Multi-Device Application on Desktop Platforms
Go Up to Database and LiveBindings Tutorials
This tutorial is a simple Multi-Device Application that shows how to establish a connection to a SQLite database and execute a simple query.
This tutorial uses a database provided by Embarcadero, but you can use any SQLite database available to you. The database used in this tutorial is located at:
- Windows:
C:\Users\Public\Documents\Embarcadero\Studio\19.0\Samples\Data\Employees.s3db. - OS X: You can copy the database provided by Embarcadero to your Mac. Before deploying your application, remember to select OS X as your target platform, and check your Connection Profile.
- Note: The SQLite program comes with OS X from version 10.4 onwards and it is placed in
/usr/bin. To create a database, you can do it just by going to Applications > Utilities > Terminal. Open a terminal window and typesqlite3<database_name>.
The database has one table named Employee and several tuples with fields. We are going to connect to the database and show all the tuples in the Employee table.
Steps
- Create a multi-device application for either Delphi or C++:
- File > New > Multi-Device Application - Delphi > Blank Application
- File > New > Multi-Device Application - C++Builder > Blank Application.
- Activate a target platform on the Project Manager. Multi-device applications support the following platforms:
- 32-bit Windows
- 64-bit Windows
- OS X
- Note: If the target platform that you want is missing from the Project Manager, right-click the Target Platform node to add this target platform to your project. For more information, see Activating and Configuring the Target Platform.
- In the Object Inspector, double-click the onCreate event of the Form and add the following code:
- Delphi:
procedure TDemonstration.FormCreate(Sender: TObject);
begin
  Self.Caption := 'Demonstration';
end;
- C++:
void __fastcall TDemonstration::FormCreate(TObject *Sender) {
	this->Caption = "Demonstration";
}
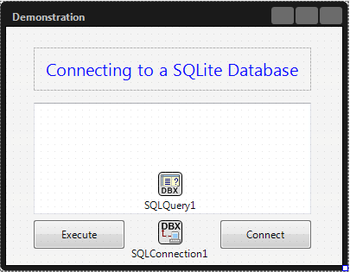
- Add the following components to your form:
- Two TButton controls; from the Object Inspector, set the Name properties of the buttons to
executeButtonandconnectButton, and their Text properties toExecuteandConnect, respectively. - A TSQLConnection control; from the Object Inspector, set the Driver property to
Sqlite. - A TMemo control; from the Object Inspector, set the Name to
outputMemo. - A TSQLQuery control; from the Object Inspector, set the SQLConnection property to
SQLConnection1.
- At this point, your form should look like this:
- Two TButton controls; from the Object Inspector, set the Name properties of the buttons to
- Create a new setParamsToConnect procedure in your unit and add the following code:
- Note: Replace "full_path_to_your_database_file" with the absolute path of your database file.
- Delphi:
procedure TDemonstration.setParamsToConnect();
begin
  //  If Database param does not exist, it adds it. Otherwise, the existing value is overwritten.
  if SQLConnection1.Params.IndexOf ('Database=') = -1 then
    SQLConnection1.Params.Add('Database=full_path_to_your_database_file');
  else
   SQLConnection1.Params.Values ['Database'] := 'full_path_to_your_database_file';
end;
- Note: Do not forget to declare
procedure setParamsToConnect();in theinterfacepart of your source file.
- Note: Do not forget to declare
- C++:
void __fastcall TDemonstration::setParamsToConnect() {
	// Use double backslash in Windows paths, as the backslash character (\) must be escaped with another backslash to be treated literally.
	if (SQLConnection1->Params->IndexOf("Database") == -1) {
		SQLConnection1->Params->Add("Database=full_path_to_your_database_file" );
	}
	else {
		SQLConnection1->Params->Values["Database"] = "full_path_to_your_database_file";
	}

}
- Note: Do not forget to declare
void __fastcall TDemonstration::setParamsToConnect();in theUnit.hfile of your project.
- Note: Do not forget to declare
- In the Object Inspector, double-click the BeforeConnect event of the TSQLConnection component.
- Add the following code to this event handler:
- Delphi:
procedure TDemonstration.SQLConnection1BeforeConnect(Sender: TObject);
begin
   SetParamsToConnect;
end;
- C++:
void __fastcall TDemonstration::SQLConnection1BeforeConnect(TObject *Sender) {
	setParamsToConnect();
}
- Add the following code to the OnClick event handler for the
connectButton.- Delphi:
procedure TDemonstration.connectButtonClick(Sender: TObject);
begin
  try
    // Establish the connection.
    outputMemo.Lines.Clear;
    SQLConnection1.Connected := true;
    executeButton.Enabled := true;
    outputMemo.Text := 'Connection established!';
  except
    on E: EDatabaseError do
      ShowMessage('Exception raised with message' + E.Message);
  end;
end;
- C++:
void __fastcall TDemonstration::connectButtonClick(TObject *Sender) {
	outputMemo->Lines->Clear();
	try {
		SQLConnection1->Connected = true;
		executeButton->Enabled = true;
		outputMemo->Text = "Connection established!";
	}
	catch (EDatabaseError& E) {
		ShowMessage("Exception raised with message" + E.Message);
	}
}
- Add the following code to the OnClick event handler for the
executeButton.- Delphi:
procedure TDemonstration.executeButtonClick(Sender: TObject);
var
  query: String;
begin
  outputMemo.Lines.Clear;
  // A random query
  query := 'SELECT * FROM Employee;';
  try
    // Assign the query to the object SQLQuery1.
    SQLQuery1.SQL.Text := query;
    SQLQuery1.Active := true;
  except
    on E: Exception do
      outputMemo.Text := 'Exception raised with message: ' + E.Message;
  end;
  // Show the results of the query in a TMemo control.
  ShowSelectResults();
end;
- C++:
void __fastcall TDemonstration::executeButtonClick(TObject *Sender) {
	String query;

	outputMemo->Lines->Clear();
	// A random query
	query = "SELECT * FROM Employee;";
	try {
		// Assign the query to the object SQLQuery1.
		SQLQuery1->SQL->Text = query;
		SQLQuery1->Active = true;
	}
	catch (Exception& E) {
		outputMemo->Text = "Exception raised with message" + E.Message;
	}
	// Show the results of the query in a TMemo control.
	ShowSelectResults();
}
- Add the following code for the
ShowSelectResultsprocedure:- Delphi:
procedure TDemonstration.ShowSelectResults();
var
  names: TStringList;
  i: Integer;
  currentField: TField;
  currentLine: string;
begin
  if not SQLQuery1.IsEmpty then
  begin
    SQLQuery1.First;
    names := TStringList.Create;
    SQLQuery1.GetFieldNames(names);
    while not SQLQuery1.Eof do
    begin
      currentLine := '';
      for i := 0 to names.Count - 1 do
      begin
        currentField := SQLQuery1.FieldByName(names[i]);
        currentLine := currentLine + ' ' + currentField.AsString;
      end;
      outputMemo.Lines.Add(currentLine);
      SQLQuery1.Next;
    end;
  end;
end;
- Note: Do not forget to declare
procedure ShowSelectResults();in theinterfacepart of your source file.
- Note: Do not forget to declare
- C++:
void __fastcall TDemonstration::ShowSelectResults()
{
	TStringList* names;
	TField* currentField;
	String currentLine;

	if (!SQLQuery1->IsEmpty()) {
	SQLQuery1->First();
	names = new TStringList;
	SQLQuery1->GetFieldNames(names);
	while (!SQLQuery1->Eof)
		{
		currentLine = "";
		for (int i = 0; i < names->Count; ++i)
		{
			currentField = SQLQuery1->FieldByName(names->Strings[i]);
			currentLine = currentLine + " " + currentField->AsString;
		 }
		 outputMemo->Lines->Add(currentLine);
		 SQLQuery1->Next();
		}

	}

}
- Note: Do not forget to declare
void __fastcall TDemonstration::ShowSelectResults();in theUnit.hfile of your project.
- Note: Do not forget to declare
-
After running your application and clicking the Connect button first, and then the Execute button, your application must look like this:


Note: On Windows, in order to connect to a SQLite database, place the library sqlite3.dll in your system path and verify that sqlite3.dll can be found by your application.
- On 32-bit Windows: C:\Windows\System32
- On 64-bit Windows: C:\Windows\SysWOW64
Uses
- Data.DB.TDataSet
- Data.DB.TField
- System.Classes.TStringList
- Data.SqlExpr.TSQLConnection
- Data.SqlExpr.TSQLConnection.BeforeConnect
- FMX.StdCtrls.TButton
- FMX.Memo.TMemo
- FMX.Controls.TControl.OnClick