macOS Application Development
Go Up to Types of Multi-Device Applications You Can Create
Contents
You can use RAD Studio to create macOS applications, and you can use your Mac as the required intermediate platform for iOS apps.
From the hardware point of view, in addition to the development PC, you need a Mac connected with the development computer (where RAD Studio is installed); for example, using a local area network (LAN). See FireMonkey Platform Prerequisites for a list of system requirements, both for your development PC and for the Mac. See also Working with a Mac and a PC.
The Delphi compiler for macOS 64-bit (Intel) and macOS 64-bit (ARM) is DCCOSX64.
Setting Up Your Development Environment for macOS
- Physical Connection: Ensure that RAD Studio can connect with the target Mac:
- Click Test Connection in the Connection Profile Manager panel.
- However, if the macOS app does not have an assigned connection profile, and you attempt to perform an operation that requires a connection profile, the IDE displays the following message:
A connection profile is required for this operation but has not been assigned.
Would you like to assign or create a profile now?
- Then the IDE guides you through the necessary steps in creating a connection profile. On the Platform Properties dialog, you can assign an existing profile to the target platform, or select Add New to create a new connection profile to assign to the target platform instead.
- Platform Assistant: On the Mac, install the Platform Assistant and run it.
- Target Platform: In the IDE, set the target platform. When you create a Delphi or C++Builder multi-device application, RAD Studio sets Win32 as the default target platform.
- To change the target platform to macOS:
- Right-click the Target Platforms node in the Project Manager.
- Click Add Platform macOS 64-bit (Intel) or macOS 64-bit (ARM).
- The macOS option is unavailable if the application uses VCL (VCL does not support macOS).
- Connection Profile: In the IDE, create and assign a connection profile (a group of settings that characterize the connection to your target machine; see Creating and Testing a Connection Profile on the Development PC).
Developing Your Application
Using Frameworks in Mac Apps
This section describes some aspects of multi-device application development that are specific to macOS 64-bit (Intel) and macOS 64-bit (ARM) target platform. For general multi-device development documentation, see Developing Multi-Device Applications.
RTL
Some RTL units that provide basic functionality are common for Mac and Windows, such as System.pas or System.SysUtils.pas.
A number of RTL units are Mac-only (see Mac Objective-C Frameworks). These units are prefixed with the Macapi or Posix unit scope.
FireMonkey
The FireMonkey framework is ideal for macOS 64-bit (Intel) and macOS 64-bit (ARM) target platform, and it also supports both Win32 and Win64. See FireMonkey Platform Prerequisites.
VCL (not available for Mac)
The VCL is available only on Windows (32-bit or 64-bit).
Mac Objective-C Frameworks (Macapi)
The RTL contains a number of units that provide Delphi interfaces to Mac frameworks written in Objective-C. These units are scoped with Macapi (from Mac API) and typically located in the /source directory of your product installation:
- Macapi.AppKit
- Macapi.AVFoundation
- Macapi.CocoaTypes
- Macapi.Consts
- Macapi.CoreFoundation
- Macapi.CoreGraphics
- Macapi.CoreServices
- Macapi.CoreText
- Macapi.Foundation
- Macapi.ImageIO
- Macapi.Mach
- Macapi.ObjCRuntime
- Macapi.ObjectiveC
- Macapi.OCMarshal
- Macapi.OpenGL
- Macapi.QuartzCore
- Macapi.Security
- Macapi.SystemConfiguration
The FireMonkey framework relies on some of these units.
For help on these API, see the Apple documentation at Mac Developer Library.
Resolving Ambiguities: 'Byte' and 'System::Byte' on macOS
Both Delphi and the OSX SDK headers define the Byte type. Thus, you might run into ambiguity errors when using plain Byte.
For example, the following code:
#include <System.hpp>
DynamicArray<Byte> AByteArray;
results in error E2015 Ambiguity between 'function1' and 'function2' (C++) when compiled for macOS:
Error E2015 t.cpp 2: Ambiguity between 'Byte' and 'System::Byte'
*** 1 errors in Compile ***
To resolve the issue, you should explicitly specify the definition of Byte that you want to use, that is, either of the following:
| Delphi | macOS SDK |
|---|---|
System::Byte |
::Byte |
For example, the following code should compile with no errors:
#include <System.hpp>
DynamicArray<System::Byte> AByteArray;
Exception Handling
System.SysUtils contains a number of exception classes that represent non-language/hardware exceptions. These exception classes derive from EExternal. The following exception categories are covered:
- Floating-point exceptions
- Integer divide exceptions
- CTRL+C, CTRL+BREAK
- Privileged instruction violations
- Memory access violations
On the Mac, most of the EExternal exceptions originate as Mach exceptions. The only ones that do not originate as Mach exceptions are CTRL+C (EControlC) and CTRL+BREAK (EQuit).
If you use assembly routines, then see PC-Mapped Exceptions, Unwinding Assembly Routines.
Processing of Mach Exceptions
For Mach exceptions, the RTL from System.SysUtils creates a thread that listens for exception notifications from the operating system. You just have to include in your code the System.SysUtils unit. When the listening thread receives a Mach exception notification, it transforms the Mach exception into the corresponding Pascal language exception derived from EExternal, as appropriate, and raises/throws the Pascal exception to the user thread that caused the original Mach exception.
If you want to directly work with Mach exceptions, then be aware that, by including System.SysUtils, a dedicated thread is started for listening Mach exceptions. You can investigate the System.Internal.MachExceptions.pas source to make sure you do not interfere with the RTL.
CTRL+C and CTRL+BREAK
For CTRL+C and CTRL+BREAK, the application installs signal handlers. (macOS 64-bit (Intel) and macOS 64-bit (ARM) does not create Mach exceptions for CTRL+C and CTRL+BREAK.)
The SIGINT and SIGQUIT handlers are in conformity with the standards that define the way shell applications must treat CTRL+C and CTRL+BREAK.
We strongly recommend that you do not override the SIGINT and SIGQUIT handlers. However, if you do this, you do not receive EControlC and EQuit exceptions.
Documentation for Mac Libraries
You can obtain the macOS documentation at the macOS Developer Library. RAD Studio does not provide help for the libraries you might need to use on the Mac.
You can also register as a Mac developer (free of charge) at the Mac Dev Center. Being a registered member of the Apple Developer Program enables you to distribute apps in the App Store (this is along with other requirements, such as a developer certificate and a provisioning profile). For more information, see http://developer.apple.com/programs/mac/gettingstarted/
Deploying Your Final macOS Application
Before each release of your macOS application, you should check that every setting is properly configured. See Preparing a macOS Application for Deployment.
To self-distribute your macOS application you can simply build your application and distribute the resulting binaries to your clients. See Distributing Applications Outside the Mac App Store in the Apple documentation for more information.
If you want to publish your application on the Mac App Store, however, you must follow some additional steps. See Submit your application to the Mac App Store for detailed steps.
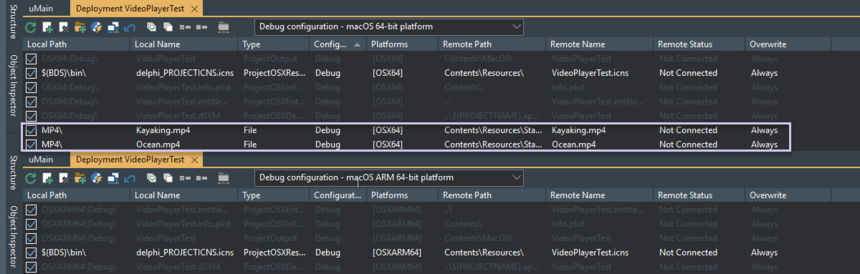
Dealing With The Project Deployment (macOS ARM 64-bit)
When the macOS ARM 64-bit target platform is automatically added to the demo application project, the deployment list for the macOS ARM 64-bit target platform doesn't inherit the non-default entries from the macOS 64-bit target platform. You need to manually add the non-default entries to the project deployment list for the macOS ARM 64-bit target platform. Follow the steps below to do it:
- In the IDE, go to Project > Deployment to open the Deployment tab.
- Compare the entries from All configurations - macOS 64-bit platform against All configurations - macOS ARM 64-bit platform.
- E.g., FMX.Mobile.VideoPlayback sample project.
If you find missing entries in the deployment list for the macOS ARM 64-bit target platform, follow the steps below to add macOS ARM 64-bit:
- Choose All configurations - macOS 64-bit platform from the combo box.
- Click the non-default entries that have OSX64 but do not have OSXARM64 in the Platforms column.
- Click the value in the Platforms column to display the ellipsis button (
 ).
). - Click the ellipsis.
- Select OSXARM64 in the Select Platforms window.
- Click OK.
Choose All configurations - macOS ARM 64-bit platform from the combo box and make sure the value of the Remote Name column matches the value of the deployment list for the macOS 64-bit target platform.
macOS Topics
- Prepare Your Development Environment (macOS):
- Write and Run Your macOS Application:
- Deploy Your Application:
- Joining the Apple Developer Program
- Provisioning a macOS Application
- Configuring an Application Entry on iTunes Connect to Wait for Upload
- Preparing a macOS Application for Deployment
- Sandboxing Your macOS Application
- Sandboxing Your macOS Application Manually
- App Sandboxing with InterBase ToGo for macOS
- Non-sandboxed InterBase applications for macOS
- Submitting Your App to the Mac App Store
See Also
- Developing Multi-Device Applications
- Differences between Windows and macOS
- iOS Mobile Application Development
- Debugging Multi-Device Applications
- Working with Native and Custom FireMonkey Styles
- FireMonkeyPlatform Prerequisites
- Migrating VCL Applications to FireMonkey
- Apple Developer Center
- Mac Dev Center
- macOS Developer Library
- Introduction to Codesigning for Mac
- Submitting Your Mac App to the App Store
- Building for the Mac app store
- Getting Started with Windows and Mac Application Development (E-Learning Series)