Using the Compare and Merge Utility
Contents
What Can the Compare/Merge Utility Do?
The Compare and Merge utility allows you to reconcile differences between models in the same file or between a model and a database. For example, you have designed and created a model and then created a database based on that data model. A data modeler alters the model and adds a column Gender to the Employee table and simultaneously a DBA alters the Department table in the database and adds a column Name to the table. The model and the database are no longer in synch. Round-trip engineering using the Compare and Merge utility can now help you reconcile the model with the database.
The Compare and Merge utility compares, merges, and synchronizes models from a variety of comparison targets. It can perform different kinds of comparisons. You can use the information from these comparisons to perform merges or to create detailed reports.
The Compare and Merge utility compares a source and a target model. The active diagram, the one you are viewing and editing, will always be the source, and from it you select a valid target with which to compare and subsequently merges if desired, or to create alter sql to update offline databases.
![]() Note: Targets of logical and physical ER/Studio Data Architect data models can be Repository-based data models including named releases, which are read-only archived snapshots of diagrams managed within the Repository.
Note: Targets of logical and physical ER/Studio Data Architect data models can be Repository-based data models including named releases, which are read-only archived snapshots of diagrams managed within the Repository.
You can compare and merge a logical model to:
- A physical model in the same.dm1 file.
- A logical model of another ER/Studio Data Architect data model.
- A physical model of another ER/Studio Data Architect data model.
You can compare and merge a physical model to:
- The logical model of the same data model.
- Another physical model of the same data model that shares the same DBMS platform (and version).
- A logical model of another ER/Studio Data Architect data model.
- A physical model of another ER/Studio Data Architect data model sharing the same DBMS platform (and version).
- A live database.
- An SQL file.
When comparing two physical models, make sure they are the same platform and version (i.e. Oracle 11g to Oracle 11g). if they are not the same, then you will only be able to compare to the logical. If you want to compare Oracle to SQL Server, you would need to compare to the logical model from the reverse engineered physical database, then push the changes from the logical model to the original physical model.
You can compare and merge a submodel to:
- A submodel of the same data model.
- The physical model of the same data model.
- An SQL file.
The broad spectrum of valid targets allows for various information-merging strategies. For example, information in the Compare and Merge utility can be:
- Merged from the current model to a valid target.
- Merged from the valid target to the current model.
- Bi-directionally merged simultaneously between source and valid target.
![]() Note: Objects in SQL 2005 are owned by schemas. A schema can behave like a user, but does not have to be a user. A schema is not explicitly represented in the Data Model Explorer, nor is there a CREATE SCHEMA DDL function. In the Reverse Engineering and Compare/Merge Wizards, the "owner" field in the object editors of ER/Studio Data Architect represents the schema name for an SQL Server 2005 physical model. The field will be the schema list.
Note: Objects in SQL 2005 are owned by schemas. A schema can behave like a user, but does not have to be a user. A schema is not explicitly represented in the Data Model Explorer, nor is there a CREATE SCHEMA DDL function. In the Reverse Engineering and Compare/Merge Wizards, the "owner" field in the object editors of ER/Studio Data Architect represents the schema name for an SQL Server 2005 physical model. The field will be the schema list.
A subset of the functionality on the Compare and Merge utility is used to bring new data source into the diagram for purposes of importing new data sources from the Data Lineage tab.
![]() Note: There are instances as previously noted that during compare/merge the alter code generated renames a table, creating a new table with the updated structure and reads data from the old (renamed) table into the new table. This is called an extended alter and can happen if for instance you have added a column to somewhere other than the end of the table or chose a child table but did not choose option to reverse engineer parent table.
Note: There are instances as previously noted that during compare/merge the alter code generated renames a table, creating a new table with the updated structure and reads data from the old (renamed) table into the new table. This is called an extended alter and can happen if for instance you have added a column to somewhere other than the end of the table or chose a child table but did not choose option to reverse engineer parent table.

Comparing Models and Submodels
Using the Compare and Merge utility, you can compare two models, two submodels, or a model with a submodel and merge any differences found, if required. You can also report on the differences and if you want, synchronize your source model with another model or update the source or target models selectively.
- Choose File > Open and display the source data model or submodel.
 Tip: You can save time by selecting diagram objects on the data model before opening the utility. Objects that are pre-selected in this manner will be already in the object tree of the utility.
- In the Data Model Explorer, click the model or submodel to be the comparison source.
- Choose 'Model > Compare and Merge Utility'.
- The Compare and Merge Utility will walk you through the rest of the process.
![]() Note: When comparing or merging with a physical data model or SQL imported data model that was not initially created by reverse-engineering an existing database, you must synchronize constraint names between the data model and the database in order to generate correct ALTER SQL. The Compare and Merge Utility may not generate the SQL correctly unless the target model (physical or SQL import) has the same constraint names as the database.
Note: When comparing or merging with a physical data model or SQL imported data model that was not initially created by reverse-engineering an existing database, you must synchronize constraint names between the data model and the database in order to generate correct ALTER SQL. The Compare and Merge Utility may not generate the SQL correctly unless the target model (physical or SQL import) has the same constraint names as the database.
The following describes the options that require additional explanation. Note that the number of pages and options in the Compare/Merge utility vary depending on what kind of compare/merge you perform and the source and target models selected:
Page 1: Select Target
- Select the target you with to compare against:
- Compare against another model in this DM1 file: Compares a data model with another data model or submodel in the same DM1 file.
- Compare against another model in a DM1 or DT1 file: Compares a data model with another DM1 file or with a DT1 file.
- Compare against a Repository based DM1 file: Compares a data model with another data model or Named Release managed within the ER/Studio Repository. When you select this option, ER/Studio Data Architect opens the Repository Operation Status dialog box and the Get From Repository dialog box where you can choose the diagram you want to compare with. This process connects to the current Repository Server defined in the Repository Options (Repository > Repository Options). The Model Compare and Merge wizard automatically gets the diagram from the Repository.
- Compare against an SQL file This option is available when the current model selected is a Physical data model. The selected SQL file must be of the same database platform as the current model. When you select this option, ER/Studio Data Architect imports the SQL file and compares it to the current model.
- Compare against a live database: If you select this option, a page appears where you can select the database and connection type. The connection type can be:
- ODBC
- Native/Direct Connection.
- ER/Studio Team Server data source
If you select the ODBC or Native/Direct option, you also have the option to create a new data source definition on ER/Studio TS, using the settings you provide on this wizard.
For information about ODBC and native/direct connections, including troubleshooting information, see Connecting to Database Sources and Targets. For information on ER/Studio Team Server data sources, see Logging In and Out of the Repository and ER/Studio TS.
- Comparison Quick Launch: The Compare Quick Launch data is saved as an *.rvo file. For information on using the Quick Launch option in the wizard, see Saving and Using Quick Launch Settings.
Page 2: Select Model
The models available on this page depend on the target type chosen on the previous page. Click one model or submodel to compare against the source model.
Page 3: Select Comparison Options
- Comparison Options
Please select the off-line ALTER SQL generation options: This option is available only when comparing a physical data model to an SQL file or to a live database and you have selected to generate SQL on the first page of the utility and have changed at least one of the default ignore resolutions. When the target model is a live database you have the option to generate ALTER SQL or to update the target model when the merge is executed. If you choose to create the ALTER SQL, an additional page of the Compare and Merge Utility becomes available where you can choose where to save the script file, along with Rebuild and Pre/Post SQL Options.
![]() Note: If physical models were not reverse-engineered in the first place, you may have to synchronize constraint names between models and the database in order to generate correct ALTER SQL. It won't run correctly unless the target model (physical or SQL import) has the same constraint names as the database.
Note: If physical models were not reverse-engineered in the first place, you may have to synchronize constraint names between models and the database in order to generate correct ALTER SQL. It won't run correctly unless the target model (physical or SQL import) has the same constraint names as the database.
- Objects
Selecting or clearing a higher-order objects selects or clears all related subobjects. For example, if you clear Column Constraints, the Name and Value subobjects will also be cleared.
![]() Note: For Oracle databases, deselecting the Disabled checkbox under the Relationship or Indexes node causes the utility to ignore the disabled attribute of Primary and Foreign Keys.
Note: For Oracle databases, deselecting the Disabled checkbox under the Relationship or Indexes node causes the utility to ignore the disabled attribute of Primary and Foreign Keys.
Source Column Mapping Properties: These options refer to the mappings created on the Data Lineage tab of the Table Editor. For more information, see Documenting Data Extraction, Transformation, and Load.
- General Merge Options
- Merge only selected objects: When selected, only objects that are selected in the model prior to invoking the Compare Wizard will be selected in the Object Selection page of the wizard (page 4). This is an easy way to compare just a portion of the model.
- Match Native to Foreign Attribute: When selected, the native attribute or column in one model will match to a foreign key in another. By default, the wizard only consider matches between a foreign keys and other foreign keys.
- Show Base Tables Of Denormalization Mappings: When comparing two physical models, shows the base tables of denormalization maps in the results page; the last page of the wizard. Base tables are the pre-map state tables that are included in a denormalization map. These tables can be seen in the model by expanding the Denormalization Mapping node in the Data Model Explorer. These objects are not actually visible in the Data Model Window, but can be made visible by undoing the denormalization map.
In the results page of the Compare and Merge Wizard, ignored columns are italicized. By displaying the ignored columns in the results screen, you can preserve changes on the target side as you are merging denormalization maps from one physical model to another.
Denormalization objects are merged in order; the base objects are merged to the target first, and then the denormalization mapping is done. By setting resolutions to Ignore, you can preserve changes after the denormalization mapping is created.
- Options for new Tables and Columns: Exclude table and column definitions, notes, and attachments. These options are for comparing all model types against each other. When objects do not exist in the target model and new objects are created via the merge, the definitions, notes, and attachments will not be included for those new objects. This option can be useful when separate definitions, notes, and attachments are used between models.
- Compare Primary Key As Unique Index: When comparing against a database, ER/Studio Data Architect normally treats PK indexes in the model as PK constraints. When this option is enabled, it treats PK indexes as indexes instead of constraints. Use this option if the PKs in the database are controlled by unique indexes instead of being controlled by constraints.
- Create New Entities as Collection/Nested Object Options. MongoDB Only.
- Convert All Entities to Collection MongoDB Only. When selected, every Entity becomes a Collection.
- Convert Entities with PKs to Collection MongoDB Only. When selected, any Entity with a Primary Key becomes a Collection.
- Leave All as Nested Objects MongoDB Only. When selected, every Entity becomes a Nested Object.
- Convert if Not Contained MongoDB Only. When selected, conversions are based on whether an Object is contained after applying the Contains and Parent is Container options.
- Hide Logical Foreign Key Properties MongoDB and JSON Instance Only. When selected, this option removes the Foreign Key properties that are present in the Logical Model in the comparison.
- Ignore _id Fields MongoDB Only. This option prevents the user from comparing _id PK fields.
Page 4: Select Specific Model Objects
- Please select the specific model objects for your comparison: The tabs available on this page are dependant on the database platform of the model selected for comparison. The list of database objects on each tab is populated by the objects available in the source and target models. On these tabs you can limit the comparison to specific objects only or choose to compare all object types.
![]() Note: If you right-click anywhere on the object tree, you can select or deselect all objects using the short-cut menu. You can also display or hide object owner names for those objects with owners.
Note: If you right-click anywhere on the object tree, you can select or deselect all objects using the short-cut menu. You can also display or hide object owner names for those objects with owners.
Page 5: Results
- Current and Target Model Display Grid: Between the Source and Target models is a Resolution column. The default merge decision is Ignore. You can click the Resolution column to view a list of possible resolutions. If you want to change the resolution, click the list and then click the new resolution. When you change the default resolution of an object, the resolutions of their dependent properties and objects are automatically updated. You can also click the category folders, like the Tables Resolution column to change all the resolutions for all the underlying objects in that object category. And, you can use the CTRL key to select multiple items, and then right click to enable the list of possible resolutions.
- Force Match: In some cases the Compare and Merge Utility fails to match objects because certain criteria are not met but you may want them matched anyway. In those cases you can force the system to match those objects. Select the object in the Current Model tree, scroll down and right click the target object in the Target Model tree, and select Match Objects. For more information, see Forcing a Match.
- Reverse-Engineer parent tables: Reverse engineers parent tables of selected objects so referential constraints are valid.
- SQL DIfference: To enable the SQL Difference utility, select any difference that is a long text field, such as a Definition, Note, or DDL, and then click SQL Difference to view the differences between the SQL of the models. This functionality allows you to only view the differences; you can resolve the differences on the Results page of the Compare and Merge Utility.
Forcing a Match
In some cases the Compare and Merge Utility fails to match objects because certain criteria are not met but you may want them matched anyway. The following describes a case where the Compare and Merge Utility is forced to match objects that differ only slightly.
Create a new diagram with one entity called Entity1 with a primary key of A.
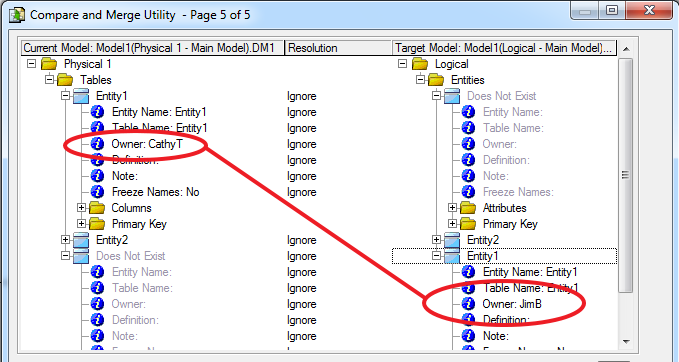
- Assign JimB as the owner of Entity1.
- Tip: The Owner property is defined on the top right-hand side of the Entity Editor or Table Editor.
- Create another entity, Entity2 and then create a non-identifying, mandatory relationship between Entity1 and Entity2.
- Generate a physical model from the logical.
- In the Data Model Explorer, right-click the logical model and select Generate Physical Model.
- Assign CathyT as the owner of Entity1 in the physical model.
- In the Data Model explorer, right click the physical model and select Compare and Merge Utility....
- Click through the Compare and Merge Utility by clicking Next on each page until Page 5 of 5 appears.
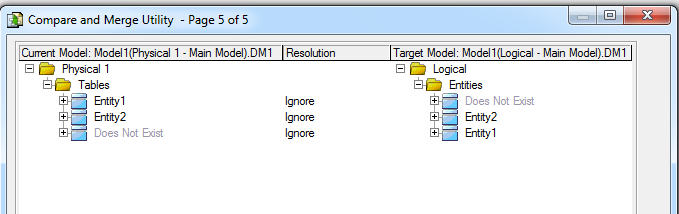
- Notice that Entity1 and Entity2 in the physical model do not align with their counterparts in the logical model. This is because Entity1 has a different owner in the logical model than in the physical model
- Expand Entity2 in the Current and Target Model trees and then expand the Relationships in Entity2
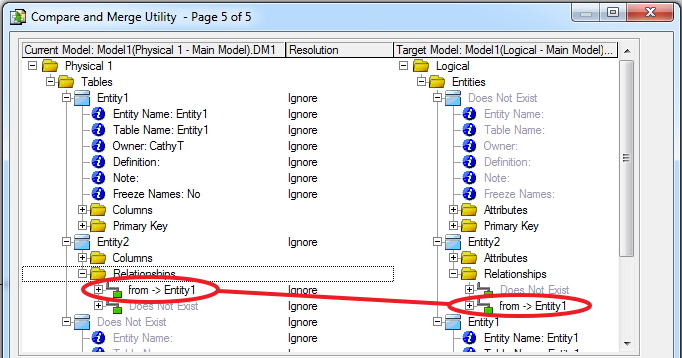
- Notice that in Entity2, the relationships are not matched either, because the parent tables are not matched. This means that the foreign key columns are not matched either.

- Because you know that Entity1 is the same in both models, you may want to match Entity1 in the Compare and Merge Utility and then update the logical model later.
- To force match Entity1 to its counterpart, in the Current model tree, select Entity1, scroll down to find Entity1 in the Target model tree, right click it and select Match Objects.
- Now that the parent tables are matched, you can also match the relationships and the foreign key columns.


![]() Note:
Note:
- Relationships must be matched before you can match columns.
- Fully expand the relationship or column before force matching them.

- You can unmatch objects by selecting one of the matched objects, right-clicking the object it is matched to, and then selecting Unmatch Objects.
Updating an Offline DBMS
As a result of comparing a physical model with either another SQL file, live database, or another physical model of the same platform version, you can create an ALTER SQL script that you can run later to update your DBMS.
- In the Data Model Explorer, right-click a physical model and then click Compare and Merge Utility.
- On the first page of the utility, choose Compare your physical model against an SQL file, live database, or another physical model of the same platform version.
- Proceed through the successive pages of the utility.
- For information on these pages, see Comparing Models and Submodels.
- Be sure to select the Generate.sql for changes merged to target model option on page 3 when comparing two physical models to generate ALTER SQL.
- To resolve the differences found on the results page, click in the Resolution column next to the object to resolve. You can choose to Ignore the differences. If the object exists in both the source and target model you can select either Merge into Target or Merge into Current ; if the object does not exist in the source or target model you can select Delete from Target or Delete from Current respectively, and then click Next.
- You must chose to merge at least one of the changes found into the target sql or live database to generate ALTER SQL.
- On the last page of the utility, provide a file name for the sql script and then choose the Rebuild Options and Pre/Post SQL Options you want.
- Click Finish.
- Run the ALTER SQL at your leisure to update the offline DBMS.
Updating a Model or Submodel
As a result of comparing two models or submodels, you can update a model in the current diagram or in another.DM1 file. The model updated can be either the target or source model. You can also update the source and the target model by merging some changes into the target and others into the source model. Changes are not applied until you click Finish.
![]() Note: To synchronize two submodels where the target model does not have relationships, you must first use the Compare and Merge Utility to bring across any relationships from the source to the target submodel and then use the Submodel Synchronize utility to synchronize the submodels.
Note: To synchronize two submodels where the target model does not have relationships, you must first use the Compare and Merge Utility to bring across any relationships from the source to the target submodel and then use the Submodel Synchronize utility to synchronize the submodels.
- In the Data Model Explorer, right-click a model and then click Compare and Merge Utility.
- On the first page of the utility, choose to compare the model with either another model in the open file or with a model in another file.
- Proceed through the successive pages of the utility until the last page.
- For information on these pages, see Comparing Models and Submodels.
- To resolve the differences found on the results page, click in the Resolution column next to the object to resolve. You can choose to Ignore the differences. If the object exists in both the source and target model you can select either Merge into Target or Merge into Current ; if the object does not exist in the source or target model you can select Delete from Target or Delete from Current respectively.
- The default resolution is Ignore. Unless you change the resolution, the models being compared will not be updated when you click Finish.
- If you are satisfied with the resolutions you have designated, click Finish. The current and target models are updated as requested.
If you do not want to change the models right now, click Cancel. You can run the Compare and Merge Utility later and implement the changes at that time.
Resolving and Reporting on Model Differences
The last page of the Compare and Merge Utility presents the differences found during the model comparison. You can modify the default display using the options at the bottom of this page in the utility.
- Follow the procedure outlined in Comparing Models and Submodels.
- Proceed through the successive pages of the utility. For information on these pages, see Comparing Models and Submodels.
- To resolve the differences found on the results page, click in the Resolution column next to the object to resolve. You can choose to Ignore the differences. If the object exists in both the source and target model you can select either Merge into Target or Merge into Current ; if the object does not exist in the source or target model you can select Delete from Target or Delete from Current respectively.
- The default resolution is Ignore. Unless you change the resolution, the models being compared will not be updated when you click Finish.
- Create a report of the differences and your proposed resolutions by clicking Filter Report on Results.
- On the Merge Report dialog, choose to create an HTML or an RTF report.
- Type the Report Title name and then type the Report Filename path or browse to locate the path.
- Click OK to create the report.
- If you are satisfied with the resolutions you designated, click Finish. The current and target models are updated as requested.
If you do not want to change the models right now, click Cancel. You can run the Compare and Merge Utility later and implement the changes at that time.