Inserting Data
The INSERT statement is the mechanism by which you store one or more rows of data in an existing table. In its simplest form, the syntax is:
INSERT INTO table_name [(columns)] VALUES (values)
If you don’t specify column names, InterBase inserts the supplied values into columns in the order in which they were defined, and there must be as many values as there are columns in the table. When you specify columns, you supply the values in the order you name the columns. Columns not specified are given default values or NULL values, depending on the column definitions.
The values supplied can be constants or can be calculated. In embedded SQL, they can also be variables.
An important variation of this syntax is one that allows you to add rows to a table by selecting rows from another table. The two tables must have columns occurring in the same order for this to work. The syntax for this form is:
INSERT INTO table_name (columns) SELECT columns FROM table_name WHERE conditions
See the Language Reference Guide for a full description of INSERT.
 Inserting Data Using Column Values
1. Enter and execute the following code to add a row to the Country table:
<INSERT INTO Country(country, currency) VALUES ('USA', 'Dollar')
- Reminder: Anything you type inside the quotation marks is case sensitive.
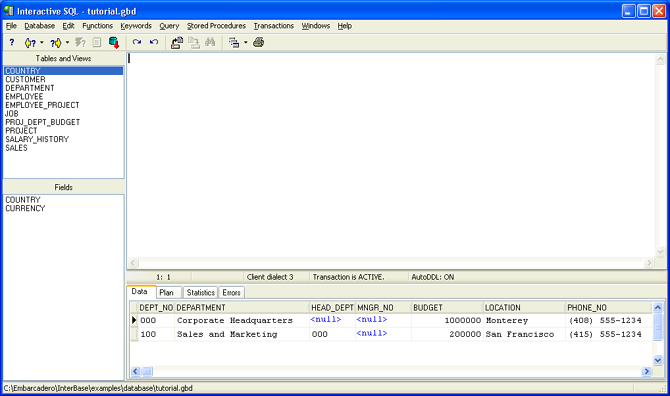
2. Enter and execute the following line to add a row to the Department table:
INSERT INTO Department
(dept_no, department, head_dept, budget, location, phone_no)
VALUES    ('000', 'Corporate Headquarters', NULL, 1000000, 'Monterey',
(408) 555-1234')
- Notice that strings are all enclosed in single quotes, while numeric values are not. The department number and default phone number, for example, are strings, not numeric values.
3. The next row of data for the Department table is similar to the previous one. To simplify entry, click the Previous Script ![]() button. This displays the previous query in the SQL Statement Area.
button. This displays the previous query in the SQL Statement Area.
4.Now substitute into the previous query so that it reads as follows and execute the statement.
INSERT INTO Department
dept_no, department, head_dept, budget, location, phone_no)
VALUES ('100', 'Sales and Marketing', '000', 200000, 'San Francisco', '(415) 555-1234')
- Notice that the new value for head_dept is a string, not a numeric value.
5. Check the accuracy of your insertions by entering and executing each of the following statements in turn. Examine the output to make sure it matches the instructions above.
SELECT * from Country
SELECT * from Department
Note: In Part IV of this Quick Start, you will learn more about the important SELECT statement.
 Reading in the Remaining Data
- To read the remaining data into the Country, Job, Department, and Employee tables, open Inserts.sql in a text editor, make sure that the CONNECT statement has the correct information, and load it into the database using Execute.
- To confirm that data has been entered into each table enter and execute each following statement in turn.
SELECT * FROM Country
- There should be 14 entries in the Country table. If this one is correct, the others probably are, too. Now run three more SELECT statements. Remember, you must execute each one before proceeding to the next.
SELECT * FROM Job
SELECT * FROM Employee
SELECT * FROM Department
- Once again it is time to back up If you have successfully entered three INSERTs and run the Inserts.sql script, this is a good time to back up your database to Tutorial4.gbk.
