Showing and Hiding Elements in the LiveBindings Designer
Go Up to LiveBindings Designer
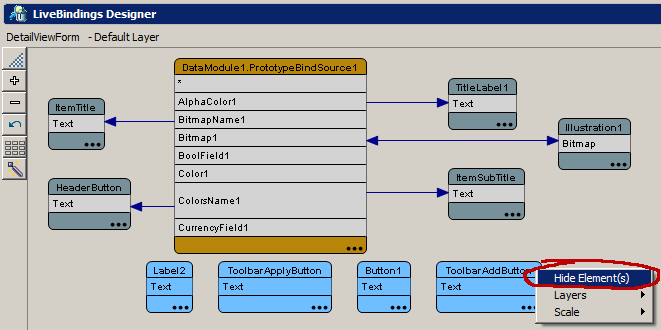
The LiveBindings Designer gives you the possibility to show or hide individual elements in your binding diagram.
To declutter your bindings diagram by removing elements that are not bound to other elements
- Right-click the title of an element, and from the context menu choose Hide Element(s).
- You can even select multiple elements and hide them all at once.
- You can even select multiple elements and hide them all at once.
- After clicking Hide Element(s), your selected elements will not show up anymore on your bindings diagram.
Tip: If you however decide to hide an element that is already bound to another element, then the binding (line on the diagram) will also be hidden but it will not be removed.
- To restore the visibility of the hidden items, right-click in the LiveBindings Designer's surface and select the Show/Hide Elements... command from the context-sensitive menu.
- The Element Visibility dialog box appears allowing you to set the visibility of individual elements present on your diagram.
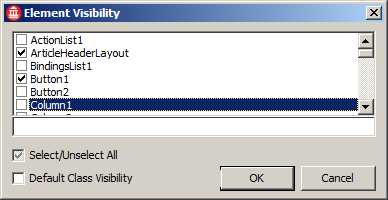
- The check boxes control the visibility of the elements in the list.
- The search box below the check boxes allows you to quickly locate a required element. Start typing the first letters of the element name, and the check boxes are updated accordingly.
- The Select/Unselect All check box selects or deselects all the elements in the check boxes all at once.
- The Default Class Visibility check box is enabled only if you already hid or showed elements that do not belong to the default class's visibility. For instance, if you hide an element that represents a TLabel, the Default Class Visibility check box becomes enabled. Checking the check box results in restoring the original show/hide states for all the elements on your binding diagram for the form you are working on.
- The Element Visibility dialog box appears allowing you to set the visibility of individual elements present on your diagram.

