Getting Started with Java BlackBerry DataSnap Mobile Connector
Go Up to Getting Started with DataSnap Mobile Connectors
This topic is a guide for getting started with generating and using the Java BlackBerry DataSnap proxy, for use with BlackBerry mobile development. The Java proxy supports all the same data types that DataSnap itself supports. Special Java classes have been created to wrap those DBX and Delphi types, and their usage is similar to the usage in Delphi.
When requested, the DataSnap REST server generates and dispatches the proxy class used to invoke the methods on the server. This is very similar to the proxy generation you might already be familiar with, but also includes the process of zipping up the proxy and all dependencies, and sending this zip file to the requester. For more information on this process, see Getting Started with DataSnap Mobile Connectors.
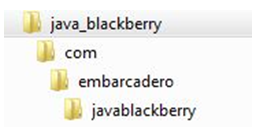
The DSProxy class and all the run-time files are contained in the com.embarcadero.javablackberry package. The structure of this package is as follow:
Note: Version 6 or higher of the BlackBerry OS is required.
Contents
How to Download BlackBerry Proxy Files from a DataSnap REST Server
First you need to obtain a copy of Win32ProxyDownloader.exe (available in the \bin directory of your product installation). For further information, see Getting Started with DataSnap Mobile Connectors. The downloader is a simple utility that helps with asking the server for the proxy and other files needed for communication with the server.
To use the proxy downloader, you need to provide the following parameters:
- -language (required): Specifies the mobile platform/language of the requested proxy. For BlackBerry development, use java_blackberry.
- -protocol: Specifies the connection protocol to use; either http or https. The default is http.
- -host: Specifies the port and host name or IP address to connect to. Default is localhost with port 80. If a different name or port is needed, the name must be fully qualified with the port number included, separated by ":"
- -output: Specifies the folder to download the proxy files into. If not specified, the current folder is used.
The following example uses most of the parameters mentioned above:
C:\Win32ProxyDownloader.exe -language java_blackberry -host 127.0.0.1:8080 -output C:\test
After executing the downloader, the BlackBerry proxy files are copied into the output folder that was specified. These files include the following:
- JSON library
- Static Java source files required by the proxy
- DSProxy.java, the generated proxy
The main file is DSProxy.java, which declares the class that contains all the methods defined on the server.
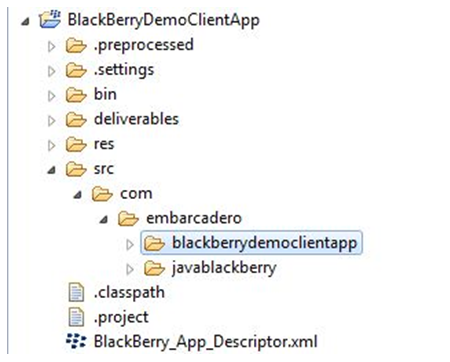
After importing the files into your project, you should have a setup that looks like this:
How to Use DSProxy Class
The code below shows the DSProxy.java file generated by the server. It contains a TServerMethods1 class, which encapsulates the server methods. The server has only one method (EchoString) and the Java Class TServerMethods1 implements it appropriately. The proxy generator has automatically generated all the code for connecting to the server and executing the methods. See the code for the EchoString method below:
public class DSProxy {
  public static class TServerMethods1 extends DSAdmin {
    public TServerMethods1(DSRESTConnection Connection) {
      super(Connection);
    }

    private DSRESTParameterMetaData[] TServerMethods1_EchoString_Metadata;
    private DSRESTParameterMetaData[] get_TServerMethods1_EchoString_Metadata() {
      if (TServerMethods1_EchoString_Metadata == null) {
        TServerMethods1_EchoString_Metadata = new DSRESTParameterMetaData[]{
          new DSRESTParameterMetaData("Value", DSRESTParamDirection.Input,
                                               DBXDataTypes.WideStringType, "string"),
          new DSRESTParameterMetaData("", DSRESTParamDirection.ReturnValue,
                                          DBXDataTypes.WideStringType, "string"),
        };
      }
      return TServerMethods1_EchoString_Metadata;
    }

    /**
     * @param Value [in] - Type on server: string
     * @return result - Type on server: string
     */
    public String EchoString(String Value) throws DBXException {
      DSRESTCommand cmd = getConnection().CreateCommand();
      cmd.setRequestType(DSHTTPRequestType.GET);
      cmd.setText("TServerMethods1.EchoString");
      cmd.prepare(get_TServerMethods1_EchoString_Metadata());
      cmd.getParameter(0).getValue().SetAsString(Value);
      getConnection().execute(cmd);
      return cmd.getParameter(1).getValue().GetAsString();
    }


    private DSRESTParameterMetaData[] TServerMethods1_ReverseString_Metadata;
    private DSRESTParameterMetaData[] get_TServerMethods1_ReverseString_Metadata() {
      if (TServerMethods1_ReverseString_Metadata == null) {
        TServerMethods1_ReverseString_Metadata = new DSRESTParameterMetaData[]{
          new DSRESTParameterMetaData("Value", DSRESTParamDirection.Input,
                                               DBXDataTypes.WideStringType, "string"),
          new DSRESTParameterMetaData("", DSRESTParamDirection.ReturnValue,
                                          DBXDataTypes.WideStringType, "string"),
        };
      }
      return TServerMethods1_ReverseString_Metadata;
    }
}
The first step in using the proxy class is to create and set up a connection to the server. Class DSRESTConnection encapsulates all the properties and methods needed for connecting to the server. Just create the connection and set up the properties as shown below:
import com.embarcadero.javablackberry.DSRESTConnection;
// ...

DSRESTConnection conn = new DSRESTConnection();
conn.setHost("host");
conn.setPort(port);
conn.setProtocol("http");
- The host property specifies the host name or IP address.
- The port property specifies the port that the server is listening on.
- The protocol property specifies the protocol to use for the connection. Specifically: http or https.
To remotely invoke the server methods, just create the proxy class, passing the connection, and then call the method:
DSRESTConnection conn = new DSRESTConnection();
conn.setHost("10.40.30.24");
conn.setPort(8080);

TServerMethods1 proxy = new TServerMethods1(conn);
String Result = proxy.EchoString("Hello, World!");
Example of a Server Method with a var Parameter
The following is an example of the code generated when your server method contains a var parameter, or returns multiple results.
This is the Delphi code for the server method
function TServerMethods1.VarParamTest(var Value: string): string;
begin
  Value := StrUtils.ReverseString(Value);
  Result := Value;
end;
And here is the generated proxy code to invoke that server method
private DSRESTParameterMetaData[] TServerMethods1_VarParamTest_Metadata;
private DSRESTParameterMetaData[] get_TServerMethods1_VarParamTest_Metadata() {
  if (TServerMethods1_VarParamTest_Metadata == null) {
    TServerMethods1_VarParamTest_Metadata = new DSRESTParameterMetaData[]{
      new DSRESTParameterMetaData("Value", DSRESTParamDirection.InputOutput,
                                           DBXDataTypes.WideStringType, "string"),
      new DSRESTParameterMetaData("", DSRESTParamDirection.ReturnValue,
                                      DBXDataTypes.WideStringType, "string"),
    };
  }
  return TServerMethods1_VarParamTest_Metadata;
}

/**
 * @param Value [in/out] - Type on server: string
 * @return result - Type on server: string
 */
public static class VarParamTestReturns {
  public String Value;
  public String returnValue;
}

public VarParamTestReturns VarParamTest(String Value) throws DBXException {
  DSRESTCommand cmd = getConnection().CreateCommand();
  cmd.setRequestType(DSHTTPRequestType.GET);
  cmd.setText("TServerMethods1.VarParamTest");
  cmd.prepare(get_TServerMethods1_VarParamTest_Metadata());
  cmd.getParameter(0).getValue().SetAsString(Value);
  getConnection().execute(cmd);
  VarParamTestReturns ret = new VarParamTestReturns();
  ret.Value = cmd.getParameter(0).getValue().GetAsString();
  ret.returnValue = cmd.getParameter(1).getValue().GetAsString();
  return ret;
}
Please note that the method returns an instance of VarParamTestReturns. This special class holds the information about var (in/out) parameters as well as the result. The example below shows how to invoke the method and read the resulting values.
TServerMethods1 proxy = new TServerMethods1(conn);
VarParamTestReturns Result = proxy.VarParamTest("Hello, World!");
System.out.println(Result.Value);
System.out.println(Result.returnValue);
Both the result value and the new value of the parameter passed in are held by the Result instance. The value for Result.Value is "!dlroW ,olleH", and Result.returnValue is "Hello, World!".
How to Use heavyweight Callbacks
Heavyweight callbacks provide a way for DataSnap Servers to send nearly instantaneous notifications to REST clients. A client can register a callback for a specific topic on the server that interests him, then whenever that topic is updated the client receives a notification. This is, of course, a very simplified description of what heavyweight callbacks accomplish, but is sufficient for the purposes of this task.
The first step towards using callbacks in your application is to create a custom callback class that is inherited from the abstract DBXCallback class and override the abstract "Execute" method. An example implementation of this class is shown below:
public class MyCallback extends DBXCallback {
    public TJSONValue execute(TJSONArray params) {
        System.out.println(params.toString());
        return new TJSONTrue();
  }
}
The DSClientCallbackChannelManager class manages the client's callbacks. It provides methods for registering and unregistering the callbacks, and closing one or all of them. Its constructor accepts 3 parameters:
- A DSRESTConnection, specifies the server connection information
- A String that contains the name of the server channel to register with
- A String that contains the manager's ID (unique to the server)
Here is the code that creates the manager:
DSCallbackChannelManager manager  =
 new DSCallbackChannelManager(conn,"chname",DSCallbackChannelManager.getNewManagerID());
The following is an example of registering a callback and then broadcasting to the same channel on which the callback is registered:
manager.registerCallback("mycb01", new MyCallback());
The example above registers the callback with the name "mycb01". The first parameter to the 'registerCallback' method is a callback ID (unique to the client channel). The second parameter is the actual callback instance to register. If this is the first callback being registered, then when the call to registerCallback returns, you are not guaranteed that the callback manager is ready, because initial registration is done asynchronously. However, after the initial call to registerCallback, any subsequent calls do not return until the registration is complete. The connection stays on until you close it or it is closed by the server. To stop the connection, you can unregister the callback and close the channel as shown below:
manager.unregisterCallback("mycb01");
manager.closeClientChannel();

