Mobile Tutorial: Using an Address Book Component (iOS and Android)
Go Up to Mobile Tutorials: Mobile Application Development (iOS and Android)
Before starting this tutorial, it is recommended that you read and perform the following tutorials:
- Mobile Tutorial: Using a MultiView Component to Display Alternate Views of Information (iOS and Android)
- Mobile Tutorial: Using ListBox Components to Display a Table View (iOS and Android)
FireMonkey provides the TAddressBook component to work with Address Book on iOS and Android devices.
This tutorial describes how to create a simple FireMonkey application that uses the TAddressBook component.
| iOS | Android |
|---|---|
|
|
|


Contents
- 1 Basic Features of the TAddressBook Component
- 2 Creating a Sample Application
- 3 Running the Sample Application
- 4 See Also
Basic Features of the TAddressBook Component
On mobile platforms (Android and iOS), FireMonkey supports the TAddressBook component that lets your applications access a device Address Book. The basic features of this component are as follows:
- Sending a request to access a device Address Book and getting the access status.
- Accessing all sources defined in the device Address Book.
- Fetching all or individual contacts from the specified source.
- Fetching all contacts from the specified group(s).
- Editing or removing existing contacts and groups.
- Creation of new contacts.
- Creation of new groups.
Creating a Sample Application
This section helps you develop a sample application (for Android and iOS target platforms) that illustrates the use of the TAddressBook component. The application demonstrates the following techniques:
- Requesting a permission to access Address Book.
- Retrieving all contacts from the default source in the device Address Book.
- Adding a new contact to Address Book.
- Removing a selected contact from Address Book.
Designing the User Interface
- Create a blank Multi-Device Application, by selecting:
- For Delphi: File > New > Multi-Device Application - Delphi > Blank Application
- For C++: File > New > Multi-Device Application - C++Builder > Blank Application
- In the Project Manager, set the target platform to Android or iOS.
- In the Tool Palette, select the TToolBar, TAddressBook, and TListBox components and drop them on the Form Designer.
- In the Object Inspector, set the Align property of TListBox to
Client. - On the Form Designer, right-click TListBox, and then on the shortcut menu, select Add Item > TSearchBox.
- In the Tool Palette, select the TMultiView component, and drop it on the Form Designer.
Designing the Application Toolbar and Master Pane
Place all control elements on the toolbar and Master Pane:
- The toolbar contains three speed buttons:
 : removes a selected contact from the Address Book.
 : refreshes the current list of contacts.
 : opens the Master Pane to add a new contact to the Address Book.
- The Master Pane provides a form to specify and add a new contact to the Address Book.
To design the application toolbar:
- On to the top toolbar, drop three TSpeedButton components.
- In the Form Designer, do the following:
- Select SpeedButton1, and set the Name and StyleLookup properties to
btnRemoveandtrashtoolbuttonordered, respectively. - Select SpeedButton2, and set the Name and StyleLookup properties to
btnRefreshandrefreshtoolbuttonordered, respectively. - Select SpeedButton3, and set the Name and StyleLookup properties to
btnAddandaddtoolbuttonordered, respectively.
- Select SpeedButton1, and set the Name and StyleLookup properties to
After performing the above steps, your Form Designer will be similar to the following screen:

To design the Master Pane:
- In the Structure View, select MultiView1, and then in the Object Inspector, specify the following properties:
- Set the MasterButton property to
btnAdd. - Set the Mode property to
Drawer. - To make the MultiView1 visible, set the Visible property to
True.
- Set the MasterButton property to
- In the Tool Palette, select three TLabel components, three TEdit components, and two TButton components, and drop them to Multiview1.
- In the Object Inspector, specify the following properties of the control elements that you have placed onto MultiView1:
- For Label1, Label2, and Label3: set the Text properties to
First Name,Last Name, andWork Mail, respectively. - For Edit1, Edit2, and Edit3:
- set the Name property to
edtFirstName,edtLastName, andedtWorkMail, respectively. - set the KillFocusByReturn property to
true - set the ReturnKeyType property to
Go.
- set the Name property to
- For Button1 and Button2:
- set the Text property to
AddandCancel - set the Name property to
btnOKandbtnCancel, respectively.
- set the Text property to
- For Label1, Label2, and Label3: set the Text properties to
We recommend that you arrange the control elements of the Master Pane in the following way:

Retrieving the Contacts List
This section explains how to retrieve the Contacts list from the default source in a device Address Book.
In your application, define the following private methods:
FillContactsList: gets the list of contacts of the default source in the device Address Book;AddListBoxItem: adds a new item to ListBox.
Make the following changes to the Private section of your application code:
Delphi:
private
    { Private declarations }
    procedure FillContactList;
    procedure AddListBoxItem(Contact: TAddressBookContact);
C++Builder:
private:	// User declarations
	void __fastcall FillContactsList();
        void __fastcall AddListBoxItem(TAddressBookContact *Contact);
Implement the FillContactslist and AddListBoxItem methods as follows:
Delphi:
// Fill the contact list
procedure TForm1.FillContactList;
var
  I: Integer;
  Contacts: TAddressBookContacts;
begin
  Contacts := TAddressBookContacts.Create;
  try
    AddressBook1.AllContacts(AddressBook1.DefaultSource, Contacts);
    ListBox1.BeginUpdate;
    try
      ListBox1.Clear;
      for I := 0 to Contacts.Count - 1 do
        AddListBoxItem(Contacts.Items[I]);
    finally
      ListBox1.EndUpdate;
    end;
  finally
    Contacts.Free;
  end;
end;
// --------------------------------------------------------------------
// Add a new contact to List box
procedure TForm1.AddListBoxItem(Contact: TAddressBookContact);
var
  ListBoxItem: TListBoxItem;
begin
  try
    ListBoxItem := TListBoxItem.Create(nil);
    ListBoxItem.Text := Contact.DisplayName;
    ListBoxItem.Tag := Contact.ID;
    ListBox1.AddObject(ListBoxItem);
  finally
    ListBoxItem.Free;
  end;
end;
C++Builder:
// Fill the List box with existed contact display names.
void __fastcall TForm1::FillContactsList() {
	int i;
	TAddressBookContacts *Contacts = new TAddressBookContacts();
	__try {
		AddressBook1->AllContacts(AddressBook1->DefaultSource(), Contacts);
		__try {
			ListBox1->BeginUpdate();
			ListBox1->Clear();
			for (i = 0; i < Contacts->Count; i++)
				AddListBoxItem(Contacts->Items[i]);

		}
		__finally {
			ListBox1->EndUpdate();
		}
	}

	__finally {
		Contacts->Free();
	}
}
// ---------------------------------------------------------------------------
// Add a new contact to List box
void __fastcall TForm1::AddListBoxItem(TAddressBookContact *Contact) {
    TListBoxItem *ListBoxItem = new TListBoxItem(ListBox1);

	__try {

		ListBoxItem->Text = Contact->DisplayName;
		ListBoxItem->Tag = Contact->ID;
		ListBox1->AddObject(ListBoxItem);
	}
	__finally {
		ListBoxItem->Free();
	}
}
Implementing the Control Elements Functionality
To complete the application development, you should implement event handlers for all control elements that you have dropped onto the application form.
To implement the OnClick event handlers for speed buttons:
- On the Form Designer, double-click a speed button (btnRefresh or btnRemove).
- In the Code Editor, specify the following event handlers for each button:
Delphi:
//-------------------For Remove button -----------------------------------------
procedure TForm1.btnRemoveClick(Sender: TObject);
var
  ContactIndex, ContactID: Integer;
  Contact: TAddressBookContact;
begin
  ContactIndex := ListBox1.ItemIndex;
  if (ContactIndex > -1) Then
  begin
    ContactID := ListBox1.ListItems[ContactIndex].Tag;
    Contact := AddressBook1.ContactByID(ContactID);
    if Contact <> nil then
      try
        AddressBook1.RemoveContact(Contact);
        ListBox1.BeginUpdate;
        ListBox1.Items.Delete(ContactIndex);
      finally
        ListBox1.EndUpdate;
        Contact.Free;
      end;
  end;
end;
// -------------------For Refresh button---------------------------------------
procedure TForm1.btnRefreshClick(Sender: TObject);
begin
  FillContactsList;
end;
C++Builder:
//-------------------For Remove button -----------------------------------------
// Remove the contact currently selected from the List box
void __fastcall TForm1::btnRemoveClick(TObject *Sender) {
	int ContactIndex = ListBox1->ItemIndex;
	if (ContactIndex > -1) {
		int ContactID = ListBox1->ListItems[ContactIndex]->Tag;
		TAddressBookContact *Contact = AddressBook1->ContactByID(ContactID);
		if (Contact != NULL) {
			__try {
				AddressBook1->RemoveContact(Contact);
				ListBox1->BeginUpdate();
				ListBox1->Items->Delete(ContactIndex);

			}
			__finally {
				ListBox1->EndUpdate();
				Contact->Free();

			}
		}
	}
}
// --------------------------For Refresh button-------------------------------------
void __fastcall TForm1::btnRefreshClick(TObject *Sender) {
	FillContactsList();
}
To implement the onClick event handlers for the Master Pane buttons:
- In the Structure View, select MultiView1.
- In the Object Inspector, set the Visible property to
True.
This makes the Master Pane visible. - On the Master Pane, double-click the Add button, and then implement the following event handler:
- For Delphi:
// --------------------------------------------------------------------
// Add a newly created contact to Address Book
procedure TForm1.btnOKClick(Sender: TObject);
var
  Contact: TAddressBookContact;
  eMails: TContactEmails;
  Addresses: TContactAddresses;

begin
  Contact := AddressBook1.CreateContact(AddressBook1.DefaultSource);
  try
    Contact.FirstName := edtFirstName.Text;
    Contact.LastName := edtLastName.Text;
    // Add the work mail
    eMails := TContactEmails.Create;
    try
      eMails.AddEmail(TContactEmail.TLabelKind.Work, edtWorkMail.Text);
      Contact.eMails := eMails;
    finally
      eMails.Free;
    end;
    AddressBook1.SaveContact(Contact);
    try
      ListBox1.BeginUpdate;
      AddListBoxItem(Contact);
    finally
      ListBox1.EndUpdate;
    end;
  finally
    Contact.Free;
  end;
  MultiView1.HideMaster;

end;
- For C++:
// Add a newly created contact to Address Book
void __fastcall TForm1::btnOKClick(TObject *Sender) {

	TContactEmails *eMails;
	TAddressBookContact *Contact =
		AddressBook1->CreateContact(AddressBook1->DefaultSource());

	__try {

		Contact->FirstName = edtFirstName->Text;
		Contact->LastName = edtLastName->Text;
		// Add the work mail
		eMails = new TContactEmails();
		__try {
			eMails->AddEmail(TContactEmail::TLabelKind::Work,
			edtWorkMail->Text);
			Contact->EMails = eMails;
		}
		__finally {
			eMails->Free();
		}
		AddressBook1->SaveContact(Contact);
		__try {
			ListBox1->BeginUpdate();
			AddListBoxItem(Contact);
		}
		__finally {
			ListBox1->EndUpdate();
		}

	}
	__finally {
		Contact->Free();
	}
	MultiView1->HideMaster();
}
- On the Master Pane, double-click the Cancel button, and then implement the following event handler:
- For Delphi:
// Clear and close the Add New Contact form
procedure TForm1.btnCancelClick(Sender: TObject);
begin
  edtFirstName.Text := '';
  edtLastName.Text := '';
  edtWorkMail.Text := '';
  MultiView1.HideMaster;
end;
- For C++:
// Clear and close the Add New Contact form
void __fastcall TForm1::btnCancelClick(TObject *Sender)
{
	edtFirstName->Text = "";
	edtLastName->Text = "";
	edtWorkMail->Text = "";
	MultiView1->HideMaster();
}
Keeping Address Book in Sync
Perhaps some third-party tools make changes to a device Address Book when your application is running. In this scenario, it is important to keep information synchronized between the device Address Book and the instance of the Address Book with which your application is directly working. For this purpose, FireMonkey provides the TAddressBook.RevertCurrentChangesAndUpdate method.
To keep Address Book in Sync
- In the Object Inspector, select AddressBook1, and then open the Events tab.
- Double-click next to OnExternalChange, and then implement the following event handler:
- For Delphi:
procedure TForm1.AddressBook1ExternalChange(ASender: TObject);
begin
  AddressBook1.RevertCurrentChangesAndUpdate;
  FillContactsList;
end;
- For C++:
void __fastcall TForm1::AddressBook1ExternalChange(TObject *ASender) {
	AddressBook1->RevertCurrentChangesAndUpdate();
	FillContactsList();
}
Configuring Access to Address Book
Before using TAddressBook, your application should request a permission to access the Address Book on a target mobile device.
This section provides the steps to configure your Android and iOS applications to access the Address Book on the target mobile devices.
To request a permission to access the Address Book:
- In the Object Inspector, select Form1, and then open the Events tab.
- Double-click next to onShow, and then implement the following event handler:
- For Delphi:
procedure TForm1.FormShow(Sender: TObject);
begin
  // Display this information box while loading the contacts
  if AddressBook1.Supported then
  begin
    TDialogService.ShowMessage('Loading contacts...');
    AddressBook1.RequestPermission;
  end
  else
    ShowMessage('This platform does not support the Address Book service');

end;
- For C++:
void __fastcall TForm1::FormShow(TObject *Sender) {
	if (AddressBook1->Supported()) {
		// Display this information box while loading the contacts
		TDialogService::ShowMessage("Loading contacts...");
		AddressBook1->RequestPermission();
	}
	else {
		TDialogService::ShowMessage
			("This platform does not support the Address Book service.");
	}
}
Note To use the TDialogService.ShowMessage method, ensure that your code includes the following instructions:
Delphi:
uses
  FMX.DialogService;
C++:
#include <FMX.DialogService.hpp>
- In the Object Inspector, select AddressBook1, and then open the Events tab.
- Double-click next to OnPermissionRequest, and then implement the following event handler:
- For Delphi:
procedure TForm1.AddressBook1PermissionRequest(ASender: TObject;
  const AMessage: string; const AAccessGranted: Boolean);
begin
 if AAccessGranted then
   Begin
      FillContactlist;
   End
                   else
      ShowMessage('You cannot access Address Book. Reason: ' + AMessage);


end;
- For C++:
void __fastcall TForm1::AddressBook1PermissionRequest(TObject *ASender,
	const UnicodeString AMessage, const bool AAccessGranted) {

	if (AAccessGranted) {
		FillContactsList();

	}
	else {
		ShowMessage("You cannot access Address Book. Reason: " + AMessage);
	}
}
Configuring Android Applications to Access the Address Book
Before running Android applications that use the TAddressBook component, you need to configure some Uses Permissions for your project.
To configure Uses Permissions:
- In the RAD Studio IDE, open Project > Options > Uses Permissions.
-
Enable the following permissions:
- Get accounts
- Read contacts
- Write contacts
Running the Sample Application
To run this application, do the following:
- In the Project Manager, select the target platform (supported platforms: Android or iOS).
Important: Before running this application on Android devices, ensure that you have completed the steps from Configuring Android Applications to Access the Address Book.
- Press
Shift+Ctrl+F9to run the application without debugging.
To test your application, you can use the following scenarios.
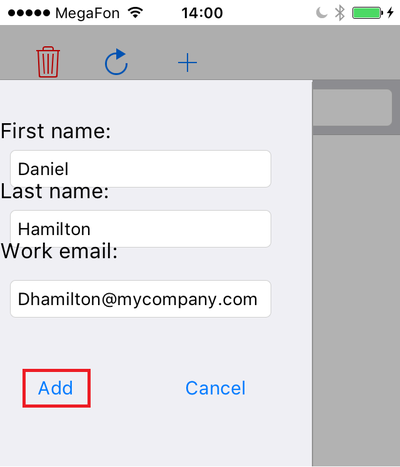
To add a new contact to Address Book
- On the application toolbar, tap .
This opens the Master Pane. -
In the Master Pane, enter appropriate information in the First name, Last name, and Work mail text boxes. When finished, tap Add to add the newly created contact to Address Book.

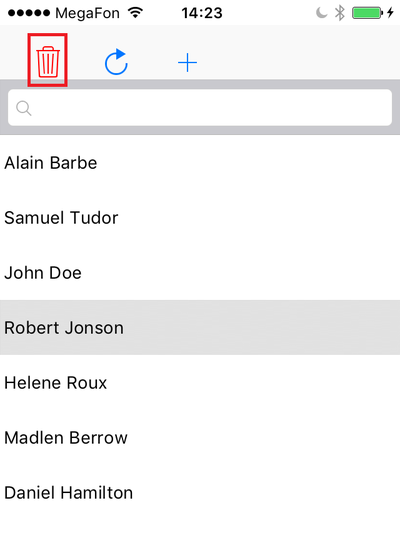
To delete a contact
- In the contacts list, tap a contact to delete.
- On the application toolbar, tap
Attention! This removes the contact from the device Address Book without displaying a confirmation prompt!

See Also
- TAddressBook
- Mobile Tutorial: Using a MultiView Component to Display Alternate Views of Information (iOS and Android)
- Mobile Tutorial: Using ListBox Components to Display a Table View (iOS and Android)