User:Mariac/Creating the Client Side with DataSnap Server and FireDac (InterBase Tutorial)
Go Up to Tutorial: Using an InterBase Database in a Delphi or C++ Application
Now we create a client that uses the server. The client exercises both functions of the server:
- Call GetTable and return a TDataSet.
- Display the database table in a TStringGrid.
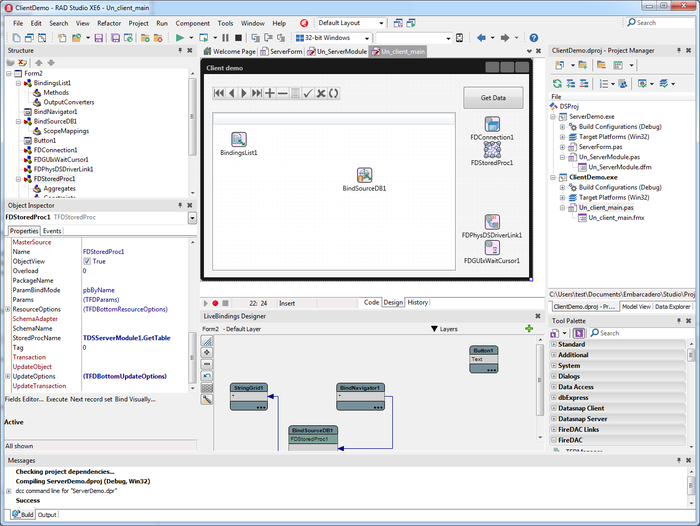
Here is a view of the client application's form with the components we will be adding:
Follow these steps to create the client application.
- To create the client application in the same project group as the server application, right-click the name of the project group in the Project Manager and select Add New Project or choose Project > Add New Project.
- The New Items dialog box appears.
- For Delphi, select the Delphi Projects category, then select FireMonkey Desktop Application.
- For C++Builder, select the C++Builder Projects category, then select FireMonkey Desktop Application.
- Click OK. Select the new form and set its Caption property to "Client demo" in the Object Inspector. Choose File > Save All to save the files:
- For Delphi, save the unit as Un_client_main.pas. Save the project as ClientDemo.dproj.
- For C++, save the unit as Un_client_main.cpp. Save the project as ClientDemo.cbproj.
- Now run the server that you built in the previous section. Double-click ServerDemo.exe in the Project Manager. Choose Run > Run Without Debugging to run it. You can minimize the ServerForm dialog that appears.
- Note: You need to have the server running to be able to connect to the server.
- Add the following components to the form:
- A TFDConnection component . Set its properties as follows:
- On the Object Inspector, set the DriverName property to "DS".
- Right-click the component to display additional properties:
- Set Port to "211" (default).
- Set HostName to "localhost" or "127.0.0.1" (default).
- These properties can also be set by changing the Params property. Click on the ellipsis (...) button in the Params property to display the String List Editor. You can enter property values in this dialog, then click OK to set the values.
- Set LoginPrompt to false to prevent the user name and password dialog appearing every time the client connects to the server.
- Set Connected to True.
- A TFDStoredProc component.
- You can edit the StoredProcName property on the Object Inspector with the function form the server: TDSServerModule1.GetTable. You can also assign this property name at run-time.
- A TFDPhysDSDriverLink component.
- A TFDGUIxWaitCursor component.
- A TFDConnection component . Set its properties as follows:
- Now add the components to interact with the table. Drag the following components from the Tool Palette:
- A TBindNavigator control to navigate through the database.
- A TStringGrid control to view a database table.
- A TButton to load the database table. Set the corresponding TButton Caption to "Get Data".
- Bind the components visually using the LiveBindings Designer
- Link the TFDStoredProc component to the TStringGrid.
- Two new components are automatically added to the form: a TBindSourceDB and a TBindingsList.
- Also link the TBindNavigator to the TBindSourceDB.
- Double-click the "Get Data" button to generate the skeleton code for the event handler. Add the following code in the event handler:
- Add the following code to the OnCreate event of the Form:
After you have placed the components, move and resize them as needed.
Delphi
procedure TForm2.Button1Click(Sender: TObject);
begin
 if FDStoredProc1.Active then
    FDStoredProc1.Close;

  FDStoredProc1.Unprepare;
  FDStoredProc1.StoredProcName := 'TDSServerModule1.GetTable';
  FDStoredProc1.Open;

end;
procedure TForm2.FormCreate(Sender: TObject);
begin
  FDConnection1.Open();
end;
This completes the client running as an application.
Previous
Creating the Server Side with DataSnap Server
