Mobile Tutorial: Using Notifications (iOS and Android)
Contents
- 1 Three Basic Notification or Alert Styles
- 2 Notification Center on Mobile Devices
- 3 Access the Notification Service
- 4 Add FMLocalNotificationPermission (iOS)
- 5 Set the Icon Badge Number and Notification Number from Code
- 6 Schedule Notification
- 7 Repeat a Notification Message
- 8 Update or Cancel a Scheduled or Repeated Notification Message
- 9 Present the Notification Message Immediately
- 10 Customizing the Notification Sound
- 11 Notification Banner or Notification Alert
- 12 Add Action to the Notification Alert (iOS Only)
- 13 Add Action to Notifications
- 14 Running the Application
- 15 See Also
Go Up to Mobile Tutorials: Mobile Application Development (iOS and Android)
This tutorial describes the basic steps to use notifications on your mobile device; for further details, see using notifications.
Three Basic Notification or Alert Styles
When users set notifications for apps on their mobile devices, notifications can be delivered from apps in the three basic styles shown here. The banner appears briefly, but the alert dialog box requires dismissal by the user.
Notification Banner on Mobile Devices
| iOS |
|---|
|
|

| Android |
|---|
|
|

Alert Dialogs: iOS Badge Number and Android Notification Number
| iOS Badge Number | |
|---|---|
 iPad |
| Android Notification Number |
|---|
 Android |
Notification Center on Mobile Devices
The following images show the notification center on an iPad (Notification Center) and Android (notification drawer), where the user can pull down the list of all recent notifications.
| iOS |
|---|
|
|

| Android |
|---|
|
|

Access the Notification Service
RAD Studio provides the TNotificationCenter component that allows you to easily access the Notification Service.
To access the notification service, do the following:
- Create a new mobile application:
- For Delphi: File > New > Multi-Device Application - Delphi
- For C++: File > New > Multi-Device Application - C++Builder
- Select the TNotificationCenter component in the Tool Palette, and drop it on the Form Designer.
- Check that the following unit has been automatically added to the project:
- For Delphi applications, add the following unit to the uses clause if it is not present:
uses
  System.Notification;
- For C++ applications, add the following include operator to the project header file (.h file):
#include <System.Notification.hpp>
The System.Notification.TNotificationCenter.CreateNotification method allows you to create an instance of the TNotification class object.
Add FMLocalNotificationPermission (iOS)
In order to use notifications on iOS 8+ devices, you need to ensure that the FMLocalNotificationPermission Key/Value pair is enabled on the Version Info page of Project Options.
- Choose Project > Options > Version Info.
- In the Target field, select Debug configuration - iOS device - 32-bit platform.
- Set the Value field for FMLocalNotificationPermission to true.
- The FMLocalNotificationPermission setting enables local notifications on iOS 8+ devices:

Set the Icon Badge Number and Notification Number from Code
TNotification.Number defines the Icon Badge Number (for iOS devices) and the notification number (for Android devices).
To set the iOS icon badge number (for Delphi or C++) or the Android notification number (only for Delphi apps), you need to implement the corresponding method.
- Drop a TButton to the form.
- In the Object Inspector, change the Name property to SetNumber.
- Create the OnClick event of the SetNumber button by double-clicking the button.
- Implement the event handler for the OnClick event of the SetNumber button by adding the following code:
- For Delphi:
procedure TForm1.SetNumberClick(Sender: TObject);
var
  MyNotification: TNotification;
begin
  // Create an instance of TNotification
  MyNotification := NotificationCenter1.CreateNotification;
  try
      // --- your code goes here ---
      // Set the icon or notification number
      MyNotification.Number :=18;
      // Set the alert message
      MyNotification.AlertBody := 'Delphi for your mobile device is here!';
      // Note: You must send the notification to the notification center for the Icon Badge Number to be displayed.
      NotificationCenter1.PresentNotification(MyNotification);
  finally
    MyNotification.DisposeOf;
  end;
end;
- For C++:
void __fastcall TForm1::SetNumberClick(TObject *Sender)
{
        if (NotificationCenter1->Supported()) {
                TNotification *myNotification = NotificationCenter1->CreateNotification();
                __try {
                        myNotification->Number = 18;
                        myNotification->AlertBody = "C++ for your mobile device is here!";
                        NotificationCenter1->PresentNotification(myNotification);
                }
                __finally {
                        myNotification->DisposeOf();
                }
        }

}
- For Delphi:
After running your application (press F9) and clicking the SetNumber button, you can see the following:
- A badge on the application icon (on the iOS Home screen):
- A number next to the notification message in the notification center (on Android):
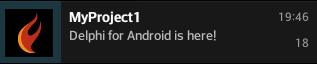 Android
Schedule Notification
You can also schedule Notification Messages using the ScheduleNotification method that the TNotificationCenter class inherits from TCustomNotificationCenter.
To show a Notification Message, you need to create an instance of the TNotification class, and then define the Name, AlertBody, and FireDate fields.
- Drop a new TButton to the form.
- In the Object Inspector, change the Name property to ScheduleNotification.
- Create the OnClick event of the ScheduleNotification button by double-clicking the button.
- Implement the event handler for the OnClick event of the ScheduleNotification button by adding the following code:
- For Delphi:
procedure TForm1.ScheduleNotificationClick(Sender: TObject);
var
  MyNotification: TNotification;
begin
  MyNotification := NotificationCenter1.CreateNotification;
  try
    MyNotification.Name := 'MyNotification';
    MyNotification.AlertBody := 'Delphi for your mobile device is here!';
    // Fired in 10 seconds
    MyNotification.FireDate := Now + EncodeTime(0, 0, 10, 0);
    // Send notification to the notification center
    NotificationCenter1.ScheduleNotification(MyNotification);
  finally
    MyNotification.DisposeOf;
  end;
end;
- For C++:
void __fastcall TForm1::ScheduleNotificationClick(TObject *Sender)
{
        if (NotificationCenter1->Supported()) {
                TNotification *myNotification = NotificationCenter1->CreateNotification();
                __try {
                        myNotification->Name = "MyNotification";
                        myNotification->AlertBody = "C++ for your mobile device is here!";
                        // Fire in 10 seconds
                        myNotification->FireDate = Now() + EncodeTime(0, 0, 10, 0);
                        // Send notification to the notification center
                        NotificationCenter1->ScheduleNotification(myNotification);
                }
                __finally {
                        myNotification->DisposeOf();
                }

        }
}
After running your application (press F9) and clicking the ScheduleNotification button, you can see the Notification Message (AlertBody) at the top of your device Home Screen. For iOS devices, this message is similar to the following screen:

Repeat a Notification Message
You can also repeat a Notification Message using the RepeatInterval property of the TNotification object.
To repeat a Notification Message, you need to create an instance of the TNotification class, and then define the Name, AlertBody, and FireDate fields.
Also you need to use the ScheduleNotification method and set the RepeatInterval property. In the following code, the repeated interval is set to a minute.
- Drop a new TButton to the form.
- In the Object Inspector, change the Name property to RepeatedNotification.
- Create the OnClick event of the RepeatedNotification button by double-clicking the button.
- Implement the event handler for the OnClick event of the RepeatedNotification button by adding the following code:
- For Delphi:
procedure TForm1.RepeatedNotificationClick(Sender: TObject);
var
  MyNotification: TNotification;
begin
  MyNotification := NotificationCenter1.CreateNotification;
  try
    MyNotification.Title := 'MyNotification';
    MyNotification.AlertBody := 'Repeating notification each minute!';
    //Fired in 10 seconds
    MyNotification.FireDate := Now + EncodeTime(0, 0, 10, 0);
    //Repeated each minute
    MyNotification.RepeatInterval := TRepeatInterval.Minute;
    // Send notification to the notification center
    NotificationCenter1.ScheduleNotification(MyNotification);
  finally
    MyNotification.Free;
  end;
end;
- For C++:
void __fastcall TForm1::RepeatedNotificationClick(TObject *Sender) {
    if (NotificationCenter1->Supported()) {
        TNotification *myNotification =
            NotificationCenter1->CreateNotification();
        __try {
            myNotification->Name = "MyNotification";
            myNotification->AlertBody = "Repeating notification each minute!";
            // Fire in 10 seconds
            myNotification->FireDate = Now() + EncodeTime(0, 0, 10, 0);
            // Repeated each minute
            myNotification->RepeatInterval = TRepeatInterval::Minute;
            // Send notification to the notification center
            NotificationCenter1->ScheduleNotification(myNotification);
        }
        __finally {
            myNotification->Free();
        }

    }

}
After running your application (press F9) and clicking the RepeatedNotification button, you can see the Notification Message (AlertBody) at the top of your device Home Screen. For iOS devices, this message is similar to the following screen:

Update or Cancel a Scheduled or Repeated Notification Message
Each Scheduled Notification Message is identified through the Name property of the TNotification object.
- Note: For the iOS platform, CancelNotification and ScheduleNotification can cancel or update those notifications that have not been presented yet.
To update a scheduled notification, simply call the ScheduleNotification method again with an instance of TNotification that has the same name (Name property).
To cancel a scheduled notification, you can simply call the CancelNotification method with the identifier you used.
- Drop a new TButton to the form.
- In the Object Inspector, change the Name property to CancelNotification.
- Create the OnClick event of the CancelNotification button by double-clicking the button.
- Implement the event handler for the OnClick event of the CancelNotification button by adding the following code:
- For Delphi:
procedure TForm1.CancelNotificationClick(Sender: TObject);

begin
   NotificationCenter1.CancelNotification('MyNotification');
end;
- For C++:
  void __fastcall TForm1::CancelNotificationClick(TObject *Sender)
{
   NotificationCenter1->CancelNotification("MyNotification");
}
Present the Notification Message Immediately
You can also show the notification message immediately through the PresentNotification function.
To show a notification message, you need to create an instance of the TNotification class, and then define the Name and AlertBody fields.
- Drop a new TButton to the form.
- In the Object Inspector, change the Name property to PresentNotification.
- Create the OnClick event of the PresentNotification button by double-clicking the button.
- Implement the event handler for the OnClick event of the PresentNotification button by adding the following code:
- For Delphi:
procedure TForm1.PresentNotificationClick(Sender: TObject);
var
  MyNotification: TNotification;
begin
  MyNotification := NotificationCenter1.CreateNotification;
  try
    MyNotification.Name := 'MyNotification';
    MyNotification.AlertBody := 'Delphi for your mobile device is here!';
    // Set Icon Badge Number (for iOS) or message number (for Android) as well
    MyNotification.Number := 18;
    MyNotification.EnableSound := False;
    // Send message to the notification center
    NotificationCenter1.PresentNotification(MyNotification);
  finally
    MyNotification.DisposeOf;
  end;
end;
- For C++:
void __fastcall TForm1::PresentNotificationClick(TObject *Sender)
{
  if (NotificationCenter1->Supported()) {
           TNotification *myNotification = NotificationCenter1->CreateNotification();
           __try {
                   myNotification->Name = "MyNotification";
                   myNotification->AlertBody = "C++ for your mobile device is here!";
                   // Set Icon Badge Number (for iOS) or message number (for Android) as well
                   myNotification->Number = 18;
                   myNotification->EnableSound = False;
                   // Send notification to the notification center
                   NotificationCenter1->PresentNotification(myNotification);
          }
          __finally {
                   myNotification->DisposeOf();
          }
 }

}
Customizing the Notification Sound
You can use a customized sound for the notification message immediately through the SoundName property of the TNotification object.
You need to create an instance of the TNotification class, define the EnableSound and the SoundName properties. You also need to indicate the full path to the file sound and the file extension.
- Drop a new TButton to the form.
- In the Object Inspector, change the Name property to SoundNotification.
- Create the OnClick event of the SoundNotification button by double-clicking the button.
- Implement the event handler for the OnClick event of the SoundNotification button by adding the following code:
- For Delphi:
procedure TForm1.SoundNotificationClick(Sender: TObject);
var
  MyNotification: TNotification;
begin
  MyNotification := NotificationCenter1.CreateNotification;
  try
    MyNotification.Name := 'MyNotification';
    MyNotification.AlertBody := 'Delphi for your mobile device is here!';
    MyNotification.EnableSound := True;
    MyNotification.SoundName := GetSoundName;
    MyNotification.FireDate := Now + EncodeTime(0, 0, 10, 0);
    // Send message to the notification center
    NotificationCenter1.ScheduleNotification(MyNotification);
  finally
    MyNotification.Free;
  end;
end;
- For C++:
- In the .cpp file, add the following code:
void __fastcall TForm1::SoundNotificationClick(TObject *Sender)
{
TNotification *myNotification = NotificationCenter1->CreateNotification();
        __try {
            myNotification->Name = "MyNotification";
            myNotification->AlertBody = "C++ for your mobile device is here!";
            myNotification->EnableSound = true;
            myNotification->SoundName = GetSoundName();
            myNotification->FireDate = Now() + EncodeTime(0, 0, 10, 0);
            // Send notification to the notification center
           NotificationCenter1->ScheduleNotification(myNotification);
        }
        __finally {
            myNotification->Free();
        }
}
- Declare the GetSoundName function.
- For Delphi:
- Set the GetSoundName declaration in the private section of the unit.
- Add the System.IOUtils to the project uses clauses.
uses
  System.IOUtils;
private
    function GetSoundName: string;
- For C++:
- In the header file (.h file), add the following declaration:
- Set the GetSoundName declaration in the private section of the unit.
- Include the
System.IOUtils.hppto the project uses clauses.
#include <System.IOUtils.hpp>
private:    // User declarations
     __fastcall  UnicodeString GetSoundName ();
- For Delphi:
- Implement the GetSoundName function.
- Note: Depending on the target operating system, the sound data should be a different file extension.
- For Delphi:
{$R *.fmx}
function TForm1.GetSoundName: string;
begin
{$IFDEF IOS}
  Result := 'myiOSSound.caf';
{$ENDIF}
{$IFDEF ANDROID}
  Result := TPath.Combine(TPath.GetSharedDocumentsPath, 'myAndroidSound.mp3');
{$ENDIF}
end;
- For C++:
- In the .cpp file, add the following code:
UnicodeString __fastcall TForm1::GetSoundName ()
{
    UnicodeString result;
#if defined(_PLAT_IOS)
    result = "myiOSSound.caf";
#endif
#if defined(__ANDROID__)
    result = System::Ioutils::TPath::Combine(System::Ioutils::TPath::GetSharedDocumentsPath(), "myAndroidSound.mp3");
#endif
    return result;
  //
}
- Add the sound files to your project:
- Find the myAndroidSound.mp3 and myiOSSound.caf files in the Windows Explorer, and drag them to the Projects Window. Drop them on the name of your project.
- Note: The sound files myAndroidSound.mp3 and myiOSSound.caf are not included in the RAD Studio installation. You can use any MP3 and CAF files that you have, but remember to change the name in the code snippet above to the name of your files. See this link for more information on how to convert MP3 files to CAF format: How to convert MP3 to CAF
- In the Confirm dialog, click Yes to add the sound files to your project.
- Find the myAndroidSound.mp3 and myiOSSound.caf files in the Windows Explorer, and drag them to the Projects Window. Drop them on the name of your project.
- Open the Deployment Manager to ensure that the sound files are deployed with your application. You can see the corresponding entries in the remote path column:
- For iOS:
StartUp\Documents(see deploying files in iOS applications). - For Android:
assets\internal(see deploying files in Android applications).
- For iOS:
- Change the remote path of the added files in the Deployment Manager:
- For iOS:
.\ - For Android:
assets\
- For iOS:
Notification Banner or Notification Alert
By default, your application shows the notification banner:
- Notification Banner on iPad
- Notification Banner on Android devices
- Android
- Notification Alert (only for iOS devices)
To use a notification alert instead of a notification banner (only for iOS devices), the end user needs to change the Alert style to Alerts through the configuration page of Notification Center, available in the device Settings:

Add Action to the Notification Alert (iOS Only)
You can also customize an alert by adding an Action button that opens the application.
To customize an Alert Action, you need to set the AlertAction field to the Action button name, and then set the HasAction field to True, as follows.
- Drop a new TButton to the form.
- In the Object Inspector, change the Name property to ActionNotification.
- Create the OnClick event of the ActionNotification button by double-clicking the button.
- Implement the event handler for the OnClick event of the ActionNotification button by adding the following code:
- For Delphi:
procedure TForm1.ActionNotificationClick(Sender: TObject);
var
  MyNotification: TNotification;
begin
   MyNotification := NotificationCenter1.CreateNotification;
  try
    MyNotification.Name := 'MyNotification';
    MyNotification.AlertBody := 'Delphi for iOS is here! ';
    MyNotification.Number := 2;
    MyNotification.AlertAction := 'Launch';
    MyNotification.HasAction := True;
    MyNotification.FireDate := Now + EncodeTime(0, 0, 20, 0);
    NotificationCenter1.ScheduleNotification(MyNotification);
  finally
    MyNotification.DisposeOf;
  end;
end;
- For C++:
void __fastcall TForm1::ActionNotificationClick(TObject *Sender)
{
   if (NotificationCenter1->Supported()) {
           TNotification *myNotification = NotificationCenter1->CreateNotification();
           __try {
                   myNotification->Name = "MyNotification";
                   myNotification->AlertBody = "C++ for iOS is here!";
                   myNotification->Number = 2;
                   myNotification->AlertAction = "Launch";
                   myNotification->HasAction = True;
                   myNotification->FireDate = Now() + EncodeTime(0,0,20,0);
                   NotificationCenter1->ScheduleNotification(myNotification);
           }
           __finally {
                   myNotification->DisposeOf();
           }
   }
 }
Note: Only iOS devices support the notification alert feature.
The notification alert opens at the time that was specified through the FireDate field.

Add Action to Notifications
The TNotificationCenter class provides the onReceiveLocalNotification event handler that allows you to write a response when the user clicks the notification message in the notification center. To write the response, double-click the TNotificationCenter component on the Form Designer, and then implement the OnReceiveLocalNotification event handler.
The following code snippet implements a response to show a message box that says "The <Notification name>" notification clicked."
- For Delphi:
 procedure TForm1.NotificationCenter1ReceiveLocalNotification(Sender: TObject; ANotification: TNotification);
   begin
     ShowMessage('The ' + ANotification.Name + ' notification clicked.' );
   end;
- For C++:
void __fastcall TForm1::NotificationCenter1ReceiveLocalNotification(TObject *Sender, TNotification *ANotification)
{
       ShowMessage("The " + ANotification->Name + " notification clicked.");
}

Running the Application
To run the application, either choose Run > Run or press F9. Click the different buttons to schedule or present notifications in your device.
See Also
- Using Notifications
- Mobile Tutorial: Taking and Sharing a Picture, and Sharing Text (iOS and Android)
- Mobile Tutorial: Using Location Sensors (iOS and Android)
- Mobile Tutorial: Using Remote Notifications (iOS and Android)
- Mobile Code Snippets: Notifications
- Creating events Index
- Using the macOS Notification Center
- How to convert MP3 to CAF
Samples
- FireMonkey Send Cancel Notification sample
- FireMonkey Android Notification Service sample
- FireMonkey Set Reset Badge Number sample
- OSX Dock Badges (Delphi)
- FireMonkey Notification Mac (Delphi)
- FireMonkey Notification Mac (C++)