Step 1 - Create a Component Using the New Component Wizard
Go Up to Creating a Styled FireMonkey Component by Extending an Existing Component
- Select Component > New Component.
- On the first page of the New Component wizard, select FireMonkey for Delphi or FireMonkey for C++ :
- On the Ancestor Component page, select TLabel as the ancestor of the new component:
- On the New Component page, enter TClockLabel as the name of the class. In the Unit name field, enter
C:\Users\<user>\Documents\Embarcadero\Studio\Projects\ClockLabel.pasas the name of a file to create:
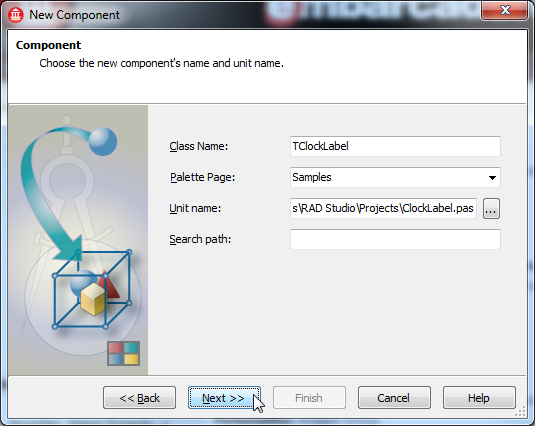
- Note: Remember the specified path.
- On the Create Unit page, select Install to New Package:
- On the New Package page, set ClockLabel as the name of the new package to generate:
- The wizard opens the Save '<UnitFile>' As dialog box, asking for confirmation of the name and the path of the generated unit file:
- Create a folder for your new component package by clicking New folder and supplying a name such as ClockLabel.
- Check that
C:\Users\<user>\Documents\Embarcadero\Studio\Projects\ClockLabel\ClockLabel.pasis displayed. Carefully check that the shown path is correct!
- Now you have created your new package project. Select Yes to confirm that this package is for FireMonkey:
- The following message confirms that your new component is built, installed, and registered in RAD Studio:
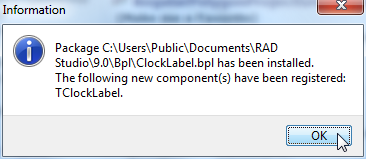
- Note: Remember the path of the created
.BPLfile.
- Create a new Multi-Device Application by right-clicking the project group in the Project Manager and selecting Add New Project from the context menu. Then select Blank Application:
- Save your new Multi-Device Application as TestClockLabel.dproj and save the Unit as TestClockLabelUnit.pas. Save the project group as ClockLabelProjectGroup.groupproj by right-clicking the project group item in the Project Manager and selecting Save Project Group As from the context menu. Notice that the command first sequentially shows dialog boxes asking to save each project in the project group and in the end it shows the dialog box for saving the project group.
- Now you see the TClockLabel component on the Tool Palette when Form1 is shown in the Form Designer. However, when you drop TClockLabel onto the Form Designer, you may notice that TClockLabel just looks like TLabel. This is because you have not implemented any new features yet.
- Next, you implement the TClockLabel component.


