Configuring Android Applications to Use Google Maps
Go Up to Mobile Tutorial: Using a Map Component to Work with Maps (iOS and Android)
This topic explains how to configure your Android applications to use the TMapView component and Google Maps Android API.
The following subjects are covered:
- Getting Google Maps API key
- Configuring specific project options
Contents
Getting the Google Maps API key
To access the Google Maps servers with the Maps API, you have to add a Maps API key to your application. This section outlines basic steps to get this key:
- Retrieve information about the certificate of your application.
- Register a project in the Google APIs Console and add the Maps API as a service for the project.
- Request a MAPS API key.
Note: For more information and detailed instructions, see Get an Android certificate and the Google Maps API key.
Retrieving Your Application Certificate
The Maps API key is based on a short form of the digital certificate of your application, known as its SHA-1 fingerprint. The fingerprint is a unique text string generated from the commonly-used SHA-1 hashing algorithm. You may have certificates of two types: Debug certificate and Release certificate.
Note: This section explains how to retrieve the debug certificate. For information on how to retrieve the release certificate, see Get an Android certificate and the Google Maps API key.
To display the debug certificate fingertip
- Locate the appropriate debug.keystore file. RAD Studio uses the debug.keystore file located into:
%Users%\<user name>\AppData\Roaming\Embarcadero\BDS\<version number>\, for example:
C:\Users\JohnDoe\AppData\Roaming\Embarcadero\BDS\17.0\debug.keystore- Tip: If you cannot find the debug.keystore file in the above mentioned location, run your application on the Android target platform, and then RAD Studio automatically creates this file.
-
Find the keytool.exe file. The
keytooltool is available in<Java installation folder>\Bin, for example:
C:\Program Files\Java\jdk1.7.0_71\bin\. -
Switch to the folder where the debug.keystore file is located and run:
keytool -list -v -keystore debug.keystore -alias androiddebugkey -storepass android -keypass android
- Tip: You need to add the full path to
keytool; if the keytool.exe file is located in the example provided above, you can use the following: "C:\Program Files\Java\jdk1.7.0_71\bin\keytool" -list -v -keystore debug.keystore -alias androiddebugkey -storepass android -keypass android
- Tip: You need to add the full path to
-
The
keytooltool displays an output similar to this:Alias name: androiddebugkey Creation date: Jan 24, 2015 Entry type: PrivateKeyEntry Certificate chain length: 1 Certificate[1]: Owner: CN=Unnamed, OU=Mobile Organization, O=My Company, L=San Francisco, ST=California, C=US Issuer: CN=Unnamed, OU=Mobile Organization, O=My Company, L=San Francisco, ST=California, C=US Serial number: 1af9d77f Valid from: Sat Jan 24 23:12:12 GST 2015 until: Wed Jun 11 23:12:12 GST 2042 Certificate fingerprints: MD5: 20:E1:7D:12:4F:83:2A:37:FB:F5:43:3B:CC:27:88:4B SHA1: 0B:4D:1E:83:2F:91:3A:BD:92:EB:87:62:6D:34:66:9D:6A:51:3B:ED SHA256: 91:75:AC:BE:C9:74:6F:67:3E:9A:E4:35:04:D4:05:E0:8F:A4:54:30:41:4A:EB:0A:61:E0:D1:33:7C:D8:0F:82 Signature algorithm name: SHA256withRSA Version: 3The line that begins SHA1 contains the certificate's SHA-1 fingerprint. The fingerprint is the sequence of 20 two-digit hexadecimal numbers separated by colons.
Creating an API Project in the Google APIs Console
Important: Before proceeding with this section, make sure that you have a Google Account.
- In a browser, navigate to the Google APIs Console.
Note: If you have not used the Google APIs Console before, you are prompted to create a project that you use to track your usage of the Google Maps Android API. Click Create Project to create a new project called API Project. On the next page, this name appears in the upper left-hand corner.
- Select Services from the left navigation bar.
The main window displays a list of APIs and services. - In the list of services, scroll down until you see Google Maps Android API v2.
- To the right of the entry, click the switch indicator so that it is on.
This displays the Google Maps Android API Terms of Service. -
If you agree to the terms of service, click the checkbox below the terms of service, and then click Accept.
This returns you to the list of APIs and services.
Requesting a Maps API Key
Now you can request an API key. It is possible to request and register more than one key per project.
To request an API key
- Navigate to your project in the Google APIs Console.
- In the Services page, verify that the "Google Maps Android API v2" is enabled.
- In the left navigation bar, click API Access.
- In the resulting page, click Create New Android Key.
-
In the resulting dialog, enter the SHA-1 fingerprint, then a semicolon, and then the package name of your application. For example:
0B:4D:1E:83:2F:91:3A:BD:92:EB:87:62:6D:34:66:9D:6A:51:3B:ED;my.company.MymapImportant: To get a valid Maps API key, ensure that you use the exact application's package name. This name uniquely identifies your application. The package key in the Android Version Information contains the package name (see the screenshot under the "To set the apiKey key value" procedure later in this document).
-
The Google APIs Console displays Key for Android apps (with certificates) followed by a forty-character API key, for example:
API key: AIzaSyCMuJ2w8_gQEedvqUg-9lxWXFg7feAl9PQ
Configuring Specific Project Options
For your Android application to access Google Maps, ensure that you have configured the following project options and permissions:
- Enable the Access network state uses permission.
- Enable the Maps Service entitlement option.
- Set the apiKey key value in the Android Version information.
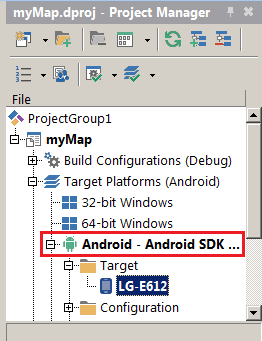
Important: Before proceeding with this section, in the Project Manager, set the Target Platform to
Android:

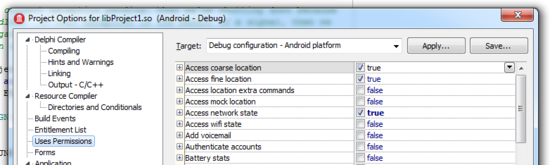
To check the configured permissions list
- In the RAD Studio IDE, open Project > Options > Uses Permissions
-
Ensure that the Access network state permission is enabled:

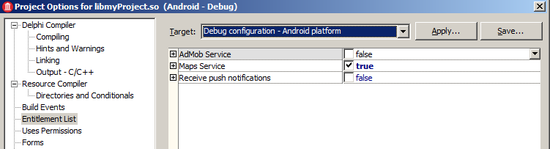
To check the Entitlement List
- In the RAD Studio IDE, open Project > Options > Entitlement List
-
Ensure that the Maps Service option is enabled:

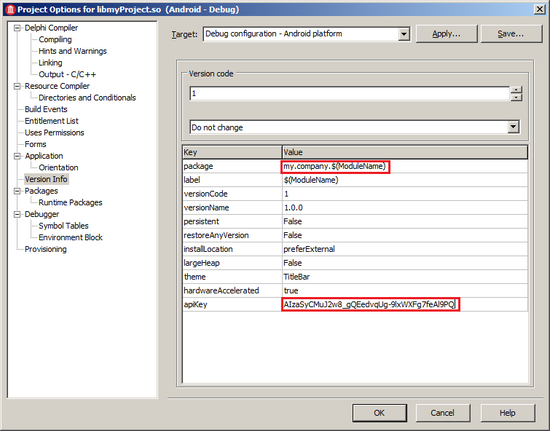
To set the apiKey key value
- In the RAD Studio IDE, open Project > Options > Version Info
- Set the apiKey key to the Maps API key value that you have requested for your application (see Step 6 in the Requesting a Maps API Key section earlier in this document).
-
Click OK.

Important: For your changes to the project options to take effect, press
Shift + F9to rebuild your project.