Managing BaaS Users
Go Up to BaaS Overview
Before you read this page, ensure you previously see the below pages:
You can add user authentication to your apps using the BaaS providers Kinvey and Parse.
Using BaaS to manage users allows you to:
- Users: sing up, update, delete, and retrieve user details.
- User sessions: log in and out.
- User groups/roles: create, retrieve, update, and delete.
- Manage user authentication using other identities (like social networks).
Contents
Components
Use the following components in your application to manage BaaS users:
- The TBackendUsers service component allows you to perform user actions. Use this non-visual component to sing up, log in, retrieve, update and delete users.
Apart from the service component, you need one of the BaaS provider components:
- TKinveyProvider – Use this component when using Kinvey as a BaaS provider. This component contains information about the cloud service connection and sets up the connection with the Kinvey BaaS provider.
- TParseProvider – Use this component when using Parse as a BaaS provider. This component contains information about the cloud service connection and sets up the connection with the Parse BaaS provider.
Creating New Users
Add users to your BaaS applications to secure the access. Both BaaS providers Kinvey and Parse allow you to create and manage users as part of the backend service they provide. You can create a new user from the Kinvey and Parse websites or create it from your application using the REST.Backend API.
Creating a New User from Kinvey website
Once you have created an account and an application with Kinvey, you can add users to your application to use authentication in your apps to secure the access. To create a user from the Kinvey website, go to your console and click Development in the app you want to create the user for. Click Users from the menu and then click on Add User… to create a new user.
Enter the appropriate information and click Create User.
Creating a New User from Parse website
Once you have created an account and an application with Parse you can add users to your application to use authentication in your apps to secure the access. To create a user from the [Parse website], go to [your dashboard] and enter the Core of the application you want to create the user for. Click on the menu Data and click on Add Class. From the drop down menu or create a new class, select User and click Create Class.
The new menu option User is now available under Data, go to this option, create a new row + Row and add the appropriate information to add a new user.
Creating a New Kinvey or Parse User with the REST API
You can create a new Kinvey or Parse user using the REST.Backend API. This allows you to embed in your application the option to create a new user, so for example new users can register from your app.
To create a new user from your app:
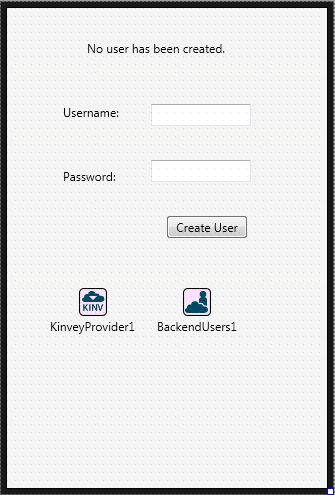
- Create a new Multi-device application.
- Drop the following components on the form:
- TEdit set the Name property to username.
- TEdit: set the Name property to password.
- TLabel: set the Text property to Username: and place it next to the username TEdit.
- TLabel: set the Text property to Password: and place it next to the password TEdit.
- TLabel: set the Name property to lastAction and the Text property to No user has been created.
- TButton: set the Text property to Create User and the Name property to CreateUserButton.
- TKinveyProvider if you are working with Kinvey as a BaaS provider or a TParseProvider if you are working with Parse as a BaaS provider.
- TBackendUsers and ensure the Provider property is set to KinveyProvider1 or ParseProvider1 depending on the BaaS provider you are using.
- Depending on the BaaS provider you are using:
- Select the KinveyProvider1 component and in the Object Inspector set the AppKey, AppSecret, and MasterSecret to the values provided by Kinvey in your app.
- Select the ParseProvider1 component and in the Object Inspector set the ApplicationID, MasterKey, and RestApiKey to the values provided by Parse in your app.
- Double-click the CreateUserButton and add the following code:
- To run your project, press F9 or choose Run > Run.
Delphi:
procedure TForm3.CreateUserButtonClick(Sender: TObject);
var
LEntity: TBackendEntityValue;
begin
  BackendUsers1.Users.SignupUser(username.Text, password.Text, nil, LEntity);
  ShowMessage('New user created, with username: '+username.Text);
  lastAction.Text:=('Last user created: '+username.Text);
end;
C++:
void __fastcall TForm1::CreateUserButtonClick(TObject *Sender)
{
  TBackendEntityValue LEntity;
  BackendUsers1->Users->SignupUser(username->Text, password->Text, NULL, LEntity);
  ShowMessage("New user created, with username: "+username->Text);
  lastAction->Text=("Last user created: "+username->Text);
}
Managing User Sessions
Login and Logout
With Kinvey and Parse BaaS providers, you can use user sessions to use authentication in your apps in order to secure the access.
This sample shows you how to log in and log out to the BaaS service:
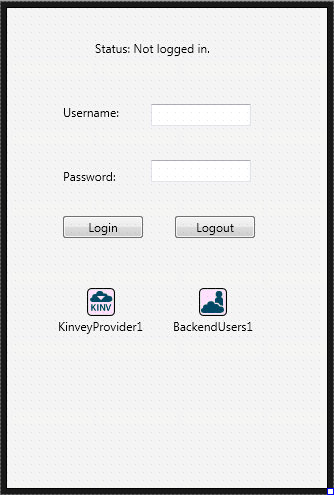
- Create a new Multi-device application.
- Drop the following components on the form:
- TEdit: set the Name property to username.
- TEdit: set the Name property to password.
- TLabel: set the Text property to Username: and place it next to the username TEdit.
- TLabel: set the Text property to Password: and place it next to the password TEdit.
- TLabel: set the Name property to status and the Text property to Status: Not logged in.
- TButton: set the Text property to Login and the Name property to LoginButton.
- TButton: set the Text property to Logout and the Name property to LogoutButton.
- TKinveyProvider if you are working with Kinvey as a BaaS provider or a TParseProvider if you are working with Parse as a BaaS provider.
- TBackendUsers and ensure the Provider property is set to KinveyProvider1 or ParseProvider1 depending on the BaaS provider you are using.
- Depending on the BaaS provider you are using:
- Select the KinveyProvider1 component and in the Object Inspector set the AppKey, AppSecret and MasterSecret to the values provided by Kinvey in your app.
- Select the ParseProvider1 component and in the Object Inspector set the ApplicationID, MasterKey and RestApiKey to the values provided by Parse in your app.
- Double-click the LoginButton and add the following code:
- Double-click the LogoutButton and add the following code:
- To run your project, press F9 or choose Run > Run.
Delphi:
procedure TForm1.LoginButtonClick(Sender: TObject);
begin
var
ACreatedObject: TBackendEntityValue;
begin
  BackendUsers1.Users.LoginUser(username.Text,password.Text, ACreatedObject);
  ShowMessage('You are logged in.');
  status.Text:=('Status: Logged in');
end;
C++:
void __fastcall TForm1::LoginButtonClick(TObject *Sender)
{
	TBackendEntityValue ACreatedObject;
	BackendUsers1->Users->LoginUser(username->Text, password->Text, ACreatedObject);
	ShowMessage("You are logged in.");
	status->Text=("Status: Logged in");
}
Delphi:
procedure TForm1.LogoutButtonClick(Sender: TObject);
begin
  BackendUsers1.Users.Logout;
  ShowMessage('You are logged out.');
  status.Text:=('Status: Not logged in');
end;
C++:
void __fastcall TForm1::LogoutButtonClick(TObject *Sender)
{
	BackendUsers1->Users->Logout();
	ShowMessage("You are logged out.");
	status->Text=("Status: Not logged in");
}
See Also
- Mobile Tutorial: Using BaaS for Backend Storage (iOS and Android)
- Mobile Tutorial: Using Remote Notifications (iOS and Android)


