Tutorial: Using a REST DataSnap Server with an Application
Go Up to Database and LiveBindings Tutorials
DataSnap technology provides the ability to create Client-Server applications that communicate through the Internet, the local network, or the local host.
The following example demonstrates the use of DataSnap in creating a simple local Client-Server application. Both the client and server applications are implemented in Delphi. After creating the server and activating the connection between the client and server with DataSnap, the client can call methods defined and implemented on the server.
You can implement a server in either Delphi or C++Builder. The client does not need to be implemented in the same language. DataSnap allows you to have a Delphi server and a C++Builder client—or vice versa.
Contents
Key DataSnap Server Components
The main components are:
The TDSServer component is the logical heart of the DataSnap server application. It contains the Start and Stop methods for starting and stopping the server. It also contains the AutoStart property. By default, the value of AutoStart is set to True, so the server starts automatically when the application does. You need only one TDSServer component per server application.
The TDSServerClass component represents a server class. The DataSnap server automatically creates and destroys instances of server classes.
The HTTP communication protocol provides the communication between the client and the server.
Creating the Server application
- Create a new project:
- Choose File > New > Other from the main menu.
- Go to the DataSnap Server node in the left column, under the C++Builder Projects or the Delphi Projects node.
- Select DataSnap REST Application and press OK.
- Specify the type of application:
- Select Stand-alone forms application and press the Next button.
- Choose one of the options:
- VCL application
- FireMonkey application
- Keep the default values to use HTTP communication protocol and press the Next button.
- Select the Server Methods Class option and press the Next button.
- Choose TComponent to entirely implement the server class and press the Next button.
- Choose the project location and press the Finish button.
- Change the Caption property of the Form1 to ServerForm.
- Click the main menu item File > Save All.
- Save the FormUnit1 as ServerUnit, the WebModuleUnit1 as WebModuleUnit1, the ServerMethodsUnit1 as ServerMethodsUnit1, and save the project as MyServerProj.
- At this point, all the DataSnap components needed were automatically added to the WebModuleUnit1:
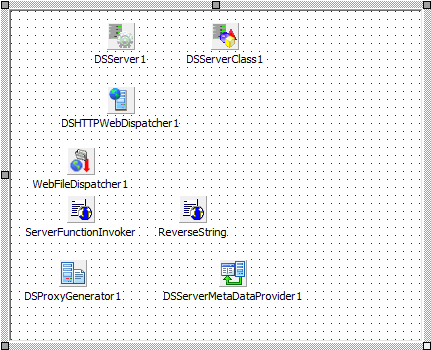


-
The ServerMethodsUnit1 contains the implementation of two simple methods called EchoString and ReverseString, which return the Value given as a parameter in normal respective reversed states.
In this example, we add a new method to ServerMethodsUnit1 - the sum of two floating-point numbers:
In Delphi:
unit ServerMethodsUnit1;

interface
uses System.SysUtils, System.Classes, Datasnap.DSServer, Datasnap.DSAuth;
type
  {$METHODINFO ON}
  TServerMethods1 = class(TComponent)
  private
    { Private declarations }
  public
    { Public declarations }
     function Sum(const A, B: Double): Double;
  end;
  {$METHODINFO OFF}

implementation
uses System.StrUtils;

function TServerMethods1.Sum(const A, B: Double): Double;
begin
  Result := A + B;
end;

end.
Note: The
{$METHODINFO ON}directive causes the generation of run-time information needed by the Datasnap server, so this is required--it is not just a comment! See METHODINFO directive (Delphi) for more information.In C++:
On the "ServerMethodsUnit1.h" add this function declaration:
double __fastcall sum(double A, double B);
Complete the code for the function you just added on "ServerMethodsUnit1.cpp":
double __fastcall TServerMethods1::sum(double A, double B)
{
	return A + B;
}
- Before creating the Client application, run the server:
- Choose Run > Run Without Debugging from the main menu.
- Click the Start button. You can minimize the ServerForm dialog that displays.
Creating the Client application
- To create the client application in the same project group as the server application, follow the steps below:
- In the Project Manager, right-click the ProjectGroup.
- Select the Add New Project option.
- From the Delphi Projects item, select Desktop Application, and click the OK button.
- Choose Blank Application and click the OK button.
- Click the main menu item File > New > Other.
- From the DataSnap Server node in the left column, select DataSnap REST Client Module and press the OK button.
- Specify the type of the module:
- Keep the default value selected--Local server--and press the Next button.
- Keep the default value selected--DataSnap stand alone server--and press the Next button.
- Keep the default value for the connection parameters and press the Finish button.
- Now the wizard has generated ClientModuleUnit and ClientClassesUnit.
- Change the Caption property of the Form2 to ClientForm.
- Click the main menu item File > Save All.
- Save the Unit2 as ClientUnit, the ClientModuleUnit1 as ClientModuleUnit, the ClientClassesUnit1 as ClientClassesUnit, and the project as MyClientProj.
- Save the Project Group to DSServerExample.
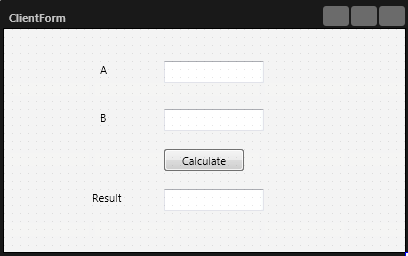
- Populate the client form with controls used for filling in the input data and writing the result (labels, edit boxes, and a button for calculating the sum) as shown in the figure below. Change the Name property of the TEdit next to the label A to EditA, and change the Name of the TEdit for B to EditB. Set the Name of the Result TEdit to EditResult. Change the Text property of all the TEdit controls to blank. Set the TButton's Name to Calculate.
- The client form now looks something like this:
- Add the units name ClientClassesUnit and ClientModuleUnit to the list of units in ClientUnit.pas.


- For C++, add the line
#include "ClientClassesUnit.h"and#include "ClientModuleUnit.h"to the beginning of ClientUnit.cpp.
- For C++, add the line
- Call the desired methods in the client application. In this example, implement the OnClick event for the TButton component to call the Sum method of the DataSnap client unit that you just automatically generated. Here the button's event handler is
TClientForm.CalculateClick(Delphi) orTClientForm::Button1Click(C++). - Note: If you change the server methods definition, you need to refresh the proxy. For this, right-click the TDSRestConnection component from ClientModuleUnit and click Generate DataSnap client classes in the context menu.
- Finally, build and run the client application. The client form is displayed. Enter decimal numbers in the A and B fields, click the Calculate button, and the sum should appear in the Result field.
In Delphi:
procedure TClientForm.CalculateClick(Sender: TObject);
var
  Temp: TServerMethods1Client;
  A, B: Double;
begin
  Temp := TServerMethods1Client.Create(ClientModule1.DSRESTConnection1);
try
  A := StrToFloat(EditA.Text);
  B := StrToFloat(EditB.Text);
  EditResult.Text := FloatToStr(Temp.Sum(A, B));
finally
  Temp.Free;
end;
end;
In C++:
void __fastcall TClientForm::Button1Click(TObject *Sender)
{
  TServerMethods1Client *Temp;
  double A, B;

  Temp = new TServerMethods1Client(ClientModule1->DSRestConnection1);
  try
  {
    A = StrToFloat(EditA->Text);
    B = StrToFloat(EditB->Text);
    EditResult->Text = FloatToStr(Temp->sum(A,B));
  }
  __finally
  {
    delete Temp;
  }
}
