Add Database Components (IBX No Code Tutorial)
Go Up to Tutorial: Using InterBase Express to Create an Application Without Code
This example allows you to view and navigate a database table with both text and image data.
Overview
The dialog box looks like this after you have assembled the components:

The visual components are placed on top of TPanel components. The visual components include data-aware components that can display database images and text. As the figure shows, data-aware components can display database data even in Design mode.
The four database components, such as TIBDatabase, are positioned over a TDBImage in the figure. These components are nonvisual, so their location on the form does not really matter.
Install InterBase
This example requires that InterBase is installed.
- InterBase 2020 is included in RAD Studio Sydney installation.
- Choose Start | Programs | Embarcadero InterBase 2020 | 64-bit/32-bit instance = gds_db | InterBase Server Manager [instance = gds_db] and verify that the InterBase server is running. The InterBase server must be running before you create or run the example.
- Make sure that the gds32.dll file can be found in your system path.
Create Project
Create a new project.
- For Delphi, choose File > New > VCL Form Application - Delphi.
- For C++, choose File > New > VCL Form Application - C++Builder.
In the Object Inspector, set the form's Caption property to "FISH FACTS". Change the form's Height to 425 and its Width component to 550.
Click File > Save All to save the project.
- For Delphi, save the file as FFactWin.pas. Save the project as FishFact.dproj.
- For C++, save the file as FFactWin.cpp. Save the project as FishFact.cbproj.
From this point on, the application is independent of the programming language. You handle the components identically in Delphi and C++Builder. You don't need to write any code.
Add Database Components
Add database components first. Later, you configure the data-aware components to get data from the database components.
- From the Tool Palette, drag a TIBDatabase, which represents an InterBase database connection, onto the form.
- Now you set the properties of the database.
Note: To set the properties of the TIBDatabase, you need to use two different tools:
- The Object Inspector, displayed by default in the lower left-hand part of the IDE or by choosing View > Object Inspector
- The Database Component Editor or Connection Broker Component Editor, displayed by double-clicking the new TIBDatabase
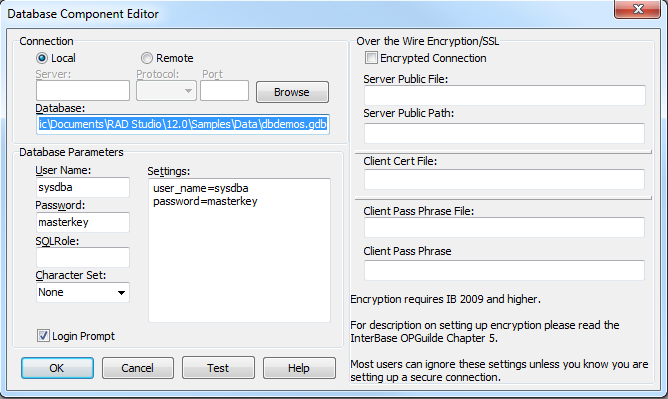

- Set the DatabaseName property (in the Object Inspector) or the Database field (in the Database Component Editor) to the file path of the database. In this tutorial, you use the DBDEMOS database that is installed with RAD Studio. The path is typically
C:\Users\Public\Documents\Embarcadero\Studio\21.0\Samples\Data\dbdemos.gdb. - On the Form Designer, select the TIBDatabase. On the Object Inspector, click the ellipsis button next to the Params property to display the String List Editor. Enter the following two lines (supplying the database user name and password):
- user_name=sysdba
- password=masterkey
- Then click OK to close the String List Editor.
- Now if you set LoginPrompt to false (on either the Object Inspector or the Database Component Editor), you are not prompted for a user name and password every time you connect to the database.
- Finally, on the Object Inspector, set Connected to true for the TIBDatabase.
- Set the DatabaseName property (in the Object Inspector) or the Database field (in the Database Component Editor) to the file path of the database. In this tutorial, you use the DBDEMOS database that is installed with RAD Studio. The path is typically
Note: If you embed the password in the application, as in this example, anyone has access to this database without logging in first.
- Add a TIBTransaction to the form. The TIBTransaction controls database connections. You need a TIBTransaction, along with a database component, to gain access to data in a database.
- On the Object Inspector, configure the TIBTransaction by setting its DefaultDatabase property to "IBDatabase1" using the drop-down menu.
- In the Form Designer, select the TIBDatabase component and set the DefaultTransaction property to "IBTransaction1". This links the two components.
-
Place a TIBDataSet on the form. This component encapsulates a database table.
- Set the Transaction property to "IBTransaction1".
- Connect this TIBDataSet to the database by setting its Database property to "IBDatabase1" using the drop-down menu.
- Right click the "IBDataSet1" TIBDataSet and select Edit SQL.
- Set the CommandText property to
select * from BIOLIFE - Right click the "IBDataSet1" TIBDataSet and select Dataset Editor.
- Select "SPECIES_NO" from the Key Fields column and click the Generate SQL button.
- Click the OK button to close the wizard.
- Add a TDataSource to the form. This component serves as an interface between the TIBDataSet and data-aware controls. Set TDataSource's DataSet to "IBDataSet1" with the drop-down menu.
Now that the database components are in place, next you can add the components that display database data.