Using Precompiled Headers with Clang-enhanced C++ Compilers
Go Up to Clang-enhanced C++ Compilers
A precompiled header file is a C++ header file that is precompiled so that it is processed faster at compilation time. A precompiled header is a C++ header file in this intermediate form. When you use a Clang-enhanced C++ compiler, your projects can only use one precompiled header for precompiling at a time. (When you use BCC32, your projects can use multiple precompiled headers each.)
Contents
PCH.h File is the Default Precompiled Header File for C++ Applications
One precompiled header is automatically generated for every C++ project. The default name for the generated precompiled header file is:
<projectname>PCH<n>.h
- <projectname> is the name of the project for which the precompiled header is created.
- <n> is the number of the precompiled header.
For example, when you create a new C++ application named Project1, the following precompiled header is automatically generated, regardless of the compiler used to build this project:
Project1PCH1.h
The PCH.h file is a node in the Projects Window for every C++ project. The automatically generated precompiled header (the PCH.h file) is used by default in compiling C++ 64-bit Windows applications.
- Note: BCC32 generates precompiled headers by default. However, you can configure them to use the
PCH.hfile shown in the Project Manager if you simplythe#include
PCH.hfile (followed by#pragma hdrstop;) in each source file in your project. You should, of course, edit the contents of thePCH.hfile toall the headers needed in your project.#include
Creating a Precompiled Header for Clang-enhanced C++ Compilers
The following procedure shows how to use precompiled headers for Clang-enhanced C++ compilers. These compilers accept only one header file per project. Following the steps below, you create the single header file and use it as a precompiled header for a source file.
Steps
- Create a C++ application ( either Console Application, VCL or FireMonkey).
- You can use either a brand new application or an application that you created in a version of C++Builder prior to XE3; that is, you could have made changes and additions to the application since it was created or it could be a legacy application created in an earlier version of C++Builder).
- Select File > Save All. Save all the files of the project to a desired location.
- In the Project Manager, enable the target platform that uses a Clang-enhanced C++ compiler (such as 64-bit Windows) and the PCH file:
- Right-click Target Platforms, select Add Platform and select the target platform.
- Right-click your project's PCH.h file and make sure that Use for precompiling is enabled.
- Edit the header file (PCH.h) file, and include the header files that you want to precompile. The PCH.h file should end with:
#pragma hdrstop
- Save the PCH.h file in the project folder.
- In the Project Manager, right-click the source file that you want to include the PCH.h precompiled header, and select Edit local options from the context menu.
- Press F9 to run the project.
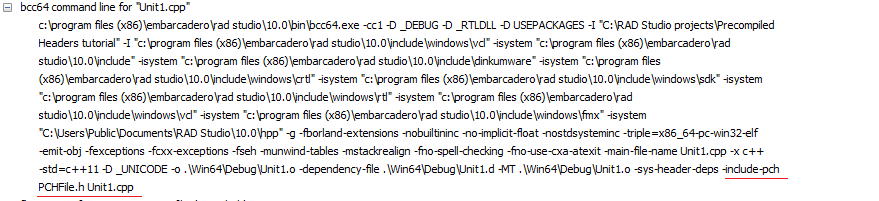
Here is the BCC64 command line for the source file for which the precompiled header is set. Note the command line option that includes a precompiled header into a source file (-include-pch):