Mobile Tutorial: Using dbExpress and SQLite (iOS and Android)
Go Up to Mobile Tutorials: Mobile Application Development (iOS and Android)
Contents
- 1 Using dbExpress to Connect to the Database
- 2 Creating the Database in the Windows Environment for Development Purposes
- 3 Design and Set Up the User Interface
- 4 Connecting to the Data
- 5 Creating the Event Handler to Make the Delete Button Visible When the User Selects an Item from the List
- 6 Creating the Event Handler for the Add Button to Add an Entry to the List
- 7 Creating the Event Handler for the Delete Button to Remove an Entry from the List
- 8 Setting Up Your Database Deployment for Mobile Platforms
- 9 Modifying Your Code to Connect to a Local Database File on Mobile Platforms
- 10 Running Your Application on a Mobile Device
- 11 See Also
 Caution: dbExpress, which is described in this tutorial, is being deprecated. This means that dbExpress will be removed from RAD Studio in an upcoming release.
- Instead of dbExpress, we recommend that you use our newer database solution, FireDAC, which is described in a similar tutorial, here:
Mobile Tutorial: Using FireDAC and SQLite (iOS and Android).
- Instead of dbExpress, we recommend that you use our newer database solution, FireDAC, which is described in a similar tutorial, here:
Before starting this tutorial, you should read and perform the following tutorial session:
This tutorial describes the basic steps to use SQLite as a local data storage on your mobile device through the dbExpress framework.
| iOS | Android |
|---|---|
|
|
|


Using dbExpress to Connect to the Database
dbExpress is a very fast database access framework, written in Delphi. RAD Studio provides drivers for most major databases, such as InterBase, Oracle, DB2, SQL Server, MySQL, Firebird, SQLite, and ODBC. You can access these different databases using procedures similar to the procedure described here.
- For the mobile platforms, dbExpress supports InterBase ToGo as well as SQLite. These database products can run on iOS and Android devices.
- For other databases, such as Oracle, you need to have at least a client library. On Windows platforms, the client library is provided as a DLL to connect to. Therefore, you need to develop applications using middle-tier technologies such as DataSnap to connect to these database products from a mobile device.
Another tutorial discusses how to connect to Enterprise Database without using a client library on a mobile device; see Mobile Tutorial: Connecting to an Enterprise Database from a Mobile Client (iOS and Android).
Creating the Database in the Windows Environment for Development Purposes
First, you need to create a SQLite database file on your Windows development platform. Use the following steps, so that you can use the Form Designer to design the user interface of your application.
Create the Database in the Data Explorer
- Go to Data Explorer, right-click the SQLite node and select Add New Connection:
- Define the name of the connection, such as ShoppingList.
- Specify the location of the database file:
- Click the Advanced button and open the Advanced Properties dialog box.
- Change the FailIfMissing property to False and click OK to close the Advanced Properties dialog box:
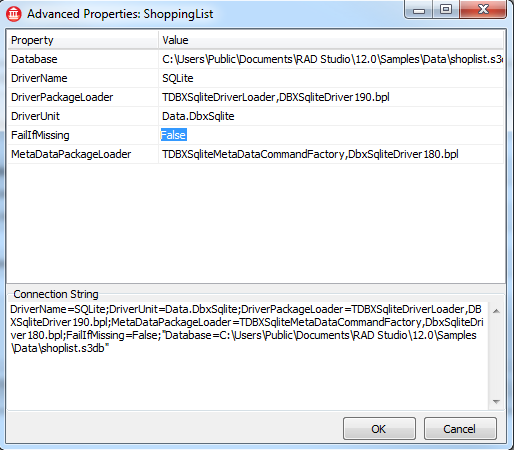
- Note: Setting FailIfMissing to False instructs the Data Explorer to create a new database file if the file is not available.
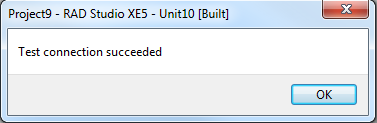
- Back on the Modify Connection dialog box, click the Test Connection button. With this operation, the new database file is created if no file existed:
- Note: Ensure that sqlite3.dll is present on your development system. If this file is not present, download sqlite3.dll from http://www.sqlite.org/download.html to your system path (such as C:\Windows\SysWOW64 for 64-bit Windows).


Create Table on DataExplorer
- On the Data Explorer, double-click the ShoppingList node under the SQLite section, right-click Tables, and then select New Table from the context menu.
- Set Data Type for a ShopItem column to TEXT.
- Click the Save button and specify a table name (for example, Item.)


Design and Set Up the User Interface

This tutorial uses one TListBox component as the UI element.
To set up a ListBox component and other UI elements, use the following steps:
- Create a multi-device application using File > New > Multi-Device Application - Delphi or File > New > Multi-Device Application - C++Builder.
- Drop a TToolBar on the form.
- Drop a TButton on the ToolBar component and set the following properties in the Object Inspector:
- Set the Align to Right.
- Set the Name property to ButtonAdd.
- Set the StyleLookup to addtoolbutton.
- Drop a TButton on the ToolBar component and set the following properties in the Object Inspector:
- Set the Align to Left.
- Set the Name property to ButtonDelete.
- Set the StyleLookup to deletetoolbutton.
- Set the Text to Delete.
- Set the Visible to False.
- Drop a TLabel on the ToolBar component and set the following properties in the Object Inspector:
- Set the Align to Client.
- Set the StyleLookup to toollabel.
- Set the Text to Shopping List.
- Set the TextSettings.HorzAlign to Center.
- Drop a TListBox component on the form and set the following properties in the Object Inspector:
- Set the Align property to Client, so that the ListBox component uses the entire form.
Connecting to the Data
Following are the basic steps to connect to data in a database which is already defined in the Data Explorer:
- Select the Item table on the Data Explorer and drag it to the Form Designer.
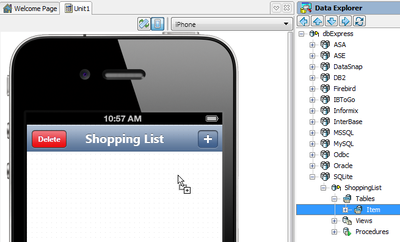
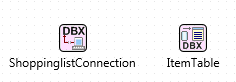
- Note: This creates two components (ShoppinglistConnection: TSQLConnection and ItemTable: TSQLDataSet) on the form.
- Select the ShoppinglistConnection component on the form, and then change the Connected property to True.
- Select the ItemTable component on the form, and then change the Active property to True.
- Select View > LiveBindings Designer and the LiveBindings Designer opens.
- Select ShopItem in the ItemTable component and drag ShopItem to Item.Text of ListBox1.


Following these steps connects the user interface of the app with data on a SQLite database. If you used a table with existing data for this tutorial, now you should see actual data within the Form Designer.
Creating the Event Handler to Make the Delete Button Visible When the User Selects an Item from the List
The Visible property for the Delete button is set to False. Therefore, by default, the end user does not see this button. You can make it visible when the user selects an item on the list, as follows:
- Select ListBox1 and define the following event handler for the OnItemClick event.
Delphi:
procedure TForm1.ListBox1ItemClick(const Sender: TCustomListBox;
  const Item: TListBoxItem);
begin
  if ListBox1.Selected <> nil then
    ButtonDelete.Visible := True
  else
    ButtonDelete.Visible := False;
end;
C++Builder:
void __fastcall TForm1::ListBox1ItemClick(const TCustomListBox *Sender,const TListBoxItem *Item)
{
        if (ListBox1->Selected)
                ButtonDelete->Visible = True;
        else
                ButtonDelete->Visible = False;
}
Creating the Event Handler for the Add Button to Add an Entry to the List

The next step is adding a feature to this application for adding an item to the shopping list.
- Drop a TSQLQuery component to the form.
- Set the following properties in the Object Inspector:
- Set the Name property to SQLQueryInsert.
- Set the SQLConnection property to ShoppinglistConnection.
- Set the SQL property as follows:
INSERT INTO ITEM (ShopItem) VALUES (:ShopItem)
- Select the Expand (...) button on the Params property.
- Select the ShopItem parameter and set DataType to ftString:
- In the Form Designer, double-click the ButtonAdd component. Add the following code to this event handler:

Delphi:
procedure TForm1.ButtonAddClick(Sender: TObject);
begin
  TDialogServiceAsync.InputQuery('Enter New Item', ['Name'], [''], Self.OnInputQuery_Close);
end;

procedure TForm1.OnInputQuery_Close(const AResult: TModalResult; const AValues: array of string);
var
  TaskName: string;
begin
  TaskName := string.Empty;
  if AResult <> mrOk then
    Exit;
  TaskName := AValues[0];
  try
    if not (TaskName.Trim = string.Empty) then
    begin
      SQLQueryInsert.ParamByName('ShopItem').AsString := TaskName;
      SQLQueryInsert.ExecSQL();
      ItemTable.Refresh;
      LinkFillControlToField1.BindList.FillList;
      if ListBox1.Selected <> nil then
        ButtonDelete.Visible := True
      else
        ButtonDelete.Visible := False;
    end;
  except
    on Ex: Exception do
      ShowMessage('Error: ' + Ex.Message);
  end;
end;
Declare this procedure prototype under the private section of the Form class:
private
    procedure OnInputQuery_Close(const AResult: TModalResult; const AValues: array of string);
C++Builder:
To replicate the same functionality in C++, additional steps are required:
1. Add the next type definition after the TForm1 definition:
typedef void __fastcall (__closure *TInputCloseQueryProcEvent)(const System::Uitypes::TModalResult AResult,
        System::UnicodeString const *AValues, const int AValues_High);
2. Add the next class definition:
class InputQueryMethod : public TCppInterfacedObject<TInputCloseQueryProc>
{
private:
    TInputCloseQueryProcEvent Event;

public:
    InputQueryMethod(TInputCloseQueryProcEvent _Event) {
        Event = _Event;
    }

    void __fastcall Invoke(const System::Uitypes::TModalResult AResult,
        System::UnicodeString const *AValues, const int AValues_High) {
        Event(AResult, AValues, AValues_High);
    }
};
3. Add the next declaration under the private section of the form:
void __fastcall OnInputQuery_Close(const System::Uitypes::TModalResult AResult,
    System::UnicodeString const *AValues, const int AValues_High);
4. Add the actual functions:
void __fastcall TForm1::ButtonAddClick(TObject *Sender) {
    String caption = "Caption";
    String Prompts[1];
    Prompts[0] = "Prompt 0";
    String Defaults[1];
    Defaults[0] = "Default 0";
    _di_TInputCloseQueryProc Met = new InputQueryMethod(&OnInputQuery_Close);
    TDialogServiceAsync::InputQuery(
        "caption", Prompts, 0, Defaults, 0, (TInputCloseQueryProc *)Met);
}
void __fastcall TForm1::OnInputQuery_Close(const System::Uitypes::TModalResult AResult,
        System::UnicodeString const *AValues, const int AValues_High) {
    String TaskName;
    TaskName = "";
    if (AResult != mrOk)
        return;
    TaskName = AValues[0];
    try {
        if (TaskName.Trim() != "")
            SQLQueryInsert->ParamByName("ShopItem")->AsString = TaskName;
        SQLQueryInsert->ExecSQL();
        ItemTable->Refresh();
        LinkFillControlToField1->BindList->FillList();
        if (ListBox1->Selected != NULL)
            ButtonDelete->Visible = True;
        else
            ButtonDelete->Visible = False;
    }
    catch (Exception& Ex) {
        ShowMessage("Error: " + Ex.Message);
    }
}
The InputQuery function shows a dialog box asking the end user to enter a text. This function returns True when the user selects OK, so that you can add data to the database only when the user selects OK and the text contains some data.
| iOS | Android |
|---|---|
|
|
|


Creating the Event Handler for the Delete Button to Remove an Entry from the List
The next step is adding a feature to this application to remove an item from the shopping list:
- Drop a TSQLQuery component to the form.
- Set the following properties in the Object Inspector:
- Set the Name property to SQLQueryDelete.
- Set the SQLConnection property to ShoppinglistConnection.
- Set the SQL property as follows:
delete from Item where ShopItem = :ShopItem
- Select the Expand (...) button on the Params property.
- Select the ShopItem parameter and set DataType to ftString.
- In the Structure View, select the ButtonDelete component. Add the following code to this event handler.
Delphi:
procedure TForm1.ButtonDeleteClick(Sender: TObject);
var
  TaskName: String;
begin
  TaskName := ListBox1.Selected.Text;

  try
    SQLQueryDelete.ParamByName('ShopItem').AsString := TaskName;
    SQLQueryDelete.ExecSQL();
    ItemTable.Refresh;
    LinkFillControlToField1.BindList.FillList;
    if ListBox1.Selected <> nil then
      ButtonDelete.Visible := True
    else
      ButtonDelete.Visible := False;
  except
    on e: Exception do
    begin
      SHowMessage(e.Message);
    end;
  end;
end;
C++Builder:
void __fastcall TForm1::ButtonDeleteClick(TObject *Sender) {
        String TaskName = ListBox1->Selected->Text;
        try {
                SQLQueryDelete->ParamByName("ShopItem")->AsString = TaskName;
                SQLQueryDelete->ExecSQL();
                ItemTable->Refresh();
                LinkFillControlToField1->BindList->FillList();
                if (ListBox1->Selected)
                        ButtonDelete->Visible = True;
                else
                        ButtonDelete->Visible = False;
        }
        catch (Exception &e) {
                ShowMessage(e.Message);
        }
}
Setting Up Your Database Deployment for Mobile Platforms
Up to this point, you have used SQLite on your desktop. This means that the actual database is located on your local hard disk drive (for example, C:\Users\Public\Documents\Embarcadero\Studio\19.0\Samples\Data\shoplist.s3db). On the mobile device, applications are sand-boxed, and typically you can only read and write data that is located in the Documents folder (for iOS device) and internal storage (for Android device) under your application folder.
To connect to a local database on mobile, you need to perform the following actions:
- Deploy the database to the mobile device.
- Check the configuration (to connect to the database file) to a local file under the Documents folder (for iOS device) or internal storage (for Android device).
Add and Configure Your Database File in the Deployment Manager
Before you can run your application on mobile, you need to set up the deployment for your database file (shoplist.s3db).
- You can add the database to your project with one of the following two methods:
- Right-click the project name in the Project Manager and select Add… from the context menu (or Project > Add to Project) to display the Add to Project dialog box. Navigate to the database location
C:\Users\Public\Documents\Embarcadero\Studio\19.0\Samples\Data, select the databaseshoplist.s3dband click Open. - Navigate to the database location
C:\Users\Public\Documents\Embarcadero\Studio\19.0\Samples\Dataand drag and drop the databaseshoplist.s3dbto the project in the Project Manager. Click Yes to confirm that you want to add the file to your project.
- Right-click the project name in the Project Manager and select Add… from the context menu (or Project > Add to Project) to display the Add to Project dialog box. Navigate to the database location
- After adding the database file, the Featured Files window displays, click Cancel to close it.
- Open the Deployment Manager by selecting Project > Deployment.
- Select Debug configuration - iOS Device - 32 bit platform, Debug configuration - iOS Device - 64 bit platform or Debug configuration - Android platform from the drop-down list of target platforms at the top of the Deployment Manager and see that the database
shoplist.s3dbhas been added to the platforms. - See how the Remote Path of
shoplist.s3dbhas been set for iOS and Android platforms:- Remote Path on iOS Device platform:
StartUp\Documents\
- Remote Path on Android platform:
assets\internal\
- Remote Path on iOS Device platform:
As you just configured, when you run the app on the mobile device, the database file (shoplist.s3db) is set to be deployed to the Documents folder (for iOS platform) or internal storage (for Android platform) in the sandbox area of your multi-device application.
Modifying Your Code to Connect to a Local Database File on Mobile Platforms
The basic features of this application are now implemented. As you worked in the Data Explorer, you created a database file on Windows. The database file is not available on your mobile device unless you copy it to the mobile device or create it on the fly.
You can create a SQLite Database and Table with the following steps:
Specifying the Location of the SQLite Database on the Mobile Device
- In the Form Designer, select the ShoppinglistConnection component.
- In the Object Inspector, double-click the BeforeConnect event.
- Add the following code to this event handler:
Delphi:
procedure TForm1.ShoppinglistConnectionBeforeConnect(Sender: TObject);
begin
  {$IF DEFINED(iOS) or DEFINED(ANDROID)}
  ShoppinglistConnection.Params.Values['ColumnMetadataSupported'] := 'False';
  ShoppinglistConnection.Params.Values['Database'] :=
      TPath.Combine(TPath.GetDocumentsPath, 'shoplist.s3db');
  {$ENDIF}
end;
The TPath record is declared in System.IOUtils unit, so you need to add System.IOUtils in the uses clause of your unit.
C++Builder:
void __fastcall TForm1::ShoppinglistConnectionBeforeConnect(TObject *Sender) {
        #if defined(_PLAT_IOS) || defined(_PLAT_ANDROID)
        ShoppinglistConnection->Params->Values["ColumnMetadataSupported"] = "False";
        ShoppinglistConnection->Params->Values["Database"] = System::Ioutils::TPath::Combine(System::Ioutils::TPath::GetDocumentsPath(), "shoplist.s3db");
        #endif
}
The TPath record is declared in System.IOUtils library, so you need to add #include <System.IOUtils.hpp> in your header unit.
Creating a Table if None Exists
With SQLite you can create a table when no table exists, by using the CREATE TABLE IF NOT EXISTS statement. You can create a table after the TSQLConnection component connects to the database and before the TSQLDataSet component connects to the table. Use the following steps:
- In the Form Designer, select the ShoppinglistConnection component.
- In the Object Inspector, double-click the AfterConnect event.
- Add the following code to this event handler:
Delphi:
procedure TForm1.ShoppinglistConnectionAfterConnect(Sender: TObject);
begin
  ShoppinglistConnection.ExecuteDirect('CREATE TABLE IF NOT EXISTS Item (ShopItem  TEXT NOT NULL)');
end;
C++Builder:
void __fastcall TForm1::ShoppinglistConnectionAfterConnect(TObject *Sender){
        ShoppinglistConnection->ExecuteDirect("CREATE TABLE IF NOT EXISTS Item (ShopItem  TEXT NOT NULL)");
}
Running Your Application on a Mobile Device
Now your application is ready to run on either a simulator or your connected mobile device.
To run your application
- In Project Manager, select your target platform.
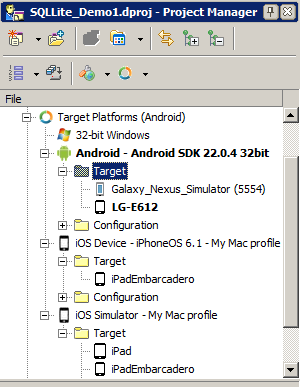
- Choose either of the following commands:
- Run > Run
- Run > Run Without Debugging

| iOS | Android |
|---|---|
|
|
|
Note: If you have an issue with running the application, follow the steps given in Troubleshooting.