Tutorial: Using TAdapterBindSource and the LiveBindings Designer
Go Up to Database and LiveBindings Tutorials
This tutorial shows how to use LiveBindings Designer and TAdapterBindSource in order to visually create LiveBindings between existing controls and custom objects (adaptees) for fast developing of applications that require little or no source code.
Contents
Step 1: Creating the Project
Create a new project. Choose an HD Multi-Device Application for this example.
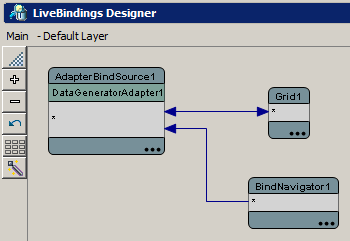
- Drag and drop a TAdapterBindSource component onto the Form Designer.
- Drag and drop a TDataGeneratorAdapter component onto the Form Designer.
- In the Tool Palette, locate a TBindNavigator component and drop it onto the form.
- Do the same with a TGrid control.
In this tutorial you will learn how to build an application that uses multiple methods (navigating a random data set with colors, direct typing of a color ID, or selecting a color from a list) for changing the fill color of a rectangle.
After placing the components on the form, it should look as in the following image.

Step 2: Creating a Custom Object (Adaptee)
For this tutorial you will create a custom object that will represent an employee. So you will design a class TEmployee with several information regarding a particular person. This is the custom object that you will adapt using the TAdapterBindSource object.
In your project:
- Add a new unit to your project. Do this by going to File > New > Unit - Delphi.
- Save your new unit as EmployeeAdaptee.pas.
- Add the following source code to your new unit:
unit EmployeeAdaptee;

interface

type
  { An Employee model object that will be adapted and enabled for LiveBindings usage. }
  TEmployee = class(TObject)
  private
    FFirstName: String;
    FLastName: String;
    FAge: Byte;
    FStartDate: TDate;
    FPosition: String;
    FManager: String;
  public
    constructor Create(const AFirstName, ALastName: String; const AAge: Byte;
                       const AStartDate: TDate; const APosition, AManager: String); overload;
    property FirstName: String read FFirstName write FFirstName;
    property LastName: String read FLastName write FLastName;
    property Age: Byte read FAge write FAge;
    property StartDate: TDate read FStartDate write FStartDate;
    property Position: String read FPosition write FPosition;
    property Manager: String read FManager write FManager;
  end;

implementation

{ TEmployee }

constructor TEmployee.Create(const AFirstName, ALastName: String; const AAge: Byte;
                             const AStartDate: TDate; const APosition, AManager: String);
begin
  inherited Create;

  FFirstName := AFirstName;
  FLastName := ALastName;
  FAge := AAge;
  FStartDate := AStartDate;
  FPosition := APosition;
  FManager := AManager;
end;

end.
The unit above implements an Employee object that can model employees in a company for instance. You can add any fields you want in order to model your employee according to your needs.
Step 3: Using the Custom Object (Adaptee)
Switch to your main form and go to File > Use Unit (or alternately Alt+F11), select Interface and then select the EmployeeAdaptee.pas unit.

This ensures your EmployeeAdaptee.pas unit is used in the uses clause inside the interface section of your main unit.
To use your new object with the LiveBindings framework:
- In the Form Designer click the AdapterBindSource1 component and locate the Adapter property in the Object Inspector.
- Select the DataGeneratorAdapter1 component that you previously added. Now your object becomes a bindable data source.
- Start the LiveBindings Designer from the View > LiveBindings Designer.
- Bind the * property of the grid component to the * property of the AdapterBindSource1 component.
- With all the bindings completed, you need to add some employee data to the AdapterBindSource1 component.
- In the Form Designer, locate the AdapterBindSource1 component and in the Object Inspector go to the Events tab.
- Search the OnCreateAdapter event and double-click it in order to go to the Code View to add the sample data with something like:

procedure TMain.AdapterBindSource1CreateAdapter(Sender: TObject; var ABindSourceAdapter: TBindSourceAdapter);
var
  LEmployee: TEmployee;

begin
  LEmployee := TEmployee.Create('John', 'Anders', 26, StrToDate('10/10/2011'), 'Developer', 'Adrian Hermann');
  ABindSourceAdapter := TObjectBindSourceAdapter<TEmployee>.Create(Self, LEmployee);
end;
Step 4: Running the Application
All you have to do now is run the application by pressing F9 or from the Run menu.

Your employee has been just added to the grid.
Step 5: Adding Design-Time Fields
In order to demonstrate how to get some design-time fields that you can connect to other controls in the LiveBindings Designer, you will use the DataGeneratorAdapter1 component. Next you will be adding generated fields with the same name as your employee members, and then you can connect individual fields to individual controls, if you want.
Adding individual fields to the DataGeneratorAdapter1 component is very easy:
- In the Form Designer, locate and right-click the DataGeneratorAdapter1 component.
- Select the Add Fields command.
- From the Add Field dialog box, select (none) of type
ftStringto add a new field.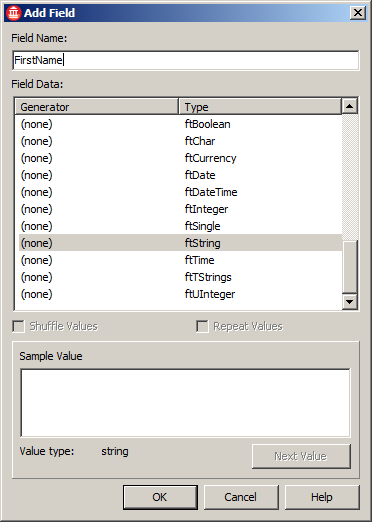
- Repeat the steps for the other data: LastName (with (none),
ftString), Age (with (none),ftInteger), StartDate (with (none),ftDate), Position (with (none),ftString), and Manager (with (none),ftString)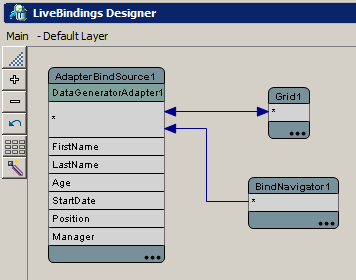 .
. - Now you can use individual fields in order to bind to other controls (an edit-box or a label, for instance).

