ビデオ キャプチャ
チュートリアル:FireMonkey のオーディオ/ビデオ機能 への移動
このチュートリアルでは、FireMonkey でビデオ データをキャプチャして表示する方法およびビデオ データの表示をカスタマイズする方法について説明します。
フォームの設計
- [ファイル|新規作成|マルチデバイス アプリケーション - Delphi|空のアプリケーション]を選択します。
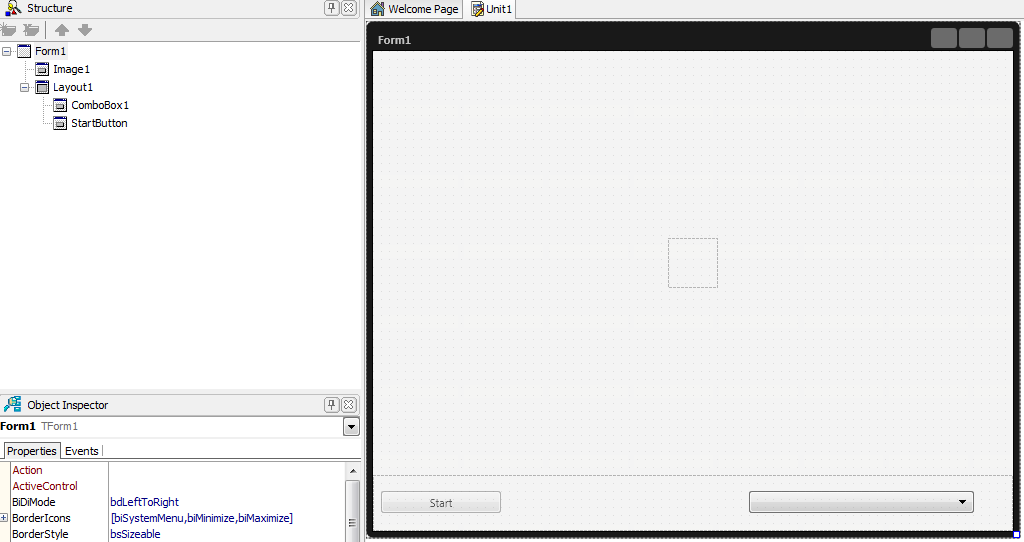
- TLayout をフォームに追加します。そのレイアウトにフォーカスを当て、[オブジェクト インスペクタ]で Align プロパティを
MostBottomに設定します。 - TLayout に以下を追加します。
- ボタンの名前を Start に変更します。
- [Start]ボタンの Enable プロパティを False に設定することで、ボタンを無効状態に設定します。
- キャプチャしたデータを表示するためのキャンバスとして使用する TImage を追加します。ビデオ データがフォームの中央に表示されるように、この画像の Align プロパティを
Centerに設定します。- フォームは次のようになります。

実装
- 1. FMX.Media ユニットをインクルードします。
Delphi の場合:
// Delphi 版の実装
uses
 FMX.Media;
C++Builder の場合:
// C++ 版の実装
#include <FMX.Media.hpp>
- 2. VideoCamera という TVideoCaptureDevice 型の public メンバを TForm1 クラスに宣言します。
Delphi の場合:
type
  TForm1 = class(TForm)
   // ...............
  public
    VideoCamera: TVideoCaptureDevice;
C++Builder の場合:
class TForm1 : public TForm
// ...............
public:
  TVideoCaptureDevice* VideoCamera;
- 3. キャプチャしたデータを画像に表示できるようにするために、SampleBufferReady 手続きと SampleBufferSync 手続きを TForm1 クラスに public メンバとして追加します。SampleBufferReady は、キャプチャ デバイスの OnSampleBufferReady イベントに関連付けられているイベント ハンドラです。このハンドラでは、Synchronize が呼び出され、画像へのビデオ データの表示が必ずメイン スレッドで実行されるため、マルチスレッド競合が回避されます。SampleBufferSync は、ビデオ データを画像に明示的にバッファリングします。
- これら 2 つの手続きの実装は以下のとおりです。
Delphi の場合:
// 宣言
  TForm1 = class(TForm)
   //.........
  public
    //........
    procedure SampleBufferSync;
    procedure SampleBufferReady(Sender: TObject; const ATime: TMediaTime);
  end;

// 実装
procedure TForm1.SampleBufferReady(Sender: TObject; const ATime: TMediaTime);
begin
  TThread.Synchronize(TThread.CurrentThread, SampleBufferSync);
  // ビデオが元のサイズでバッファリングされるように画像のサイズを変更する
  Image1.Width:=Image1.Bitmap.Width;
  Image1.Height:=Image1.Bitmap.Height;
end;

procedure TForm1.SampleBufferSync;
begin
  VideoCamera.SampleBufferToBitmap(Image1.Bitmap, true);
end;
C++Builder の場合:
// 宣言
class TForm1 : public TForm
//.........
public:
  //.........
  void __fastcall SampleBufferSync();
  void __fastcall SampleBufferReady(TObject *Sender, const TMediaTime ATime);

// 実装
void __fastcall TForm1::SampleBufferReady(TObject *Sender, const TMediaTime ATime) {
  TThread::Synchronize(TThread::CurrentThread, (TThreadMethod)&SampleBufferSync);
  // ビデオが元のサイズでバッファリングされるように画像のサイズを変更する
  Image1->Width = Image1->Bitmap->Width;
  Image1->Height = Image1->Bitmap->Height;
}

void __fastcall TForm1::SampleBufferSync() {
  VideoCamera->SampleBufferToBitmap(Image1->Bitmap, true);
}
- 4. フォームの OnCreate イベントで、コンピュータに接続されているすべてのビデオ デバイスのリストをコンボ ボックスに設定します。それには、GetDevicesByMediaType メソッドを使用します。このメソッドには、キャプチャ デバイス マネージャの Current プロパティを通じてアクセスします。実装は以下のとおりです。
Delphi の場合:
procedure TForm1.FormCreate(Sender: TObject);
var
  DeviceList: TCaptureDeviceList;
  i: integer;
begin
  DeviceList := TCaptureDeviceManager.Current.GetDevicesByMediaType
    (TMediaType.Video);
  for i := 0 to DeviceList.Count - 1 do
  begin
    ComboBox1.Items.Add(DeviceList[i].Name);
  end;
end;
C++Builder の場合:
void __fastcall TForm1::FormCreate(TObject *Sender) {
  TCaptureDeviceList DeviceList;
  int i;

  DeviceList = TCaptureDeviceManager::Current->GetDevicesByMediaType
	(TMediaType::Video);
  for (i = 0; i < DeviceList->Count; i++) {
    ComboBox1->Items->Add(DeviceList->Items[i]->Name);
  }
}
- 5. コンボ ボックスの OnChange イベントでは、ビデオ デバイスを名前で識別することで VideoCamera を初期化します。
Delphi の場合:
procedure TForm1.ComboBox1Change(Sender: TObject);
begin
  VideoCamera := TVideoCaptureDevice
    (TCaptureDeviceManager.Current.GetDevicesByName(ComboBox1.Selected.Text));
  if (VideoCamera <> nil) then
  begin
    StartButton.Enabled := true;
  end;
end;
C++Builder の場合:
void __fastcall TForm1::ComboBox1Change(TObject *Sender) {
  VideoCamera = dynamic_cast<TVideoCaptureDevice*>
	(TCaptureDeviceManager::Current->GetDevicesByName(ComboBox1->Selected->Text));
  if (VideoCamera != NULL) {
    StartButton->Enabled;
  }
}
- 6. [Start]ボタンをダブルクリックして、OnClick イベントのハンドラを付加します。キャプチャ処理の実行中は、[Start]ボタンは、処理を停止させるのに使用されます。
Delphi の場合:
procedure TForm1.StartButtonClick(Sender: TObject);
begin
  if (VideoCamera <> nil) then
  begin
    if (VideoCamera.State = TCaptureDeviceState.Stopped) then
    begin
      VideoCamera.OnSampleBufferReady := SampleBufferReady;
      VideoCamera.StartCapture;
      StartButton.Text := 'Stop';
    end
    else
    begin
      VideoCamera.StopCapture;
      StartButton.Text := 'Start';
    end;
  end
  else
  begin
    Caption := 'Video capture devices not available.';
  end;
end;
C++Builder の場合:
void __fastcall TForm1::StartButtonClick(TObject *Sender) {
  if (VideoCamera != NULL) {
    if (VideoCamera->State == TCaptureDeviceState::Stopped) {
      VideoCamera->OnSampleBufferReady = SampleBufferReady;
      VideoCamera->StartCapture();
      StartButton->Text = "Stop";
    }
    else {
      VideoCamera->StopCapture();
      StartButton->Text = "Start";
    }
  }
  else
    Caption = "Video capture devices not available.";
}
- 7. フォームが破棄されたときに StopCapture メソッドを呼び出すことで、キャプチャ処理がまだ実行されているときにフォームが閉じられても、キャプチャ デバイスによるキャプチャ処理が必ず停止するようにします。
Delphi の場合:
procedure TForm1.FormDestroy(Sender: TObject);
begin
  if VideoCamera <> nil then
    VideoCamera.StopCapture;
end;
C++Builder の場合:
void __fastcall TForm1::FormDestroy(TObject *Sender) {
  if (VideoCamera != NULL) {
    VideoCamera->StopCapture();
  }
}
アプリケーションの実行
- 1. プロジェクトを実行するには、F9 キーを押します。
- 2. コンボ ボックスからビデオ デバイスを選択します。
- 3. データのキャプチャを開始するには、[Start]ボタンをクリックします。キャプチャされたデータがフォームの中央に表示されます。
キャプチャ画像のカスタマイズ
次のステップでは、現在のフォームに表示されているキャプチャ画像に FireMonkey のさまざまな効果を適用できます。
- 1. さまざまな効果を選択できるように、上記で追加したレイアウトに TComboBox をもう 1 つ追加します。Enable プロパティを False に設定することで、それを無効状態に設定します。これは、キャプチャ デバイスが処理を開始したときに有効になります。
- 2. 追加したコンボ ボックスに、現在使用可能な FireMonkey 効果を TFilterManager を使って設定します。効果とフィルタにアクセスできるように、FMX.Filter ユニットと FMX.Filter.Effects ユニットを組み込みます。
Delphi の場合:
uses
 FMX.Media,FMX.Filter,FMX.Filter.Effects ;
C++Builder の場合:
#include <FMX.Filter.hpp>
#include <FMX.Filter.Effects.hpp>
- 3. Effect という TImageFXEffect コンポーネントと FillComboxEffect 手続きを public メンバとして追加します。TImageFXEffect はすべての FireMonkey 画像効果の基底クラスで、Effect は現在適用されている効果を保持するのに使用されます。
- FillComboxEffect 手続きは以下を実行します。
- 現在使用可能なフィルタのリストを取得します。
- フィルタの名前を抽出します。
- フィルタの名前から効果の名前を作成します(フィルタごとに効果が定義されています)。[ツール パレット]の[Effects]カテゴリや FMX.Filter.Effects ユニットには、すべての効果が用意されています。
- 効果をコンボ ボックス リストに追加します。
- 実装は以下のとおりです。
Delphi の場合:
procedure TForm1.FillComboxEffect();
var
  i, j, pos: integer;
  FiltersCategoryList, FilterList: TStrings;
  str: string;
  filterClass: TFilterClass;
begin
  FiltersCategoryList := TStringList.Create;
  TFilterManager.FillCategory(FiltersCategoryList);
  for j := 0 to FiltersCategoryList.Count - 1 do
  begin
    FilterList := TStringList.Create;
    TFilterManager.FillFiltersInCategory(FiltersCategoryList[j], FilterList);
    i := 0;
    for i := 0 to FilterList.Count - 1 do
    begin
      str := FilterList[i];
      pos := AnsiPos('Filter', str);
      if (pos <> 0) then
        Delete(str, pos, 6);
      str := 'T' + str + 'Effect';
      ComboBox2.Items.Append(str);
    end;
    FilterList.Free;
  end;
  FiltersCategoryList.Free;
  ComboBox2.Items.Add('None');
  ComboBox2.ItemIndex:=ComboBox2.Items.IndexOf('None');
end;
C++Builder の場合:
void __fastcall TForm1::FillComboxEffect() {
  int i, j, pos;
  TStrings *FiltersCategoryList, *FilterList;
  String str;
  TFilterClass filterClass;

  FiltersCategoryList = new TStringList();
  TFilterManager::FillCategory(FiltersCategoryList);
  for (j = 0; j < FiltersCategoryList->Count; j++) {
    FilterList = new TStringList();
    TFilterManager::FillFiltersInCategory
          	(FiltersCategoryList->operator[](j), FilterList);
    i = 0;
    for (i = 0; i < FilterList->Count; i++) {
      str = FilterList->operator[](i);
      pos = AnsiPos("Filter", str);
      if (pos != 0) {
	str.Delete(pos, 6);
      }
      str = "T" + str + "Effect";
      ComboBox2->Items->Append(str);
    }
    FilterList->Free();
  }
  FiltersCategoryList->Free();
  ComboBox2->Items->Add("None");
  ComboBox2->ItemIndex = ComboBox2->Items->IndexOf("None");
}
- 4. フォームの OnCreate イベント ハンドラから FillComboxEffect を呼び出します。
- 5. 最初のコンボ ボックス(ビデオ デバイスの選択に使用されるもの)の OnChange イベント ハンドラから、効果のコンボ ボックスを有効状態に設定します。
- 6. 現在選択されている効果を画像に適用するため、効果のコンボ ボックスに OnChange イベントを追加します。実装は以下のとおりです。
Delphi の場合:
procedure TForm1.ComboBox2Change(Sender: TObject);
var
  filterClass: TFmxObjectClass;
begin
  if (ComboBox2.ItemIndex <> -1) then
  begin
    if Assigned(Effect) then
      Effect.Free;
    if (ComboBox2.Selected.Text <> 'None') then
    begin
      filterClass := TFmxObjectClass(FindClass(ComboBox2.Selected.Text));
      if Assigned(filterClass) then
      begin
        Effect := TImageFXEffect(filterClass.Create(self));
        Effect.Parent := Image1;
      end;
    end;
  end;
end;
C++Builder の場合:
void __fastcall TForm1::ComboBox2Change(TObject *Sender) {
  TFmxObjectClass filterClass;

  if (ComboBox2->ItemIndex != -1) {
    if (Effect != NULL) {
      Effect->Free();
    }
    if (ComboBox2->Selected->Text != "None") {
      filterClass = TFmxObjectClass(FindClass(ComboBox2->Selected->Text));
      if (filterClass != NULL) {
	Effect = dynamic_cast<TImageFXEffect *>(filterClass->InitInstance(this));
	Effect->Parent = Image1;
      }
    }
  }
}
- 7. プロジェクトを実行して、キャプチャを開始し、ビデオ データがキャプチャされて表示される際に効果がどう適用されるかを観察します。