Setting Up Single Sign On (SSO)
Go Up to Administrator Guide
Team Server includes support for Azure AD and Okta identity providers via OpenID Connect. This Single Sign On (SSO) feature allows you to authenticate your users quickly with your existing database and avoids creation of additional user accounts. Note that the machine where Team Server resides must support SSO login when it is accessed through IP Address or hostname.
Contents
Understanding the Types of User Access to Team Server
For login to the web interface, Team Server allows authentication using:
- a traditional process of username and password
- Single Sign On (SSO) using OpenID Connect
In the traditional process, users are manually created as Person objects, and then added to a Team Server Group which is then granted permissions. You can set up password authentication against a password stored in Team Server or the administrator can switch on LDAP, which then causes the system to look up the password against Active Directory using LDAP.
Using Single Sign On (SSO), the administrator simply sets up SSO authentication against either Azure AD or Okta using OpenID Connect. When users log in via the new "Login via SSO" button, if they already exist as a user they will log in (assuming a successful SSO authentication) using the credentials already provided. If they are new to Team Server a new entry in the Person table of Team Server will be created and the default permissions group allocated. You can change the permissions of the default permission group in the Admin section under Permissions.
Register Team Server in your SSO Authentication Provider
Before you can set up Team Server for SSO you will need to register Team Server in your SSO Authentication Provider. ER/Studio currently support Azure AD and Okta. For more information about this topic, see:
Activating SSO in the Team Server Configurator
An Administrator must activate Single Sign-On (SSO) in the Team Server Configurator Single Sign-On page before options appear for users to select SSO.
- In the Configurator, use the available Select SSO Provider drop-down list to choose Azure or Okta for enablement.
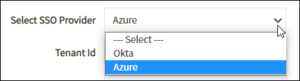
- The appropriate provider appears. Note that some fields are different depending on the selected provider.
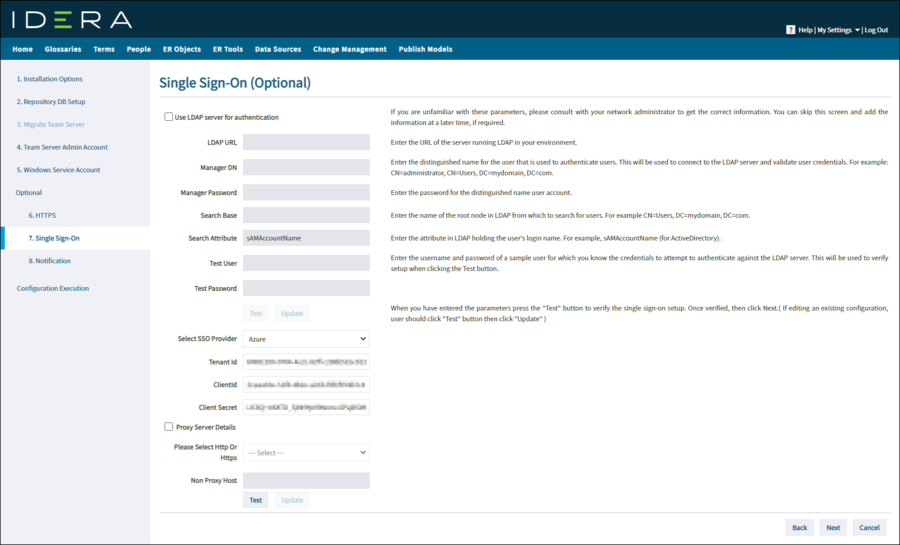
- The content of the following fields is available when you configure SSO in Microsoft Azure or Okta:
- TenantId. (Azure only)
- DomainId. (Okta only)
- ClientId.
- Client Secret.
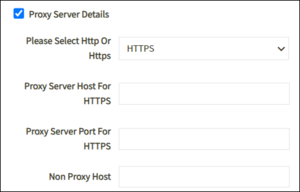
- Proxy Server Details. Check this box if you use a proxy server for this machine. Details for the server are automatically populated in the appropriate fields. If you want to change any of these fields, use the Admin user account.
- Once you complete all of the necessary fields, click Test to verify your entries. All responses to these tests are collected in the sso.log file.
- If all of the details are correct, the Update button is enabled. When you click that button, the information is encrypted and saved in a property file, and then Team Server restarts. Once the restart is complete, the Login by SSO button is enabled on the Login page.


Tips and Tricks for connecting to your Identification Provider
Team Server includes a Test button to help you avoid connection problems. When you click Test, Team Server performs the following tests:
- If GET call fails then check if Team Server Machine is able to reach https://www.idera.com . If not please make sure its accessible.
- Checks if the SSO provider is reachable over the network.
- If this fails, then check that:
- your Team Server server has access to the internet,
- there are no firewalls blocking HTTP traffic for your Team Server server, and that
- the settings are entered in your proxy server (if present).
- If this fails, then check that:
- Checks whether the SSO Provider is reachable through a proxy server (if present).
- If this fails, then check that the proxy server settings are correct.
- Checks that the Client ID and Secret credentials are accepted by the SSO provider.
- If this fails, then check that:
- the details are correct (involve your SSO Identity Provider administrator),
- the configurator settings match the SSO Portal,
- the client ID and client secret are taken from the corresponding app registration,
- the redirect URIs are correct,
- the API permissions are correct, and that
- you can get a manifest file in the application registration pages of the Identity Provider portal. Check the manifest file and compare with any other working SSO applications on the client side.
- If this fails, then check that:
Other things you can check include:
- During the Test process, more details are contained in the log file "sso.log".
- During the user login process, detailed logs of any failures are contained in the "azuresso.log" in the subfolder AzureSSOLogs.