Installing ER/Studio Team Server
Go Up to Getting Started with ER/Studio Team Server
Please ensure that you have read the Installation Notes before proceeding.
To install ER/Studio Team Server on a machine that meets the minimum system requirements, you need to run the ER/Studio Team Server installation wizard and follow the steps. In this page you can find detailed information about the different steps of the installation wizard, and suggestions on what to do after the installation.
The ER/Studio Repository server and the database server to be used for the ER/Studio Team Server Reporting repository must be running before installing ER/Studio Team Server. You may also have to create a blank database prior to starting the installation, please check the Prerequisites
![]() Note: Apache Tomcat is embedded in the ER/Studio Team Server installation.
Note: Apache Tomcat is embedded in the ER/Studio Team Server installation.
Download the ER/Studio Team Server installer. You need a user with administrative privileges to run the ER/Studio Team Server installation wizard.
Run it and follow these steps to install ER/Studio Team Server:
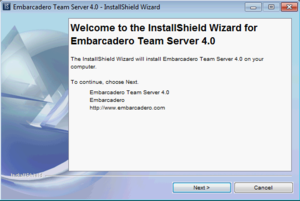
- On the Welcome page, click Next.
 Note: Do not install ER/Studio Team Server on a system where ER/Studio Portal or a previous version of ER/Studio Team Server is installed, if the ER/Studio Team Server installation wizard detects an installation of any of these applications it will ask to automatically uninstall these. If ER/Studio Data Architect or ER/Studio Business Architect are installed you must exit the wizard and uninstall these applications. Then, restart the installation wizard.
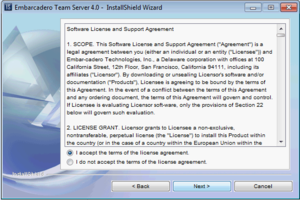
- On the Software License and Support Agreement page:
- Check I accept the terms of the license agreement if you do accept them. Otherwise, click Cancel to abort the installation.
- Click Next to continue.
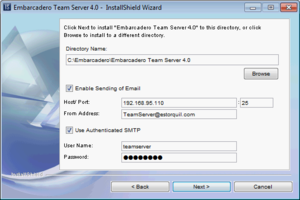
- On the Installation Directory and Email page:
- Right under the Directory Name field, click Browse to choose the directory where you want to install ER/Studio Team Server. The selected directory must be empty.
- Optionally, you can check "Enable Sending of Email" to be able to allow users to send search results and reports by email directly from ER/Studio Team Server. When you check this option, additional fields appear:
 Note: You can enable or disable this feature later, after the installation, using the ER/Studio Team Server Configuration Manager.
- In the Host field, enter the host name of the email server (for example: ETMAIL01), the fully qualified network name (for example: ETMAIL01.embarcadero.com), or the IP address (for example: 10.10.23.250).
- In the Port field, enter the port number where the email server is listening. The default port is 25.
- In the From Address field, enter the email address that you want to use as the sender of the emails sent from ER/Studio Team Server. You may want to prepare a special email address on your email server for this purpose.
- Optionally, check "Use Authenticated SMTP" if your email server requires authentication. When you check this option, additional fields appear. Fill User Name and Password with the required values to authenticate ER/Studio Team Server against your STMP server.
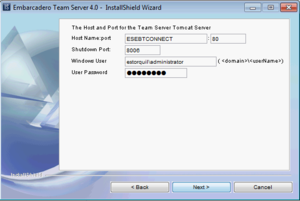
- On the ER/Studio Team Server Tomcat Server page:
- In the Host Name field, enter the host name to run the ER/Studio Team Server server (for example: DEWKBROW01), the fully qualified network name (for example: DEWKBROW01.embarcadero.com), or the IP address (for example: 10.10.23.250).
- In the Port field, enter the port number where the ER/Studio Team Server server must listen for connections. The default port is 80. If another application on your system is already using the default port (for example, another web-based application), enter an unused port number (a commonly-used alternative is 8).
- Tip: Network ports may be a number between 0 and 65535. The ports in use depend on the platform and the services installed on your system. For example, you cannot use 0 or 139 on Windows as they are used for the NetBios Session Service. Higher numbers are less likely to be already in use.
- In the Shutdown Port field, enter the port number where the ER/Studio Team Server server must listen for the shutdown command. The default port is 8006. If another application on your system is already using the default port, enter an unused port number.
 Note: You can change the shutdown port later, after the installation, using the ER/Studio Team Server Configuration Manager.
- If you are using a Windows version newer than Windows XP, such as Windows Vista, Windows 7, and Windows 2008, you must also specify the following to enable ER/Studio Team Server to synchronize with the ER/Studio Repository:
- In the Windows User field, enter the name of a Windows user that ER/Studio Team Server can use to log in to the system. The user account must have local administrative privileges. The name should be in the format "machine_name\username".
- In the User Password field, enter the password of the Windows user.
- Click Next to continue.
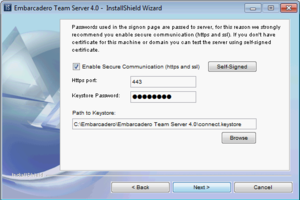
- On the Secure Communications page you can optionally choose to enable SSL and HTTPS. It is recommended that you enable secure communications as this will keep your password transmissions secure.
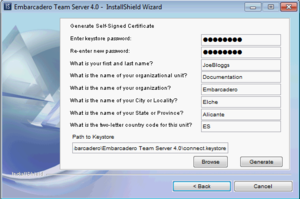
- If you do not have SSL set up on your server, you can click the Self-Signed button to take you through the short wizard which will create a Keystore file allowing you to use encryption.
- Fill out the fields of the Self-Signed wizard and click Next. The Keystore file will be created in the location of your choosing.
- Click Next.
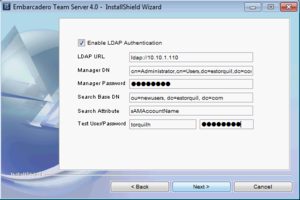
- On the Enable LDAP Authentication page, optionally, check "Enable LDAP Authentication" to use the Lightweight Directory Access Protocol (LDAP) to enable users to log in to ER/Studio Team Server using their domain username and password. You can also enable LDAP authentication after the installation):
- In the LDAP URL field, enter the URL of the server running LDAP. For example, ldap://10.40.40.94:389 for normal connections, or if you wish to use ldaps://10.40.40.94:636 for secure connections then you can enable this after installation with the ER/Studio Team Server Configuration Manager.
- In the Manager DN field, enter the distinguished name for the user that is used to authenticate users. ER/Studio Team Server uses this to connect to the LDAP server and validate user credentials. For example, CN=administrator,CN=Users,DC=mydomain,DC=com.
 Note: In this example, administrator has been used. In which case, Users is defined as a container rather than an organizational unit as is the Microsoft Active Directory default. Your user accounts may be in an organizational unit, in this case you would specify it differently, for example, CN=user1,OU=sales,DC=mydomain,DC=com.
- In the Manager Password field, enter the password for the administrative user.
- In the Search Base DN field, enter the name of the root node in LDAP from which to search for users. For example, CN=Users,DC=mydomain,DC=com.
- In the Search Attribute field, enter the attribute in LDAP holding the user's login name. For example, sAMAccountName (for ActiveDirectory).
- On the Test User/Password field, enter the username and password of a sample user to attempt to authenticate against the LDAP server. The installer uses this information to validate the given LDAP information before moving to the next page.
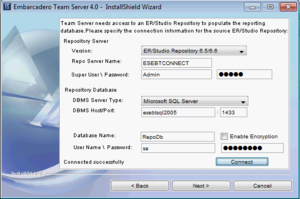
- On the Repository Information page you can specify the target instance of ER/Studio Repository that is the information source for ER/Studio Team Server:
- Complete the information about the ER/Studio Repository server:
- On the Version field, select the corresponding version of the ER/Studio Repository.
- On the Repo Server Name field, enter the name of the machine where the ER/Studio Repository is installed.
- On the Super User Login field, enter the username for a user with the Super User role in the ER/Studio Repository.
- On the Password field, enter the password for the specified user.
- Complete the information about the ER/Studio Repository database:
- On the DBMS Server Type field, select a supported database platform from the list.
- On the DBMS Host/Port field, enter the hostname of the machine that contains the ER/Studio Repository database.
- On the DataBase Name field, enter the name of the ER/Studio Repository database.
- Optionally, for Microsoft SQL Server only, you can check "Enable Encryption" to enable the Secure Sockets Layer (SSL) communication protocol, which encrypts messages between ER/Studio Team Server users and the ER/Studio Repository. When SSL is enabled, ER/Studio Team Server uses ports 80 and 443 for secure communications.
- On the User Name field, enter the username to access the ER/Studio Repository database.
- On the Password field, enter the password for the user specified earlier.
- After you have entered the required information, click Connect to test the JDBC connection. The Next button, to continue the installation, is disabled until the installer successfully establishes a connection to the ER/Studio Repository and validates the specified username and password.
- Click Next to continue.
- Complete the information about the ER/Studio Repository server:
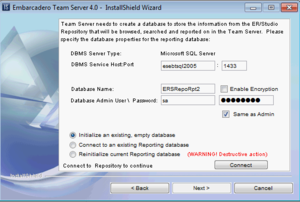
- On the Reporting Repository page you can specify the details for the Reporting Repository:
- Additional Notes:
- You should have an empty database for the Reporting Repository on your database server. If you do not have one, create one now. In the screenshot example here we have created a new blank database on our DBMS using the SQL Management Studio, called ERSRepoRpt
- If ER/Studio Repository and the Reporting Repository are installed on the same database server, you must use different schema owners for each database. There might be naming conflicts between ER/Studio Repository and the Reporting Repository otherwise.
- On the DBMS Server Type field, select a supported database platform from the list.
- On the DBMS Service Host: Port field, enter the hostname and port number of the DBMS Service.
- Depending on the database platform that you selected previously, complete the following fields:
- If you selected Oracle:
- On the SID field, enter your database identifier.
- On the Tablespace field, enter your database tablespace.
- If you selected IBM DB2 Universal Database:
- On the DBName field, enter your database name.
- On the Tablespace field, enter your database tablespace.
- If you selected Microsoft SQL Server:
- On the Database Name field, enter your database name.
- Optionally, you can check "Enable Encryption" to enable the Secure Sockets Layer (SSL) communication protocol, which encrypts messages between ER/Studio Team Server users and the Reporting Repository.
- If you selected Oracle:
- On the Database Admin User field, enter the username of an Admin User that has the privilege to create reporting database tables, etc.
- On the Database Admin Password field, enter the password for the user specified earlier.
- For Microsoft SQL Server only:
- Optionally, check "Same as Admin" so that the User Name and Password fields below disappear, and the installer uses the admin username and password specified previously instead.
- On the User Name field, enter the username of a user with read and write access to the Reporting Repository database.
- On the Password field, enter the password for the user specified earlier.
- Select one of the following options for connecting to the Reporting Repository:
- Select "Initialize an existing, empty database" if the Reporting Repository database exists and it is empty with no tables. The installation wizard creates the Reporting Repository database schema, so the "Admin" user must have that privilege.
- If you are upgrading ER/Studio Team Server, select "Connect to an existing Repository database".
- Select "Reinitialize current Repository database" if the Reporting Repository database exists. The installation wizard drops all the Reporting Repository database tables and creates a new database schema, so the “Admin” must have that privilege.
- Warning: This is a destructive action.
- Click Connect to establish a connection to the Reporting Repository database. After a connection is established, the Next button is enabled.
- Click Next to continue.
- Additional Notes:
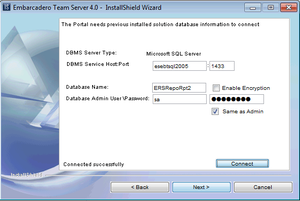
- On the Solution Database page you can specify the details for the Solution Database.
- Click Connect to establish a connection to the previously installed Solution Database. After the connection is established, the Next button is enabled. This page will only appear on a reinitialization or connection to an existing installation.
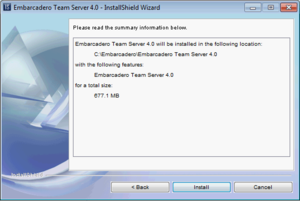
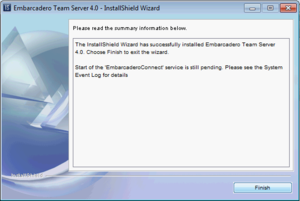
- On the Summary Information page review all the summary information. Click Back if you want to make any changes; otherwise, click Install to start the installation process. A panel appears showing the progress of the installation. When the installation wizard finishes, the final page appears.
 Note: You may see a message indicating that start up of the Apache Tomcat service is in progress. However this occurs only if the service is still in the process of starting when the installation is complete.
- Click Finish to exit the installation wizard.
ER/Studio Team Server is now installed on your system.
- Additional Notes:
- You can use the ER/Studio Team Server Configuration Manager to prevent Apache Tomcat from interacting with the desktop, so that next time that you start up ER/Studio Team Server, the Apache Tomcat service window does not appear. For more information, see ER/Studio Team Server Configuration Manager.
- If any errors occur during the installation, an error page opens, which directs you to the log file located in the directory where you were installing ER/Studio Team Server. For example: C:\Program Files\Embarcadero\Team Server X.X\log.txt .
Starting ER/Studio Team Server
Once the installation is complete, a web login page will appear. Or open a supported Web browser and browse to http://<host>:<port>, where <your host> and <your port> are the values you specified in the Installation Wizard - Host and Port for ER/Studio T.S. Tomcat Server fields above. Enter a valid login and password for the ER/Studio Repository as specified in the ER/Studio Team Server installer. If you have chosen to enable LDAP (Lightweight Directory Access Protocol) during the installation, you will need to provide your domain name as part of your user name in the format of domain name\username. The login must be a user with the Super User role in the ER/Studio Repository to access the Admin functionality in ER/Studio Team Server. The default base user will be Admin > Admin.
