FMXTBitmapCanvas (Delphi)
Contents
Description
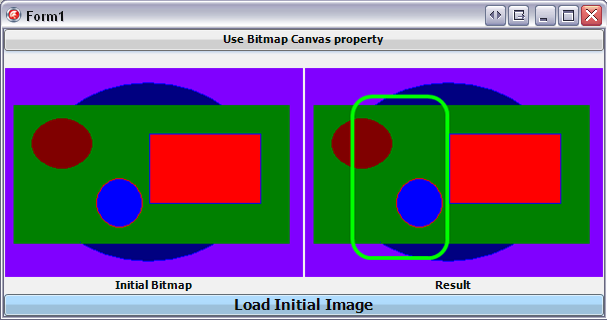
This example shows how to use the TBitmap.Canvas property. This sample draws a rectangle on an image.
To build and test this example, create a Multi-Device Application - Delphi, then add the next objects to the form:
- A TImage to display the initial TBitmap.
- A TImage to display the result.
- Two TLabel, one for each TImage.
- A TButton to draw on the initial image.
- A TOpenDialog and a TButton to load the image to be customized.
Add the following code to the OnClick event handlers of the load button.
Code
procedure TForm1.Button2Click(Sender: TObject);
begin
   if OpenDialog1.Execute then
   begin
     Image1.Bitmap.LoadFromFile(OpenDialog1.FileName);
   end;
end;
Add the following code to the OnClick event handlers of the other button.
Code
procedure TForm1.Button1Click(Sender: TObject);
var
  MyBitmap: TBitmap;
  MyRect: TRectF;
begin
  MyBitmap := TBitmap.Create(0, 0);
  try
    if Image1.Bitmap.IsEmpty then
      // Display a message when there is no image loaded
      TDialogServiceAsync.MessageDialog(
        'There is no image to customize:',
        TMsgDlgType.mtWarning, [TMsgDlgBtn.mbOk], TMsgDlgBtn.mbOK,0)
    else
    begin
      // The rectangle to be drawn on the canvas
      MyRect.Create(50, 30, 150, 200); // A record on the stack, does not Free
      // A copy of the initial bitmap
      MyBitmap.Assign(Image1.Bitmap);
      // Draw a rectangle on the copy
      with MyBitmap.Canvas do
      begin
        BeginScene;
        Stroke.Kind := TBrushKind.Solid;
        Stroke.Color := claLime;
        StrokeThickness := 4;
        DrawRect(MyRect, 20, 20, AllCorners, 1.0);
        EndScene
      end;
      // Display the result
      Image2.Bitmap := MyBitmap;
    end;
  finally
    MyBitmap.Free;
  end;
end;
The result should look like in the following image:
Uses
- FMX.Graphics.TBitmap.Canvas ( fr | de | ja )
- FMX.Graphics.TCanvas.DrawRect( fr | de | ja )
- FMX.Objects.TImage.Bitmap( fr | de | ja )
See Also
- FMX.Objects.Objects.TImage ( fr | de | ja )
- FMX.Dialogs.TOpenDialog( fr | de | ja )
- C++ version of this example
