Using Groups to Partition Concurrent Licenses
Go Up to Configuring the AppWave Enterprise License Center
Contents
Partitioning concurrent license pools gives you more control over license assignment. The ELC Admin allows you to create groups, which are logical entities that map individual users to a subset of licenses. A group has a title, user list, one or more products, and corresponding licenses taken from the pool of unassigned concurrent licenses.
You can define multiple groups, and assign users and licenses to each group. Licenses that aren't assigned to a group are available to anyone.
When a user assigned to a group requests a license, ELC provides a license from the group. If there are no licenses available from the group pool, ELC will assign a license from the pool of unassigned concurrent licenses, if available.
Users do not have to be part of a group. A user who is not part of a group can only use licenses from the pool of unassigned concurrent licenses.
To create a Group
- In Web Admin, click Manage Groups.
- Click Add entry.
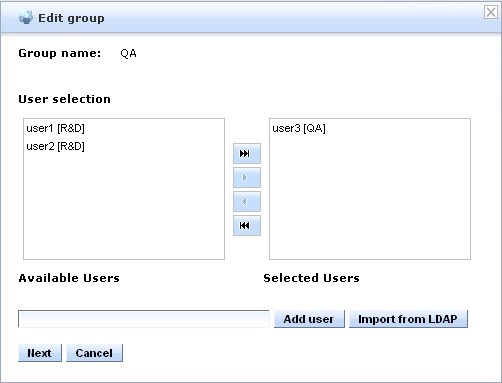
- Optionally select from the list of available users.
- Add users to the list of available users manually or with the LDAP import command.
- Users are selected from a pool of available users. Initially, this pool may contain users that are specified in the
userlist-concurrent.txtfile.
- Users are selected from a pool of available users. Initially, this pool may contain users that are specified in the
- To assign users to the group, select from the Available Users list and click the arrows to move them to the Selected Users list.
- Click Next.
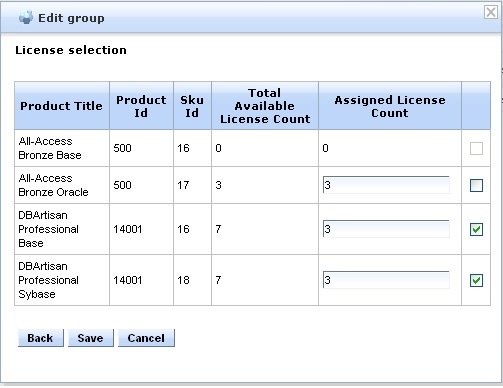
- In the License selection page, select the license check box for each license you want to add to the group.
- The default license count is equal to the count of total available licenses. Use a lower number if some licenses are needed by other groups or by the pool of unassigned licenses.
- In the Assigned License Count box, enter the number of licenses that will be available to the group.
- Click Save.
To edit the available User List
- In Web Admin, click Manage Groups.
- For the group you want to edit, click the Edit action icon.
- The available users list contains all the users that can be assigned to groups.
- Click Add user or Import from LDAP.
To move a User from one Group to another
- In Web Admin, click Manage Groups.
- For the group you want to edit, click the Edit action icon.
- In the Edit group dialog, assign the user to the group.
- Assigning a user to a group removes the user from the previously assigned group. If the user is currently using a license, the license will stay in effect until the user logs out of the associated application.
To add a License to a Group
- In Web Admin, click Manage Groups.
- For the group you want to edit, click the Edit action icon.
- In the Edit group dialog, click Next.
- Select the license check box, if it is not already selected.
- Update the license count.
- If all the licenses are already assigned to other groups, the checkbox is disabled.
- Click Save.
To remove a License from a Group
- In Web Admin, click Manage Groups.
- For the group you want to edit, click the Edit action icon.
- In the Edit group dialog, click Next.
- Deselect the license check box of the license you want to remove, or change the license count.
- If users are actively using group licenses and you lower the number of group licenses below the number being used, the licenses will continue to function until the users quit using the application.
- Click Save.


