Obtaining License Files
Go Up to Installing the AppWave Enterprise License Center
The process of generating license files is called "hosting." You can perform hosting process either directly from ELC Web Admin interface or from the Web Hosting page at https://reg.codegear.com/srs6/el/login.jsp.

Contents
To generate License Files using the ELC Web Admin Interface
- Start ELC.
- Start the ELC Web Admin interface.
- Select License Hosting page from the main menu.
- In the Login Name field, enter the login name sent to you in the Embarcadero License Certificate.
- In the Password field, enter the password sent to you in the Embarcadero License Certificate.
- Enter one or more certificate numbers or leave the field empty to retrieve licenses for all issued certificates.
- Optionally, change the default port number.
- Optionally, enter the host address.
- Optionally, enter the backup host name and address. Note that backup license server has to be already installed on a different physical machine or VM than master server.
To generate License Files using the Web Hosting Page
- In a web browser, navigate to https://reg.codegear.com/srs6/el/login.jsp.
- In the Login Name field, enter the login name and password sent to you in the Embarcadero License Certificate.
- Click the Login button. The License Hosting License Certificates screen opens.
- To choose a certificate to host, scroll through the list of license certificates and select the certificate you want.
- Click Host. The License Creation Master Server screen opens.
- Specify a master server for hosting the license certificate you selected.
- A license can be hosted on one master-backup server configuration only.


To set up a Master Server for a License Certificate
If you do not know the Host Name
The host name is displayed in the Admin, on the License Server Status page.
The host name is included in the resulting server license file (server_XXX.slip, where XXX is the certificate number). This .slip file can only be used with the supplied backup and master host names.
If you cannot obtain the host name from Admin tool, run the ELC host utility to find the host name:
- On Windows, run
elise.bathost from the<ELC>/bindirectory. - On Unix, run
elise.shhost from the<ELC>/bindirectory.
- The JAVA_HOME environment variable must be set in order to run this utility.
- The installation wizard automatically sets this for you.
Warning: System utility 'hostname' should not be used, as it may return a different value than the ELC host utility.
Once you know the Host Name
- Enter it into the Host Name field.
- Enter the port number in the Port field. The default is 5567. Do not change this value unless port 5567 is blocked or already in use by the server.
- Enter an IP address (such as 123.123.12.21) or a fully qualified address (
hostname.hostdomain.com) in the Host Address field. This address is used by clients to send licensing requests to the server. - Click Next to store the Master Server hosting information and open the Backup Server hosting page.
A license can only be hosted on one server at a time. Moving a license from one server to another is called re-hosting. A common reason to re-host is because you entered incorrect information into either of these fields or because the server computer failed. If you have to re-host (either by changing the Host Name or Port Number on this screen), you must contact Embarcadero Customer Support.
You can change the Host Address any time after the license files are issued and re-issue license files.

Defining a backup server is optional. The backup server must be installed on a separate machine prior to this step completion.
Note: Mixing master-only and master-backup license files on ELC is not allowed.
To set up a Backup Server
- Select Click here to enable backup server support to enable the Backup Host Name and Host Address text fields. If the master server has already been hosted in connection with a backup server, the checkbox is selected by default and values for Backup Host Name and Host Address are added.
- Stop here if you do not know the backup server host name and see “If you do not know the host name”.
- Once you know the backup server host name, enter it into the Host Name field.
- Enter an IP address (such as
123.123.12.21) or a fully qualified address (hostname.hostdomain.com) in the Host Address field. This address is used by clients to send licensing requests to the server. - Click Next to store the backup server hosting information and open the Review the following hosting page.
- To make changes to the backup server setup, click Back.
- The Review the following hosting page details the hosting information that you supplied in the previous steps, before you create the license files.
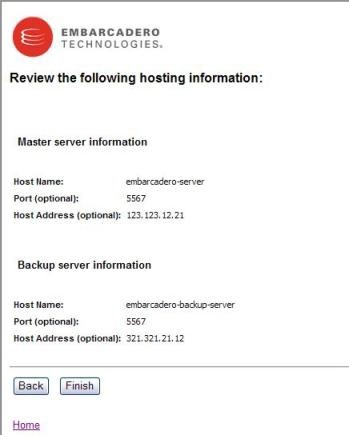
- The Review the following hosting page provides warning information about creating license files that are compatible on existing redundant/non-redundant ELC setups. Warnings do not prevent or stop the hosting process but are meant to encourage compatibility.
- All license files loaded on any ELC must be all redundant or all non-redundant. All redundant license files must point to the same backup ELC. During the hosting process, warnings may be displayed for the following cases:
- Warning: Creating new redundant licenses for a master server that has previously been hosted as non-redundant server.
- Warning: Creating new non-redundant licenses for a master server that has previously been hosted as a redundant server.
- Warning: Creating new redundant licenses in which the backup server is different from the backup server found in a previously hosted configuration.
- Warning: Creating new redundant licenses where the master server is different from the master server found in a previously hosted configuration.
- Click Finish to create the license files and move to the Download. Click Back to make any changes to your ELC configuration. The License creation page opens.
- Use the License creation page to review the information and download license files.
- A
readme.txtfile is included with the download. The file contains license summary and ELC user list setup instructions. If multiple license certificates are hosted, you will see a listing of multiple license certificates.
- A
- Download the
.zipfile and extract its contents into<ELC install>\confdirectory. The archive contains 2 configuration files (*.slip) files and areadme.txtfile with instructions about copying the configuration files (*.slipfiles) to the required directories:- The
server_nnnnn.slipfile is the server configuration file. - The
named_nnnnn.sliporconcurrent_nnnnn.slipfile is the client configuration file.
- The
readme.txtfile also contains the product identifier that is used when configuring the user list file.
- The
- Follow the instructions in the "Client for AppWave Enterprise License Center" section of the
readme.txtfile to copy client configuration files to the required directory. - Follow the instructions in the "Configuring the AppWave Enterprise License Center" section of this document to configure the IP and user list text files. These files authorize users to access licenses. The identifier you must enter into the user list file is contained in the
readme.txtfile.

