Tutorials: Defining External Source and Target Systems
Go Up to Introduction
Data sources can originate from models in the active diagram (local models) or from external sources that are either imported into the active diagram or created on the Data Lineage tab. A data source can be imported from *.dm1 files, *.dt1 files, database or from SQL files, flat files, and other common application files. The following describes how to import metadata from an external source.
![]() Note: Source data imported through the Data Lineage tab only includes information such as table and column name, datatype, nillability, primary key, and column definitions. To obtain more details, reverse engineer the database or import it into ER/Studio Data Architect using the Metadata Wizard.
Note: Source data imported through the Data Lineage tab only includes information such as table and column name, datatype, nillability, primary key, and column definitions. To obtain more details, reverse engineer the database or import it into ER/Studio Data Architect using the Metadata Wizard.
Import external source or target data
- From the Data Lineage tab, expand the Data Sources node.
- Right-click Other Sources and choose Import New Source.
- Complete the Import Source wizard as required and then click Finish to import the source.
- The new source will appear under the Other Sources node.
The following describes options that require additional explanation:
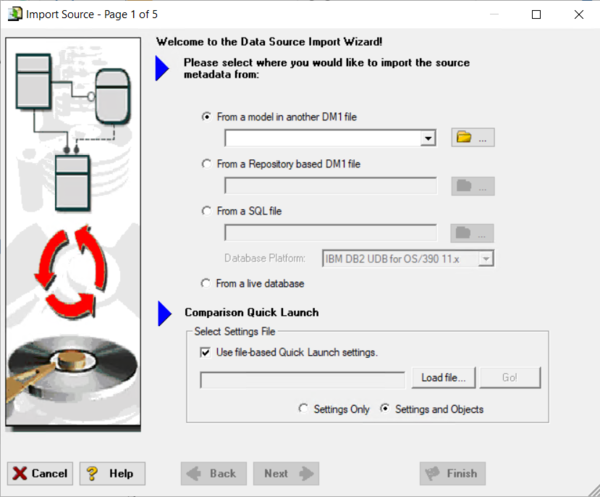
Page 1 - Please select where you would like to import the source metadata from
- From a Repository based DM1 file: Lets you obtain source from data models and Named Releases managed within the ER/Studio Repository. When you select this option, ER/Studio Data Architect opens the Repository Operation Status dialog box and the Get From Repository dialog box. This process connects to the current Repository Server defined in the Repository settings. The Import Source wizard automatically gets the diagram.
- From an SQL file ER/Studio Data Architect imports the SQL file.
- From a live database: If you select this option, a page appears where you can select the database and connection type. The connection type can be either ODBC or Native/Direct Connection. For information about connecting to databases, including troubleshooting information, see Connecting to Database Sources and Targets.
- Comparison Quick Launch: The Compare Quick Launch data is saved as an *.rvo file. For information on using the Quick Launch option in the wizard, see Saving and Using Quick Launch Settings.
Page 5 - Results
- Current and Target Model Display Grid: Between the Source and Target models is a Resolution column. The default merge decision is Merge the data into the new source file. You can click on any item in the Resolution column to enable the decision list. If you want to change the decision, click the list and then click the new resolution. When you change the default resolution of an object, the decisions of their dependent properties and objects are automatically updated. You can also click the category folders, like the Tables Resolution column to change all the decisions for all the underlying objects in that object category. And, you can use the CTRL key to select multiple items, and then right click to enable the decision list.
- SQL Difference: To enable the SQL Difference utility, select any difference that is a long text field, such as a Definition, Note, or DDL, and then click SQL Difference to view the differences between the SQL of the models. This utility only allows you to view the differences; difference resolutions are performed on the Results page of the Compare and Merge Utility.
- Filter Report on Results: Create a report of the source content and your chosen resolutions. You can choose to create an HTML or an RTF report.
 Tip: You can modify the default display using the options at the bottom of the page.

