Setting Repository and ER/Studio TS Options
Go Up to Specifying Repository and ER/Studio TS Options
The Repository Options window allows you to manage your Repository settings, properties regarding your check-out policy, and desired functionality with regard to Team Server.
To manage your Repository Options
- Log in to the Repository.
- Choose Repository > Options.
- Specify your changes on the Repository Options tabs, and then click OK to exit the editor.
The following subtopics help you complete the Repository Options:
General tab
The General tab allows you to specify all of the settings for the Repository server.
The following options and fields are available on the General tab:
- Server Machine. Displays the host name of the ER/Studio Repository. Click Select to list all previously-used Repositories, or click Refresh to update the Repository list with the host names of all Repositories found on the network.
- Refresh. Click this button to refresh the list of Repository servers available to you on your network.
- Active File Directory. This path is the directory to where files checked out or retrieved from the Repository are saved. Active File Directory should be a directory on the local machine as opposed to a shared directory on the network. Note that a shared network directory can result in Repository operation errors.
- Keep the Active File Directory on a local machine. A shared network directory can result in Repository operation errors.
- Hide Repository Status Icons. This option toggles whether you want to prevent Repository Status icons, such as the lock, from appearing in the Data Model and Data Lineage explorers, and Data Model and Data Lineage windows. This option is useful when you want to print the Diagram without the icons displayed.
- Show Repository Status Dialog. This option toggles whether you want to display the Repository Status dialog box, which shows timing information for each step taken during a Repository operation.
- View SQL Alerts. This option toggles whether you want to view SQL Alerts. If selected, the Repository Merge operation displays an alert during check-in to warn the user when multiple users have modified data used by a view. When the SQL alert is displayed, ERDA displays an option to not show such messages. If you want to re-enable these messages, select View SQL Alerts.
- Enable Repo Events Polling. Repository Events Polling returns information about Repository operations so that the Diagram or Objects status is updated with the most current information available. If you enable Repo Events Polling, you can then determine the time interval at which the polling occurs. This option is enabled by default.
- Repo Events Polling Interval. The number of seconds between polls to synchronize the status of local diagrams and objects with the Repository.
- Hide General Information. For performance reasons, you may want to select this option which prevents the Repository status information from displaying in the General Information area of the Get From Repository dialog.
- Display Synchronize Comments Warning. When selected, this option prompts the user to save any changes to the file before synchronizing the comments with the Repository. When not selected, the system automatically saves the file before synchronization.
- Diagram Name Display Format. This option determines how the diagram name displays in Repository dialogs such as Get from Repository. If you choose Diagram Name (Filename.dm1), the diagram name displayed might be Demo1 (Model.dm1) where Demo1 is the name field of the Diagram Properties dialog, which is accessed by clicking File > Diagram Properties.
Check Out Policy tab
The Check Out Policy tab allows you to change the properties for the check-out policy. For example, you can specify that you want a prompt when the user tries to edit a Repository item that is not checked out.
The following options and fields are available on the Check Out Policy tab:
- ER Objects. This area determines how to store the core data, such as names and definitions of the model objects.
- Layout Objects. This area determines how to store the entity object's display or graphic information, such as the size, color, and placement of Objects.
- Immediate. An immediate Check Out policy requires an established server connection and a user login. When you attempt to edit an object that is not checked out, you are prompted to check out the object or to open the object in an editor in a view or read-only model.
- Delayed. If Delayed and Confirmation Required are selected, when you attempt to edit an object that is not checked out, you are prompted to check out the object. If you select Yes in the Confirmation dialog or if Confirmation Required is not selected, ER/Studio Data Architect marks the object with an open red lock (indicating that check out is local) instead of an open green lock, which indicates that the object is checked out from the Repository and is marked as checked out for all Repository users to see. The Repository is not informed of the objects checked out status and the actual check out does not occur until you run the command Repository > Diagrams > Run Delayed Check Out , at which time, you may need to resolve any conflicts with changes checked in by other users.
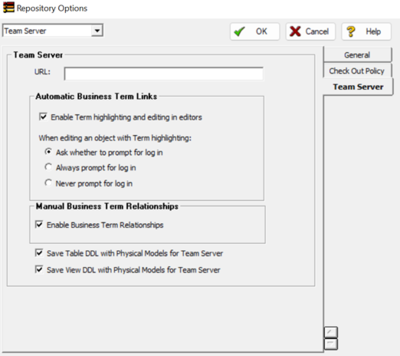
Team Server tab
The following options and fields are available on the Team Server tab:
- URL: This field lets you specify connection details to the ER/Studio Team Server server which allows you to specify the name of the server on which ER/Studio TS is running, such as datojt090, or the URL for the ER/Studio TS login, such as http://datojt090:8080.
 Note: If you want to use Glossary Integration, you must have your Team Server details entered here.
- Automatic Business Term Links. These options manage how Terms are highlighted and managed for ease of use.
- Manual Business Term Relationships. Allows you to select whether you want to show Business Term Relationships.
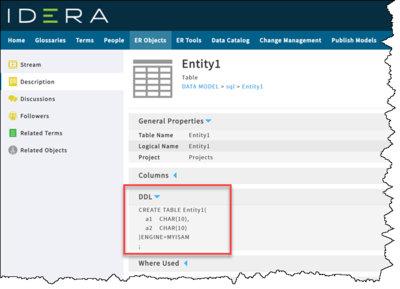
- Save Table DDL with Physical Models for Team Server and Save View DDL with Physical Models for Team Server. Select one or both of these options if you want the DDL information to appear when viewing the specific Entity types in Team Server.
Notes
- When you add or check in files to the Repository, you should do so to the Active File Directory.
- Consider your installation configuration when configuring your Repository Server Settings.
- The Repository database does not need to reside on the same machine as the Repository server, and when you are configuring your Repository server, the Repository database is not affected.

