Requirements for Multi-Device Applications
Go Up to Developing Multi-Device Applications
Contents
What Multi-Device Means
You can use RAD Studio to build multi-device applications that will run on the remote target machine that you have activated for the application, such as macOS, or a PC running Win64 OS.
- Operating-System Calls Must Be Native to the Target System: The first requirement is that a multi-device application cannot make any API calls that are specific to an operating system that is not present on the target platform. For example, you cannot make Windows API calls in an application targeted for macOS.
- You Can Use the RTL on Any Supported Platform: The RAD Studio run-time library (RTL) has been modified so that in most cases you can use the same RTL calls in all of your multi-device applications.
- Choose a Component Library that Supports Your Target Platform:
- FireMonkey is available on all supported target platforms.
- VCL is supported only on Windows (both 32-bit and 64-bit).
- Delphi applications automatically include the appropriate FireMonkey or VCL units in the
usesclause.- For more information, see Delphi Considerations for Multi-Device Applications.
- C++ applications automatically
#includethe necessary C++ headers.- For more information, see C++ Considerations for Multi-Device Applications.
- For the iOS target platform and macOS applications, you must add a new SDK that includes files required to build your applications for the target platform.
- Note: For the macOS ARM 64-bit, macOS 64-bit, and iOS Device - 64 bit target platforms, you must run the Platform Assistant server on the Mac and create a connection profile to connect to the Platform Assistant server.
- For the Android target platform, you must add a new SDK to the SDK Manager.
- Developing a Win64 Application: For a Win64 development system, using the Platform Assistant and a connection profile is optional when developing a Win64 application.
You Need to Connect to the Platform Assistant Server When You Create a Connection Profile
To start developing a multi-device application*, you need to create a connection profile that provides the settings to connect to an instance of the Platform Assistant server running on either the target platform for a project or an intermediate platform that supports the target platform. To create a connection profile, the IDE needs to access the target machine, typically over a local area network.
* This requirement pertains only to platforms other than Android (that is, macOS, iOS, Linux, or remote 64-bit Windows).
- Note: You also need to be connected to the Platform Assistant server in order to:
- Run and debug applications remotely on platforms other than Android.
- Deploy applications for platforms other than Android.
For more information, see:
Specify the Target Platform in the Project Manager
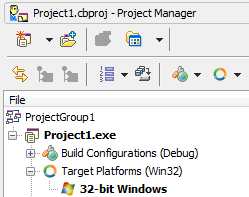
For every project in a multi-device application, the Projects Window contains a Target Platforms node:
Double-click your chosen target platform in the Target Platforms node to specify the target of your multi-device application. The Target Platforms node is not present for legacy projects or for new native Win32 projects that are not built explicitly for a cross-platform or multi-device target.
You can add target platforms to an application by right-clicking the Target Platforms node and selecting Add Platform from the context menu.
You can also assign a connection profile and an SDK to an application by right-clicking the Target Platforms node and selecting the context menu command Platform Properties. A connection profile is required for remote 64-bit Windows, macOS, iOS and Linux applications. Adding an SDK is required for multi-device applications for macOS, and for multi-device applications for the iOS device and simulator, and Android.
Target Platform Requirements
Xcode and Xcode Command Line Tools Required for macOS and iOS Development
In order to build macOS projects and iOS projects, RAD Studio must pull some development files from the Mac into a local SDK. These files are typically provided by Xcode.
See Installing Xcode on a Mac and Installing the Xcode Command Line Tools on a Mac.
