Creating Live Templates
Go Up to How To Edit Code in the Code Editor
While using the Code Editor, you can add your favorite code constructs to the Template Manager to create a library of the templates you use most often.
Contents
To add a Live Template
Start a Code Template in the Code Editor
In the Code Editor, do either of the following:
- Choose File > New > Other > Other Files and select the Code Template icon.
- Choose View > Templates, and then click the New button in the Templates Window, located in the Tool Palette position, in the lower right corner of the IDE.
You can also select code in the editor before you click the New button; the selected code is placed inside the [] in the <![CDATA[]]> field.
Here is the XML that the IDE displays when you start a Live Template:
 <?xml version="1.0" encoding="utf-8" ?>
 <codetemplate	xmlns="http://schemas.borland.com/Delphi/2005/codetemplates"
 				version="1.0.0">
 	<template '''name="|"''' invoke="manual">
 		<description>

 		</description>
 		<author>

 		</author>
 		<code language=""><![CDATA[]]>
 		</code>
 	</template>
 </codetemplate>
When you first open the Live Template outline, the name=" " field is highlighted, and the cursor is located between the two double-quotes (name="|").
Provide Attribute Values in the XML
Now fill in the fields in the template; you can add specific fields that are needed for your template.
- Start by assigning your template a name. The template name and code language fields in the template are required.
- In the invoke field, specify how this template will be invoked:
- manual - invoked by pressing TAB
- auto - invoked by pressing SPACE or TAB
- none - invoked by using CTRL+J, CTRL+SPACE, or using the Templates Window
- Fill in the description, author, and code language attributes (language="Delphi" or language="C").
Define Any Jump Points
Jump points are optional navigable placeholders for entry fields. If you want your template to contain these placeholders, then you need to define a point for each entry field in the template. When anyone uses the template, they can jump from point to point using the Tab key or Space bar.
To define jump points in your template:
- Position the cursor (jump points are typically the first elements defined in a Live Template, and so should be located before the <description> field).
- Double-click the point template, which is available in the Templates Window when you are creating a Live Template.
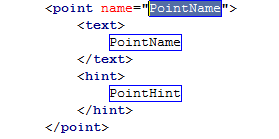
- The point template is displayed at the cursor location in the Code Editor:
Each point has three attribute values:
- PointName defines the name of the jump point.
- PointText defines the descriptive text displayed in the Templates Window. (In the Code Editor, the jump point erroneously displays PointName, but the actual XML for point is correct.)
- PointHint defines the popup hint for the point.
that are defined as jump points in this template. For each point, these attribute values define the name, text (the description displayed in the Templates Window) and a hint (that pops up when you mouse-over a template in the Templates Window.
Enter the Code and Save the Template
- Type in the code for your template, inside the nested brackets ([ ]) in the
<![CDATA[]]>tag.- For example, here is the XML for the point template itself. point.xml contains three points (PointName, PointText, PointHint), and you can see the code representation of the point template inside
<![CDATA[]]>:
- For example, here is the XML for the point template itself. point.xml contains three points (PointName, PointText, PointHint), and you can see the code representation of the point template inside
<?xml version="1.0" encoding="utf-8" ?>
<codetemplate	xmlns="http://schemas.borland.com/Delphi/2005/codetemplates"
				version="1.0.0">
    <template name="point" invoke="manual">
		 <description>
			Create a point in code templates
		 </description>
        <author>
			Embarcadero
		</author>
		 <point name="PointName">
			 <text>
				 PointName
			 </text>
			 <hint>
                 Name of the point
			 </hint>
		 </point>
		 <point name="PointText">
			 <text>
				 PointText
			 </text>
			 <hint>
			   Text for the point
			 </hint>
		 </point>
		 <point name="PointHint">
			 <text>
				 PointHint
			 </text>
			 <hint>
               Text for the point's hint
			 </hint>
		 </point>
		 <code language="XML" delimiter="|"><![CDATA['''<point name="|PointName|">
|*|<text>
|*||*||PointName|
|*|</text>
|*|<hint>
|*||*||PointHint|
|*|</hint>
</point>|end|''']]>
		 </code>
	</template>
</codetemplate>
- 2. Choose the Save command from the File pull-down menu in the Code Editor (or type
CTRL + S). Your new template now appears in the tree of the Templates Window. - Templates are saved, by default, into the
C:\Users\<user>\Documents\Embarcadero\Studio\code_templatesdirectory; they must be saved into this directory for them to appear in the Templates list in the IDE.
For complete information about Live Templates, including links to more detailed procedures and demos, see http://delphi.wikia.com/wiki/Live_Templates_Technical_Info
