Using 9-patch Images in Android
Go Up to Creating an Android App
This topic describes how to use 9-patch images for the splash screen of your Android applications.
Android may stretch the image when displaying the splash screen; use 9-patch images to define how these images should be stretched.
Contents
About 9-patch
A 9-patch image is a stretchable bitmap image with .9.png file extension. You can create a 9-patch image to configure how the image can be stretched when it needs to be resized. 9-patch images are standard .png images that add 1 extra pixel frame to the image in order to configure:
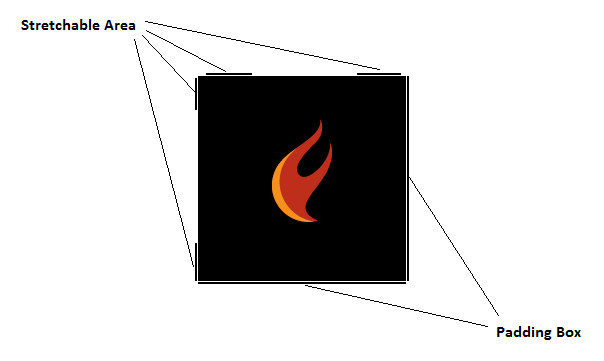
- Stretchable area: defines how the image can be stretched. This is defined in the top and left one-pixel wide guides of the 9-patch image.
- Padding box: defines the drawable area of the image. This is defined in the bottom and right one-pixel wide guides of the 9-patch image.
To indicate the stretchable area or the padding box part of the image, in the corresponding one-pixel wide guide, paint in solid black the pixels that define the stretchable or drawable areas, the rest of the pixels define the non-stretchable or non-drawable area and should be fully transparent or white.
You may check Android 9-patch documentation for further information 9-patch images.
Creating a 9-patch Image
To create a 9-patch image, you can use the draw9patch tool available in C:\Users\Public\Documents\Embarcadero\Studio\23.0\CatalogRepository\AndroidSDK-<Version>\tools\lib. You can use standard .png images and convert them to .9.png. To create a 9-patch image for the splash screen of your Android application follow these steps:
- Open draw9patch tool available in
C:\Users\Public\Documents\Embarcadero\Studio\23.0\CatalogRepository\AndroidSDK-<Version>\tools\lib. - Load a standard
.pngimage, using File > Open 9-patch... or drag and drop the image.- Note: Converting a
.pngto a.9.pngadds an extra pixel perimeter so.pngimages will be saved with 4 extra pixels (2 horizontally and 2 vertically). Keep this in mind when preparing the.pngimages to be converted to 9-patch. Loading.9.pngimages does not add any extra pixels, these remain as they are.
- Note: Converting a
- When the image is loaded on the draw9patch tool, the left pane is the drawable area and displays the image you are editing, the right pane displays a preview of how the image looks once it is stretched.
- To define the Stretchable area click on the one-pixel wide top and left lines and paint the pixels where the image can be stretched.
- To define the Padding box in RAD Studio it is important that you paint the entire one-pixel wide bottom and right lines to indicate that the entire area is drawable.
- Warning: Ensure you fill the entire one-pixel wide bottom and right lines when creating the 9-patch image. Otherwise, the form of your application may not display correctly.
- Once you define the Stretchable area and the Padding box, click on File > Save 9-patch... to save your 9-patch image that is saved with
.9.pngfile extension.
The below image illustrates an example of a 9-patch image to be used as Android splash screen:
For further information about creating a 9-patch image, see Android Draw 9-patch documentation.
Adding 9-patch Images to your Android Splash Screen
You can use 9-patch images in the Splash Screens of your Android applications. To include 9-patch splash images in your Android applications follow these steps:
- In your multi-device application, go to Project > Options > Application to open the Application Options.
- In the Target, select All configurations – Android platform.
- In the Artwork tab, change all the splash images for the 9-patch images with
.9.pngfile extension. - Ensure that the option Include splash image is checked.
- Build your project for Android if it has not been built yet. Select Android as target platform in the Projects Window to build the project for Android platform.
- Go to Project > Deployment to open the Deployment Manager.
- In the Deployment Manager select Debug configuration – Android platform.
- Disable
splash_image_def.xmlfrom the Deployment Manager- Note: The
splash_image_def.xmlindicates Android how to place the Splash image based on Splash the tile mode and Splash gravity options set in the Android Project Options. By disablingsplash_image_def.xml, these options are ignored, and the image is displayed filling the screen.
- Note: The
From this step onwards there are two different ways to add 9-patch splash images to your Android application:
- Method 1: disabling the
splash_image_def.xmlfile. - Method 2: creating a new
splash_image_def.xmlfile.
Method 1
This method consists in disabling the splash_image_def.xml file.
After following all the previous steps:
- Change the Remote Name of all the splash images from splash_image.png to splash_image_def.9.png.
- You can now run the project on your Android device or simulator to see the splash 9-patch image working.
Method 2
This method consists in creating a new splash_image_def.xml file.
After following all the previous steps:
- Change the Remote Name of all the splash images from splash_image.png to splash_image.9.png.
- Create a new XML file with the below content:
<?xml version="1.0" encoding="utf-8"?>
<nine-patch
xmlns:android="http://schemas.android.com/apk/res/android"
android:src="@drawable/splash_image"
android:dither="true"/>
- Note: Ensure the EOL (End of Line) Conversion of the XML document is set to UNIX/OSX Format. The EOL should be only LF (Line Feed, '\n') and not CR LF (Carriage Return, Line Feed, '\r\n').
- Add the XML document to the Deployment Manager (click
 ).
).
- In the newly added XML document, change the Remote Name to
splash_image_def.xmland the Remote Path tores\drawable\. - You can now run the project on your Android device or simulator to see the splash 9-patch image working.
